Configuration: 1c accounting
Configuration version: 3.0.44.177
Publication date: 20.01.2017
The 1C: Accounting program now offers the ability to routinely upload and download data from Excel spreadsheet documents, without the use of third-party processing or configuration changes. Loading and unloading is so easy that experienced users will quickly fall in love with this convenient mechanism, and new users will quickly master it.
Download from Excel 1C: Accounting 8.3 ed. 3.0
For example, we have this spreadsheet document Excel for downloading a list of items and prices (retail and purchasing).

Come to .

At the top click Nomenclature and Prices - Download. This is where loading and unloading from spreadsheet documents is hidden.

Download supports xls formats(old Excel format 97-2003) and xlsx (new format), as well as mxl and ods formats. Now we select our file with the nomenclature and wait for it to load.

The spreadsheet document has been loaded in the form we saw it in Excel, now we’ll assign columns and delete the unnecessary ones.

Click on Please provide details and select the desired item from the list.

Select the row that contains unnecessary entries, namely the table header, and click Delete line.

Now we delete the column with the purchase price, note that processing can fill out only 1 type of price at a time!!! Then you can do this operation again and load the 2nd type of price, for the 1st load Retail for the 2nd purchase.

Fill in the blank data, Price type, Set prices for. The All, Found, New, and Duplicate buttons will greatly facilitate the search and help compare items. Fill in and click Download after which the data will be loaded into 1C: Accounting.

New items appeared in the product list, filled and with assigned prices. If you need to load another type of price, do all the steps again, but select a column with a different price, 1C itself will find already created positions and will not try to duplicate them, but will simply add a new type of price.

As you can see, the download created 2 documents for setting item prices, for the Purchase Price and for the Retail Price. The difference between this treatment is Loading from Excel to 1C: Accounting 8.3, The fact is that this is standard processing and it works without failures and takes into account all the features of filling out the document.
Uploading to Excel from 1C: Accounting 8.3 ed. 3.0
Very useful function in version 3.0.44.177 and higher is uploading to Excel from 1C: Accounting 8.3, this processing will help you create a company price list or transfer your list of items to suppliers or buyers immediately with prices.
It's all there in the directory Nomenclature - Nomenclature and Prices - Unload.

In point Columns, select the columns that need to be built in the Excel document. Selection serves to select items by Groups, properties, names... etc.

To upload to Excel, we will add a new column, namely the VAT rate, it doesn’t seem to be very necessary, but we are practicing.
And data transfer within the framework of the 1C accounting software complex, as well as with other accounting systems. Today we will look at the process of integration between different 1C configurations using the example of data exchange between personnel (1C ZUP) and accounting (1C Accounting) configurations.
Indeed, it is much more convenient to keep track of salaries in an expanded and more adapted configuration. But general accounting, of course, needs to be kept in 1C Accounting. Therefore, when maintaining separate accounting areas, the need for data exchange between systems is obvious.
Setting up synchronization 1C ZUP - 1C Accounting
We will configure and perform the exchange process in 1C: ZUP edition 3.0 and 1C: Accounting edition 3.0

To begin the process of downloading the necessary data, enter 1C Salary and Personnel Management (ZUP) and go to the “Administration” section, subsection “Data synchronization settings”

Enable the synchronization option by checking the box, enter the infobase prefix, and click to proceed to setting up data synchronization.

In the window that opens, after clicking on the “Configure data synchronization” button, select the configuration we need for exchange.

The window “Setting up data exchange with the Enterprise Accounting program, edition 3” will open.

We make a backup copy, if necessary.

Once the backup is complete or if there is no need for it, proceed to manual setting synchronization If we have a saved settings file in the “*.xml” format, then it is in this window that we need to select it.
In any case, to continue, click “Next”.
In the next window we will have to enter the method of connecting to the accounting database and authorization.
For the most common case, select the following items:
- Direct connection to the program on this computer or in local network;
- On this computer or on a computer on a local network;
Then, in the appropriate fields, enter the path to the information base (1C: Accounting), login and password to enter it. The path to the Accounting information base can be viewed in the start window for selecting 1C databases or in the “About the program” section of the accounting configuration.
Connection settings

Click on the “Check connection” button to check if the connection is correct.
If the test is successful, the program will display the message “Connection test completed successfully.” If the verification fails, you need to adjust the entered data.

The program will automatically check the connection to the target database and report the existing exchange settings.

If the exchange settings differ from what we need, then click the hyperlink “Change data upload rules” and perform additional settings.

For example, we will change the exchange settings so that the upload occurs only for one organization. We complete the additional setup with the “Save and Close” button.
We check all the settings and proceed to the next window with the “Next” button. The program will automatically check all settings and display them in a consolidated list for final confirmation.

In case of error
If we have never synchronized between these specific information bases and have not configured 1C: Accounting for exchange, then the exchange will definitely stop with the error “Data synchronization is prohibited by the administrator.”
There is no need to be afraid. It is enough, without closing 1C:ZUP, leaving it in place of the error, to enter the accounting configuration and enable synchronization in the same section as the 1C:ZUP in question (Administration - Data synchronization settings). You also need to set the infobase prefix. In our case it is “BP”


Data Mapping
The next window confirms the correctness system settings exchange and opens up the opportunity to perform data synchronization. Leave the checkbox and click “Finish”.

The data will be analyzed and we will be asked to make a comparison. In our example, we are confident that the data will be loaded correctly, so we agree with the proposed comparison. Select everything and click “Match”.

In your case, verification and manual comparison may be required, please note.
Data synchronization (data exchange)


In case of successful reception and transmission of data, a corresponding system message will be issued. Now you can close the ZUP and check the synchronization in 1C: Accounting.
Checking data transfer
We check the correctness of automatically created documents already in the 1C Accounting configuration.

Subsequent synchronizations
Subsequently, synchronization can be carried out using the already created settings.

Data exchange 1C ZUP edition 2.5 and ZiK 7.7 and 1C Accounting
It is worth noting that in 1C: Accounting there is a separate mechanism for exchanging data with salary configurations of older versions. You can go to them in the “Salaries and Personnel” section, using the “Download from ZUP ed.” menu. 2.5", "Uploading to ZUP ed. 2.5" and "Loading from ZiK 7.7", "Unloading to ZiK 7.7".

Moreover, the exchange documents will be located in the subsection “Salaries ZUP 2.5 ZIK 7.7”.
This is how salary data is synchronized between 1C ZUP 3.0 and 1C Accounting 3.0
Data exchange between the 1C ZUP 8.3 program and Accounting 8.3 is necessary to reflect transactions for settlements with employees in accounting. If you keep personnel records and calculate salaries in the 1C ZUP 8.3 program, then read here how to download data from 1C ZUP 8.3 to 1C Accounting 8.3.
With a small number of employees, personnel records and payroll calculations can be carried out in the accounting program 1C 8.3 Accounting. But if your organization has a need for larger-scale and detailed accounting of salaries and personnel, then for this you will need additional program 1C 8.3 Salary and personnel management. Keeping records in two programs is not very convenient, but 1C solved this problem. Now the exchange of data between 1C 8.3 databases from ZUP 3.1 to Accounting 3.0 occurs automatically. But for this you need to configure the synchronization of 1C 8.3 Accounting and ZUP. How to do this yourself, without involving technical specialists, read in this article. How to set up data exchange between 1C 8.3 databases from ZUP 3.1 to accounting 3.0 in a few steps, see below.
Step 1. Set up synchronization in 1C ZUP 3.1
Go to 1C ZUP 8.3 in the “Administration” section (1) and click on the “Data synchronization” link (2). A window for setting up the exchange will open.
In the window that opens, check the box next to “Data synchronization” (3) and click on the “Data synchronization settings” link (4). The settings window will open.

In the window that opens, click the “Set up data synchronization” button (5) and click on the link “Enterprise accounting, edition 3...” (6). A window will open to continue the setup.

In the new window, select “Specify settings manually” (7) and click the “Next” button (8). A window will open for you to fill in the exchange parameters.

In the window that opens, you need to specify some system exchange parameters. First you need to select a connection option in another program. In our example, this is “Direct connection to a program on this computer...” (9). This method is used if the 1C 8.3 Accounting program is located on the same computer or on the same local network with 1C 8.3 ZUP. Next, you need to specify the connection parameters in another program. In our example, there are two possible options:
- On this computer or on a computer on the local network
- On the 1C:Enterprise server
In our example, we select the second option (10) and fill in the “Server cluster” (11) and “Infobase name” (12) fields. Read where to get the data for these fields in the next step (Step 2).
Next, select “1C:Enterprise Authentication” (13) and enter the user (14) and password (15) that you use to log into 1C 8.3 Accounting. The data has been entered, now check the connection by clicking on the “Check…” button (16). If the check will pass successfully, then after a while the message “Connection check completed successfully” will appear. If something goes wrong, you will see an error message with brief description Problems.

In the next step we will tell you where to get the data on the server cluster and database name, and in the third step we will return to setting up synchronization.
Step 2. Where in 1C 8.3 to get data on the cluster and infobase name
When you log into 1C you see the launch menu. In this menu, click once on the database with which you are setting up synchronization, on 1C 8.3 Accounting (1). Next, click the “Change” button (2). The database editing window will open.

In this window you see data on the server cluster (3) and the infobase name (4).

Now let's get back to setting up synchronization.
Step 3. Continue setting up synchronization in 1C ZUP 3.1
In the first step we stopped at checking the connection. If everything went well, click the “Next” button (1). A window will open for further synchronization settings.

In the new window you see rules (2) for uploading data from 1C ZUP to 1C Accounting. To change these settings, click on the “Change” link (3). The exchange rules setting will open.

In this window, you can specify the start date of the exchange (4), select organizations for exchange (5). You can also choose the method for generating transactions in 1C 8.3 Accounting:
- “with details by employee” (6);
- “summary by employees” (7).
To save the settings, click the “Save and close” button (8). To move on to the next setting, click “Next” (9). A window for further settings will open.

In this window you see the rules (10) for uploading data from 1C Accounting to 1C ZUP. If necessary, you can change them by analogy with the previous setting by clicking on the “Change” link (11). To continue, click the “Next” button (12). A window will open with general information on setting up synchronization.


If there are no errors, a window will open with a message about successful data synchronization (15). The program will prompt you to synchronize by default (16). To do this, click the “Next” button (17). A window will open with data matching information.

In the new window you can see directories for which there is unsynchronized data (18). Since you will be synchronizing information from two different information bases - 1C ZUP and 1C Accounting - from the date specified in the settings, it is necessary that certain directories in both databases have the same values. Such reference books include, for example, “Individuals”, “Organizations”, “Methods of reflecting salaries in accounting”. In this window you see directories (18) for which the data does not match. The program will automatically create the missing directory elements in both databases. To do this, click the “Next” button (19). The following window will open to synchronize data.

In the window that opens, the program informs you about the composition of the data that will be sent. To view a report that shows a list of this data, click on the link “Composition report...” (20). To complete the exchange, click “Next” (21). The exchange procedure will start, it will take some time.

Once the data exchange is complete, a window will open indicating that synchronization is complete (22). In this window you can configure the so-called “exchange schedule”, i.e. temporary rules according to which data exchange between two databases will automatically take place. To configure these rules, click the “Configure” button (23). The data synchronization script opens.

In the script window, click on the “Set up schedule” icon regulatory task"(24). The exchange schedule setting will open.

In this setting, you can set at your discretion the time interval at which programs should exchange data. For example, in the “Repeat after” field (25) you can set the number of seconds after which the exchange will be repeated. To save the setting, click “OK” (26).

You have successfully configured synchronization between databases and started data exchange. You can change exchange settings and control the synchronization process in the “Data Synchronization” window. You can enter it through the “Administration” section (27) by clicking on the “Data synchronization” link (28).

Read,
Backup 1C Enterprise 8.3 database allows you to protect the user from data loss when performing “dangerous” operations that can significantly change credentials (for example, correcting accounting registers, group changes to documents) or spoil the database (operations to update configuration, etc.). It may also be necessary to copy the database in order to transfer it to someone, and in this case the most compact size is required.
Uploading the 1C Enterprise 8.3 database to a backup copy
Backing up a 1C database can be done in several ways, the most universal is through the infobase upload utility in the 1C configurator. This method is suitable for both file and client-server applications of 1C Enterprise. For creating backup copy you need to go to the configurator and select Administration - Upload infobase...
 Menu “Configurator - Upload infobase...”
 A standard file saving panel will appear, where we indicate the directory in which we will save the backup copy. Enter the name of the upload file (the default is “1CV8”) and click the “Save” button. As an example, I'll change the default name to "1CV8-MyUpload". After this, wait until the backup procedure is completed.

After the upload is completed, a message will appear indicating that the upload of the infobase to the file has been completed, indicating the path and name of the upload.
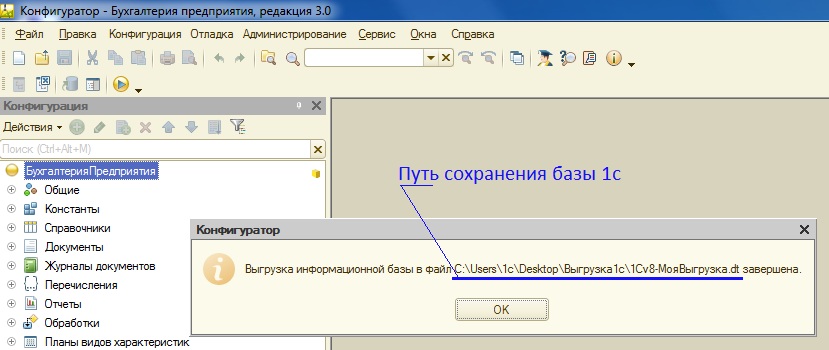
Now you can find the upload file in the directory you specified. Let's go to the specified directory and see the file in it 1CV8-MyUpload.dt. I'll add one useful note
The 1c backup upload file has the extension .dt
Now you can copy this file to media, send it, save it... the only thing is! — most likely, it will not be possible to send the download file by mail due to its volume.
Your upload file is ready, suppose you copied the file to a flash drive, brought it to a friend to show the status of your accounting, and then there is a need to restore the 1c database from your upload file.
Restoring a 1C Enterprise 8.3 database from a backup copy
To restore a database from a backup, the action plan is as follows:
- Create a new database 1C Enterprise 8.3
- Upload the 1C Enterprise 8.3 file into an empty database
Let's get started!
The process of creating a new 1C Enterprise 8.3 information database is described in detail in the article. After creation new base you need to load the upload file 1CV8-MyUpload.dt into it.
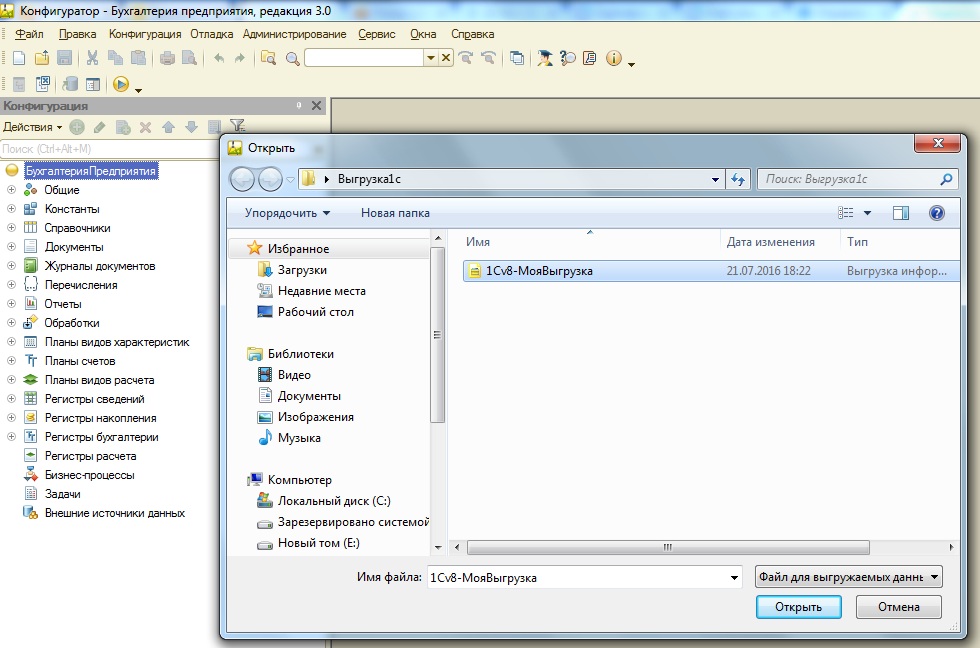
To load the 1C Enterprise 8.3 database from a backup copy, enter the created new configuration in the “Configurator” mode and select the menu item “Administration” - “Load information base...”

In the form that opens, select the 1c infobase upload file (has the extension *.dt)
and agree to the proposal to lose all data if the operation continues. The database loading operation will begin, the time depending on the volume of the loaded database.

As a result, we will receive a message that the information base has been successfully loaded. Next, we can agree to restart the configurator in order to see the loaded configuration objects, or we can choose not to do this, click “No” and close the configurator.

By entering the created database after downloading the 1c upload file in the “Enterprise” mode, you will see an identical copy of the previously uploaded 1c database.
Direct copying of the 1C Enterprise 8.3 database
After publishing this post, one of the clients received a request that he could not download the *.dt file to restore the backup. Having tried all the standard methods and interrupted all the popular queries on the Internet on this topic, we came across Recommendations for backing up 1C databases, which states that in the event of a failure in the 1C Enterprise 8.3 database, some information may not be uploaded to the *.dt file, while direct copying will save all the information. Therefore, in order to fully disclose the information, I decided to add this subsection.
Unlike uploading to a file using the 1C Enterprise 8.3 platform, direct copying involves direct copying of database files.
To copy a 1C Enterprise 8.3 file database, you need to go to the folder with the created database. The path to the database can be seen when you place the pointer to the desired infobase in the list of connected 1C Enterprise 8.3 databases. It will be located under the database selection window and will look like File = "Path to the 1C Enterprise database."

We follow the specified path and see the working files of 1C Enterprise 8.3.

The main data file is called 1Cv8.cd (type - File information base), and you need to copy it. The remaining files are auxiliary; they will be created anew when you launch the 1C Enterprise 8.3 configuration.
Accordingly, to launch the database you do not need to restore anything - copy the 1Cv8.cd file to the folder and .
Backing up a 1C Enterprise 8.3 database to a client-server version is more complex and requires special scripts or applications for working with relational databases on which the 1C Enterprise 8.3 database is deployed. This is a separate topic for discussion, so we'll talk about it next time.
If you have any questions, you can ask them in the comments to the article or on the website.
Don't lose this useful article - save it in in social networks via the buttons below:
Backing up the 1C Enterprise 8.3 database and restoring it
WiFi