Open Control Panel -> Programs -> Turn it on or off Windows components. Find the “IIS Services” section in the list. Open it and select the necessary components:
Installing web server components
Basic set:
Safety. Select all components except “Authentication with certificate matching...”.
Application development components. Basically, you only need a CGI component for subsequent PHP installations.
General Features HTTP. We tick all the boxes.
Functional testing and diagnostics. Select "HTTP Logging" and "Request Monitor".
Performance enhancement functions. We tick all the boxes.
Website management tools. Check only “IIS Management Console”. 
When all items are selected, click “Ok”. When the installation is complete, you must reboot!
Now let's move on to creating a website. Open Control Panel -> System and Security -> Administration -> Computer Management (you can quickly: Start menu -> right click on Computer -> select Management from the menu). In the window that opens, expand the “Services and Applications” group and open “IIS Services Manager”. In the “Connections” window, select the “Sites” folder, then in the right Actions window click on the “Add website” link.
Testing the created site
And finally. In order for the site to be accessible from the outside, it is necessary to open port 80 for incoming connections. Let's do this using the standard Windows 7 firewall as an example:
Open Control Panel -> System and Security -> Windows Firewall -> Additional options. You must enable the Internet Services (incoming HTTP traffic) rule in the list:
Opening port 80 in Windows Firewall
In this basic installation mode, the web server can only render static pages (plain HTML + JavaScript). Expanding its capabilities is installing support for ASP, ASP.NET or PHP. Next we will talk about installing PHP on IIS in FastCGI mode.
Installing PHP (FastCGI)
The optimal web server for PHP is Apache, but there are times when you need to install PHP on IIS. Recently, developers have done a lot of work to improve the performance of PHP on IIS.
Before installation, you need to download the PHP release from the site http://windows.php.net/download/. There are several options there. We need a VC9 x86 Non Thread Safe release. For working in FastCGI mode, this is the most reliable option. It is better to download the release with an installer, rather than a zip archive (this is for manual installation).
Next we launch the installer. After several windows you will be asked to select a web server and PHP operating mode.
Today we will show how to Windows based 8 / Windows Server 2012 deploy your own IIS web server with PHP language support. Subsequently, on this platform it will be possible to run most modern CMSs written in this most popular (but far from the best) language. at the moment web application development language.
In Windows 8, the IIS 8 web server comes as a separate feature and is not installed by default. To install IIS on Windows 8, open Control Panel and under Program and Features(appwiz.cpl) click on the button Turn Windows features on or off.
In the window that opens, check the box next to Internet Information Service and click OK.
Note. By default, IIS is installed in a minimal configuration.
After the installation is complete, let's check that our web server is working. To do this, run Internet Explorer(or any other browser) and type http://localhost (or) in its address bar.
If IIS is functioning correctly, you should see a page like this: 
Installing IIS on Windows Server 2012
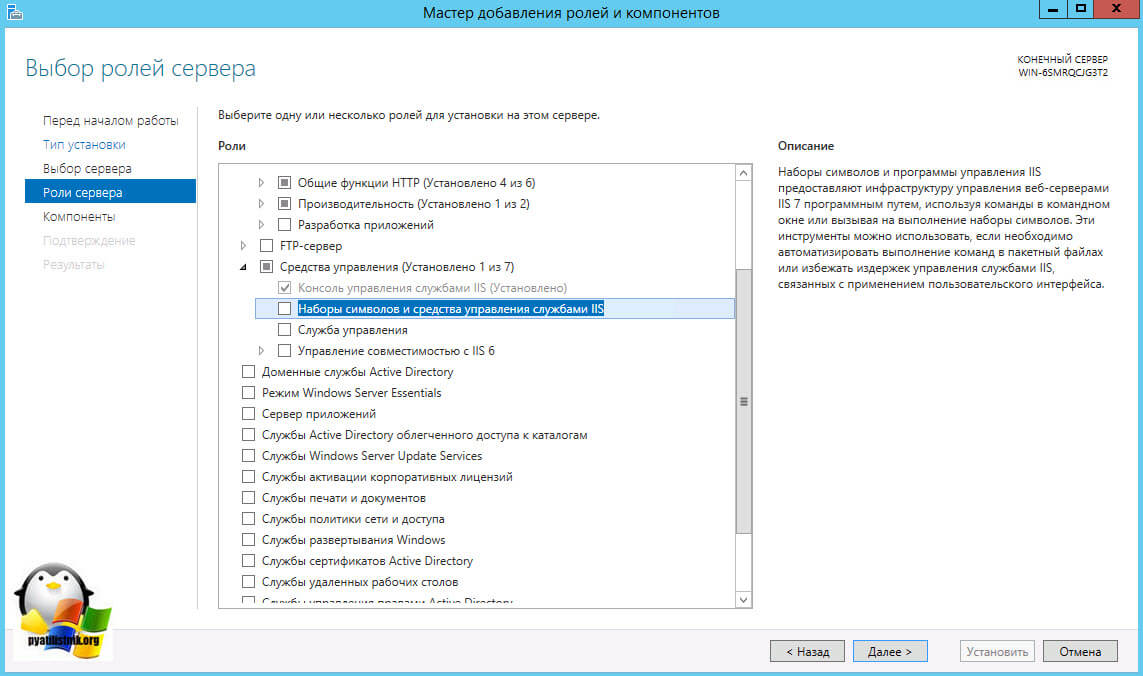
In Windows Server 2012, Internet Information Services web server can be installed from the Server Manager console by selecting the installation role Web Server IIS.

We agree with the components proposed by default, installing additionally only CGI(located in the section Application Deployment IIS roles).

Let's test the operation of IIS by opening the http://localhost page in the browser.

Installing PHP on Windows 8 / Windows Server 2012
To install PHP we need an installer Microsoft Web Platform Installer 5.0(WPI), which can be downloaded from this link: http://www.microsoft.com/web/downloads/platform.aspx(wpilauncher.exe.)
Advice. The advantage of using the PHP installer as part of the Microsoft Web Platform over manual installation PHP is as follows:
- WPI itself determines the required PHP version and installs the currently current version
- WPI itself configures integration with IIS, allows you to install PHP extensions without having to manually configure configuration files
- WPI allows you to easily update PHP in the future without losing configuration files
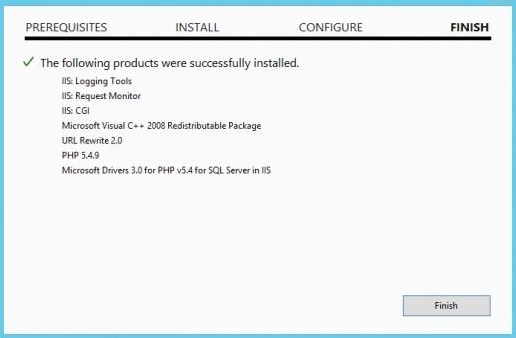
Let's run the downloaded file wpilauncher.exe. and in the Web Platform Installer window that appears, go to the tab Products and in the list of available products find the line PHP 5.5.1 1.

Let's press the button Add and then Install. Before installation begins, WPI will check your system for compliance (if necessary, it will prompt you to install missing components), after which the PHP installation will begin.
Testing PHP on IIS
After PHP is installed, let's check that it works correctly. To do this, let's go to the root directory of the web server (by default C:\inetpub\wwwroot) and create a new text file with PHP extension (for example, test.php).
Let's open it in any text editor and insert the following code into it:
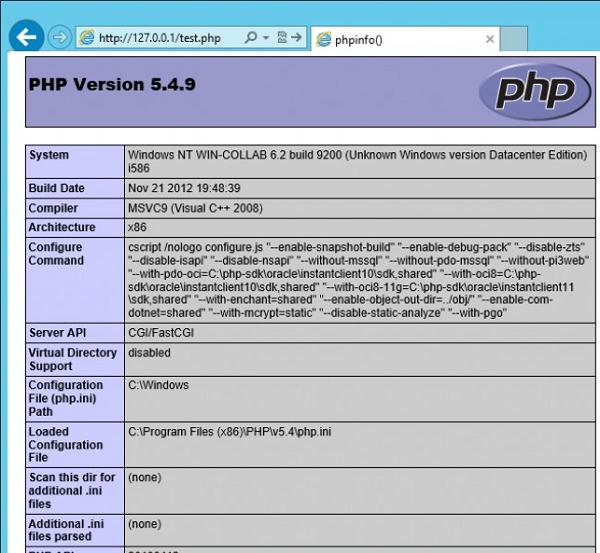
Advice. PHP configuration settings are stored in the php.ini file, which is located in the root of the installation directory.
That's all! So, we looked at the easiest way to deploy a full-fledged IIS web server with PHP support 5.x based on Windows Server 2012 / Windows 8.
Good afternoon, dear readers and guests of the blog, today we will continue to study Windows-based web services, namely, let’s see how setting up SSL on IIS for one or several sites, both with one IP address and with several. To complete this task, you must have an iis web server installed on Windows Server from 2008 R2 and higher, currently the latest is Windows Server 2016.
Setting up an https site on IIS
And so about creating an iis website on windows server 2012, I already told you, it is assumed that you have it. Next, when you have written everything DNS records, you generated a request to issue a certificate and only then received your certificate from the certification authority, but it still had to be customized for iis, since it needs the pfx format.
A little more theory and limitations
If you have one site on https on your iis server, then there will be no problems with the certificate, but if you plan two sites, then there are already options:
- Buy a wildcard certificate to be able to add SSL to any IIS site
- Buy an additional IP for each site
- Use the script and apply the required SSL binding to the desired site on one IP address
- Use SNI (Server Name Indication) technology
Installing SSL in PFX
First of all, to create websites using the https protocol, you need to import the required certificate; this is done very simply. You open IIS Manager and go to "Server Certificates"


Through the review, indicate your pfx archive.

Specify the password, in the “Select certificate store” line, specify either “Personal” is suitable for regular hosting, but the “Web services hosting” item is needed for SNI technology.

In fact, this is a complex installation of SSL in iis, how do you like it.

Now we will bind the SSL certificate to the desired site. First, I'll check my site using the http protocol, as you can see everything works fine.

Now right-click on the desired site and select “Change bindings”, this is where we will configure https in iis.

As you can see, your site will work using the http protocol by default, click the add button.

We indicate for the site:
- The https type and port number, by default, is port 443, make sure it is open in your firewall.
- In the node name, write the full name of the site.
- SSL certificate > select the one you need and save the settings.

We check your site using the HTTPS protocol, if everything is fine, then you will see a closed padlock, this means that the ssl certificate is installed correctly in IIS.

Setting up multiple HTTPS sites on different IPs
Let's assume you have two sites:
- api.pyatilistnik2010.ru
- new.pyatilistnik2010.ru
You need each of them to have its own IP linked to the DNS name and also a separate certificate, everything is simple. You also raise individual sites, with the only difference being that in the IP address field, you indicate the required one and in the field the host name, the address of your resource, and the actual certificate you need.

We save and check, everything should work on any version of the IIS server from 7.5 to 9.

Setting up multiple HTTPS sites on one IP
Now let’s imagine the situation that you have one external IP address, what should we do? Let’s try to hang everything on it. As a result, one of your sites will receive a 404 error. If you don’t know what this is, then here you go.

The whole problem is that in IIS, according to this scenario, only a domain certificate in the wildcard *.site format can work in the web interface. The asterisk means that you can use SSL on any third-level domain. But don't dare give up, there are two options:
- The use of SNI (Server Name Indication) technology in IIS is suitable for everything older than version 7.5, so Windows Server 2008 R2 and lower are in the air.
- Use a script from Microsoft.
Here is an example of such a certificate.

If you have a wildcard, then everything is simple, either you change everything through the IIS manager, or through the configuration file.
C:\Windows\System32\inetsrv\config\applicationHost.config

Open it, IIS settings are stored here. And you can set the binding to different domain names:
Now the method, if you do not have a wildcard and only one external ip on the server, is suitable for IIS 7.5 and higher. The first thing we need to do is find out the ID of your site, this can be done simply, or through the IIS manager console

Or everything is in the same applicationHost.config file

%SYSTEMDRIVE%\Inetpub\AdminScripts

If you, for example, on IIS 8 and older do not have this file in this folder, then you need to deliver IIS Management Scripts and tools
).
Applications and sites developed in ASP.NET must be hosted on a web server (hereinafter referred to as IIS). This is a Windows snap-in that is responsible for hosting web applications, parallelizing http requests, storing user sessions, and much, much more.
Windows 2008 does not have IIS by default, and before you can configure your site, you must install IIS. Therefore, the article is divided into two parts:
How to install IIS 7 on windows 2008
The IIS 7 application server is installed from the operating system distribution. It is advisable to install IIS from the same OS distribution that is installed on this computer. From experience, I can say that there are precedents for incorrect operation in the case of installing IIS from a “non-native” distribution. Insert the Windows 2008 disc into the drive and begin installing IIS:
1. Click “Start” and right-click on “Computer”, go to “Management”:

2. In Server Manager, select Components and click Add Components:

3. In the tree, select “Web Server Tools (IIS)” and click “Next”:

This will begin installing IIS 7 from the Windows 2008 operating system disc. Wait for it to finish and restart your computer. All! IIS installation is complete!
How to configure IIS 7 on windows 2008
So, we have a website, let’s call it Security. It represents the Security directory and the collection of files in that directory. The site has a home page that should load by default. Let's call it index.aspx. The first step is to install and register the .Net Framework. You need to install the same .Net Framework for which your site is written. The version can be viewed in the web.config file of your site. We will assume that our site is written in Net.Framework v.4.0.
A separate article is devoted to installing and configuring Net.Framework. How to install Asp.Net and register it in IIS. Here I will describe briefly: to register the .Net Framework in IIS, you need to command line from the directory C:\WINDOWS\Microsoft.NET\Framework\ version of your Framework\ run the command aspnet_regiis.exe -i;
Place the Security directory in C:\Inetpub\wwwroot\. This is the working directory of the Internet Information Services Manager.
Now let's get started with setting up IIS:
1. Launch IIS Service Manager. Click “Start”, “Run”. In the window that appears, enter inetmgr.exe and click “OK”:


2. First of all, let's create a group of applications for our site. In general, an application group is created in order to separate applications running on different versions of the .Net Framework. In principle, if you have only one site on your machine, then you can skip this step. In Internet Information Services Manager, right-click Application Groups, New menu, Application Group.... In the window that appears, enter the name of the application group and click OK. Because we decided that our site is written in .Net Framework v.4.0, then we will call our group of applications “Net 4.0”:


3. After we copied our site to C:\Inetpub\wwwroot, a Security directory appeared in the IIS manager in Web Sites. Right-click and select "Convert to Application":

4. In the window that appears, select our application pool and click “OK”:

5. On the “Documents” tab, you need to add our main page. Then, when accessing the site, you will not need to go to http:// server_name/Security/ndex.aspx, it will be enough to write http:// server_name/Security and we will be taken to the main page of the site. On the “Documents” tab, delete all pages that are there by default and add your own home page index.aspx:


6. This completes the IIS setup; all that remains is to configure access rights to the Security directory. Open general access on the "Access" tab and give full access group IIS_IUSRS and user IUSR (they are created when IIS is installed). On the “Security” tab, also give full access to the specified group and user:

Now you can try to open our site. Open your browser and enter address bar http:// server_name/Security, your home page will appear. All! If you have any questions, I will be happy to answer in the comments to the article.

Internet Information Services (IIS) This is a set of Internet servers from Microsoft. The main component of IIS is the web server, although it doesn't stop there. The latest version 8 of IIS ships with all editions of Windows Server 2012 R2.
Despite the proprietary nature of IIS, the share of this set of services on the market is gradually increasing. On the Internet you can find many sacred disputes about what is better - IIS, Apache or, say, Nginx. Let's not be like them, we'll just say in what cases IIS is mainly used.
The most convenient option for using IIS is when your entire working environment (and its server part too) runs on Windows. In this case, you can get a number of convenient “goodies” from IIS for working in the domain. After all, IIS is also an FTP server, and mail server. The IIS interface is quite clear, which is generally typical for the Windows environment. And, of course, IIS will be useful to you if you use MS SQL.
To enable IIS in Windows Server 2012 R2, go to Server Manager.

In Server Manager, find the “Add roles and features” option.


Make sure you have CGI enabled.

After that, in the Administration section you will see the IIS Service Manager.
You can also enable IIS in Windows 7 Professional and Ultimate, as well as in Windows 8. To do this, go to Control Panel → Programs → Turn Windows features on or off.
Service Manager is a graphical interface for managing your servers.

Servers and sites are listed on the right. By default, a folder is created on the system partition inetpub, which contains the folders ftproot And wwwroot for FTP servers and websites respectively.
Installing PHP on IIS
To install PHP, follow the link and download the ZIP archive with the version Non Thread Safe. Designation VC11 next to the version indicates that Visual C++ Redistributable for Visual Studio 2012 is required to compile it. For older versions marked as VC9, requires Visual C++ Redistributable for Visual Studio 2008 SP1.
You can select the directory for unpacking the ZIP archive at your discretion. After extracting the archive, create a copy of the file php.ini-production under the name php.ini in the same folder.
The php.ini file contains rules for executing PHP and working with the environment in which it runs. There are a number of mandatory parameters that must be specified. Below is a list of these parameters.
extension_dir = [path to extension directory]— this parameter is responsible for the location PHP extensions. For example, C:\php\ext.
extension = xxxxx.dll— for each plug-in extension, you must register such a directive. Such extensions will be loaded when PHP starts.
log_errors = On— enable error log.
error_log = [path to error log file]- Actually, everything is clear here.
cgi.force_redirect = 0— disabling the directory protection mechanism; under IIS, this parameter should take exactly this value in order to avoid PHP kernel errors in Windows.
cgi.fix_pathinfo = 1- enable PATH_INFO support according to the CGI specification. IIS FastCGI uses this setting.
fastcgi.impersonate = 1— enable the identification of security tokens of the calling client.
fastcgi.logging = 0— FastCGI logs in IIS must be disabled.
Next, in the system properties you need to adjust environment variables. In Windows Server 2012 R2, you need to go to Control Panel, select System, then Advanced system settings. On the Advanced tab at the bottom there is an Environment Variables button.

Among the system variables we find the Path variable and in the Variable Value field we add the path to the PHP directory. In my example it is C:\php.


