May 16, 2015 | comments: 1
It is convenient to have a flash drive with you that allows you to install an operating system (Linux or Windows), or run various system utilities and antivirus scanners. In today's mini lesson, we'll show you how to create such a flash drive.
YUMI(Your Universal Multiboot Integrator), is a tool for creating a multiboot USB Flash Drive containing multiple operating systems, antivirus utilities, disk utilities, diagnostic tools, and much more. from the official website.
For a list of distributions we support, go to the pictures page (the list is constantly being updated).
Working with the utility is quite simple; the first step in the “Step1” menu is to select our flash drive. Next is “Step2”, here we select which distribution needs to be added to the flash drive. Finally, select the image in *.iso format, this is step “Step3” and click “Create”. After completing the process of creating the bootloader and writing the necessary files to the flash drive, you can add the next distribution or close the program.
You can watch the detailed process of how to write several images onto one flash drive in the video clip.
How to check a bootable USB flash drive?
You can check the functionality of the flash drive and menu using the MobaLiveCD program.

A program that can be used to check a bootable CD or USB drive. Launch the program and click the “Launch LiveUSB” button. In the window that appears, select required USB Flash Drive and click OK. In the next window, click “Yes” and specify the storage location for the virtual hard drive. After everything, the BIOS emulation window will open and if the flash drive is working, you will see its boot menu.
Hello site! Tell how to create a multiboot flash drive containing several operating systems and other programs I need. I read your article and created such a flash drive, everything works, thank you, but it would be great to add an additional one to this flash drive useful software, For example:
Several free anti-virus disks Dr.Web® LiveCD, ESET NOD32 LiveCD, Kaspersky Rescue Disk,
AntiWinLocker disk (removing a banner blocking the desktop)
Victoria program to fix errors and bad blocks on your hard drive.
Acronis True Image 2014 - creating a backup of the operating system.
Acronis Disk Director - share hard drive into sections.
Resuscitation disk for Windows XP - ERD Commander 5.0, resuscitation Windows disk 7 - (MSDaRT) 7.0 and for Windows 8 (MSDaRT) 8.0.
A free Linux operating system, such as Ubuntu.
So that, if necessary, I can boot a computer or laptop from such a flash drive and not only install Windows XP, Windows 7 and Windows 8, but also install the free Linux operating system, check the computer for viruses, remove the desktop blocker banner if necessary, fix bad problems on your hard drive, repair Windows XP, Windows 7 and Windows 8.
I have a 16 GB flash drive, I think there’s enough space for all this stuff! Honestly, I have never seen such multiboot flash drives, but I would really like to have one. Best regards, Mikhail.
How to create a multiboot flash drive containing several operating systems and other programs
You can create such a flash drive, friends, and it’s not at all difficult! We will use the updated WinSetupFromUSB program that uses the Grub4dos bootloader, which is capable of booting your computer or laptop from a flash drive loaded with several operating systems of different bit sizes (32 bit and 64 bit) and various software. This flash drive is very convenient and will undoubtedly come in handy for a person who is passionate about computers. After creating such a multiboot flash drive and, if necessary, deploy it to another flash drive.
For me personally, such a flash drive is important and simply irreplaceable in my computer affairs.

We need a clean flash drive; in the end it will turn into a multiboot one and will contain everything listed below:
Note: All operating systems And software The one used for the example in my article was purchased by me quite legally on the official websites of the developers. Friends, use only licensed software.
Operating systems: Windows XP, Windows 7 and Windows 8.
Anti-virus rescue disks Dr.Web LiveCD, ESET NOD32 LiveCD, Kaspersky Rescue Disk. You can download them using the links:
Dr.Web LiveCD http://www.freedrweb.com/livecd/ 
ESET NOD32 LiveCD https://www.esetnod32.ru/download/utilities/livecd/

Kaspersky Rescue Disk http://www.kaspersky.ru/virus-scanner 
Acronis True Image 2014 backup data. www.acronis.ru
Acronis Disk Director is a hard disk partition manager.
Recovery disks for Windows XP - ERD Commander 5.0, recovery disk Windows 7 - (MSDaRT) 7.0 and for Windows 8 (MSDaRT) 8.0
Free operating room Linux system, for example Ubuntu (Ubuntu).
Download the Victoria program for fixing errors and bad blocks on your hard drive on my cloud storage
https://cloud.mail.ru/public/9Nbd/3W9PU9ED1

AntiWinLocker recovery disk (removing a banner blocking the desktop).
First, I suggest you upload three operating systems onto a flash drive, you can do this according to our article, if you do not need Windows XP, then according to another article, create a bootable one Windows flash drive 7 and Windows 8 and then come back here and continue.
Creating a multiboot flash drive
Once you create a multiboot flash drive with the number of operating systems you need, you can then add other software to the flash drive.
Note: It doesn't really matter in what order you add things to the flash drive, for example you can add programs first and then operating systems or vice versa. If you need a multiboot flash drive containing only programs, then you can read directly from this place. If you wish, you can add any operating system to the flash drive at any time using the method shown below.
Select WinSetupFromUSB 1.3.exe (22 MB). Download and run the program.

If we need to create a bootable USB flash drive for Windows 7 64 bit and Windows 8 64 bit, then we run the file WinSetupFromUSB_1-3_x64.exe.

My flash drive already has three operating systems: Windows XP, Windows 7 and Windows 8, the 16 GB flash drive is occupied by 7 GB, there is plenty of free space, I’m adding programs.
Attention: if you ran the WinSetupFromUSB program for the first time and you have a clean flash drive, that is, you did not load operating systems or any programs onto it, then before starting work you need to format the flash drive in NTFS and make it bootable. The main window of the WinSetupFromUSB program displays the name of our connected flash drive. Check the box Auto format it with FBinst and check the NTFS box.
Check the box!
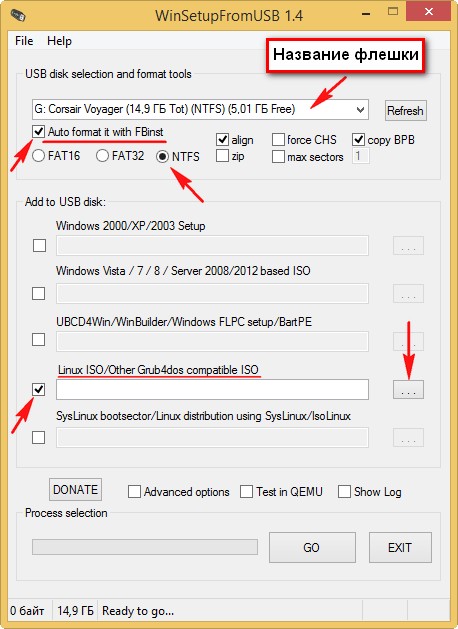
If your flash drive is already bootable and you, for example, loaded operating systems onto it using the WinSetupFromUSB program, which means we don’t check the Auto format it with FBinst option and go straight to the item Linux ISO/Other Grub4dos compatible ISO and click on the button on the right,

An explorer window opens, in which I find my folder with images of operating systems and programs.
First of all, let's add an antivirus to our multiboot flash drive. ESET disk NOD32 LiveCD,
I select it with the left mouse and click Open.


There is a short process of adding the program to our multiboot disk.


Then we add each ISO image we have in exactly the same way.
Let's try to boot from this bootable flash drive for fun and look at the boot menu of the flash drive.
If you need to install an operating system, select
0 Windows NT6 (Vista/7 and above) Setup- means installation of operating rooms Windows systems Vista, Windows 7 and higher. Press Enter.
1 Second part/continue setup (Boot first internal disk)- boot from hard drive
As you can see, the antivirus disk from Eset NOD32 has been added to the boot menu under

In the next window, select the operating system we need to install: Windows 7 SP 1 x64 or Windows 8 x64.

Well, with programs it’s even easier, in multi boot menu select any program you need and press Enter. For example, you choose to download an antivirus disk from Eset NOD32 №2 eset_sysrescue from partition 0, then the antivirus program will load.


To make everything more clear, let's add a few more programs to our multiboot flash drive.
Adding the Dr.Web LiveCD antivirus disk
In the WinSetupFromUSB program, check the box Linux ISO/Other Grub4dos compatible ISO and click on the button on the right,
Explorer will open, select the image of the Dr.Web LiveCD anti-virus disk


The process of adding a program to our multiboot disk

The program has been transferred to a multiboot flash drive.
We boot from the flash drive, we see that the Dr.Web LiveCD anti-virus disk has been added to our multiboot flash drive. Let's check its work.
Hello.
Quite often, many users, due to various system errors and failures, have to reinstall the Windows OS (and this applies to all versions of Windows: be it XP, 7, 8, etc.). By the way, I am also one of those users...
Carrying a pack of disks or several flash drives with an OS is not very convenient, but one flash drive with all the necessary versions Windows is a sweet deal! This article will tell you how to create such a multiboot flash drive with multiple versions of Windows.
Many authors of similar instructions for creating such flash drives greatly complicate their manuals (dozens of screenshots, you need to perform a huge number of actions, most users simply do not understand what to click). In this article I would like to simplify everything to a minimum!
And so, let's begin...
What do you need to create a multiboot flash drive?
1. Of course, the flash drive itself, it is better to take at least 8GB.
2. Winsetupfromusb program (you can download it on the official website: http://www.winsetupfromusb.com/downloads/).
3. Windows OS images in ISO format (either download them or create them yourself from disks).
4. A program (virtual emulator) for opening ISO images. I recommend it.
Step by step creation Bootable USB flash drive with Windows: XP, 7, 8
1. Insert the flash drive into USB 2.0 (USB 3.0 - blue port) and format it. The best way to do this is to go to “my computer”, right-click on the flash drive and select context menu"Format" item (see screenshot below).
Attention: When formatting, all data from the flash drive will be deleted, copy everything you need from it before this operation!
2. Open the ISO image with Windows 2000 or XP (if, of course, you plan to add this OS to a flash drive) in the Daemon Tools program (or in any other disk).
My computer. Please note drive letter virtual emulator in which the image with Windows 2000/XP was opened (in this screenshot the letter F:).
3. Last step.
Run the WinSetupFromUSB program and set the parameters ( see the red arrows in the screenshot below):
- - first select the desired flash drive;
- - further in the “Add to” section USB disk"Indicate the drive letter in which we have the image open with Windows 2000/XP;
- - indicate the location of the ISO image with Windows 7 or 8 (in my example I indicated the image with Windows 7);
(Important to note: those who want to write several to a flash drive different Windows 7 or Windows 8, or maybe both, you need to: specify for now only one image and press the GO record button. Then, when one image has been recorded, specify the next image and press the GO button again, and so on, until all the desired images have been recorded. For information on how to add another OS to a multiboot flash drive, see later in the article.)
- - press the GO button (no more checkboxes need to be checked).
Your multiboot flash drive will be ready in about 15-30 minutes. The time depends on the speed of your USB ports, the overall PC load (it is advisable to disable all heavy programs: torrents, games, movies, etc.). When the flash drive is written, you will see the “Job Done” window (job done).
How to add another Windows OS to a multiboot flash drive?
1. Insert the flash drive into USB port and run the WinSetupFromUSB program.
2. Specify the desired flash drive (to which we have previously recorded using the same Windows utilities 7 and Windows XP). If the flash drive is not the one with which the WinSetupFromUSB program previously worked, it will need to be formatted, otherwise nothing will work.
Testing a multiboot flash drive
1. To start installing Windows OS from a flash drive you need:
- insert the bootable USB flash drive into the USB port;
- configure the BIOS to boot from a flash drive (this is discussed in great detail in the article “” (see Chapter 2));
- restart your computer.
2. After restarting the PC, you need to press some key, such as the arrows or spacebar. This is necessary so that the computer does not automatically load the OS installed on the hard drive. The fact is that the boot menu on the flash drive will only be displayed for a few seconds, and then it will immediately transfer control to the installed OS.
3. This is what the main menu looks like when loading such a flash drive. In the example above, I recorded Windows 7 and Windows XP ( in fact they are on this list).
Boot menu of the flash drive. You can choose from 3 operating systems: Windows 2000, XP and Windows 7.
4. When selecting the first item " Windows 2000/XP/2003 Setup"The boot menu prompts us to select the OS to install. Next, select the item “ First part of Windows XP…" and press Enter.
Perhaps many people have their own collection of images with different versions of Windows. Some even store it on bootloaders DVD discs, which become more and more numerous over time as the number of versions of Windows increases. And now a stack of boot disks is beginning to take up space on the shelves of your desk. But why not make one single flash drive from all these disks, which will contain installations of all the versions of Windows you need. Today I will show you how to do this.
There is one important note. The utility works with only one version of Windows in the image at a time. So if you have a dual ISO that includes both 32-bit and 64-bit Windows versions, You will not be able to use it. Download single Windows images, for example from this source, and use them.
I will show how to use the utility to upload several installation images from Windows 7/8/10. You can upload other images in the same way.
Take an empty USB large enough to hold all the ISOs you want to install, plus leave a small amount extra space. For example, a 16 GB flash drive can hold up to three versions of Windows and one Rescue Disk. If you have a 32 GB USB, then all versions of Windows can be placed on that USB size. And if you also want to add several images with recovery images and rescue disks, you will need a larger flash drive with at least 64 GB.
WinSetupFromUSB is a portable tool that does not need to be installed. After you have downloaded it, extract the archive into new folder. If you are using a 64-bit version of Windows, then run executable file with the suffix "64" in the name. If you are using a 32-bit version of Windows, run the file without "x64".
Unpacking WinSetupFromUSB-1-6
If the USB drive was already inserted when the utility was launched, its name will appear at the top of the window. If the USB has not been inserted, plug it in and press the button Refresh.
 Run WinSetupFromUSB 1.6
Then check the box Advanced options. At the same time we will open additional window, in which check the box.
 Installing additional options
This option allows you to use custom names for the folders in which you store ISO image s Windows, and their own names in the boot menu that you will see when you start your computer from a USB drive. Window Advanced options do not close, otherwise the changes will not be saved.
Now comes the difficult part of the instructions. You need to add all versions of Windows one at a time. When adding an image for the first time, make sure that the Auto format it with FBinst installed. This allows WinSetupFromUSB to format the drive appropriately, suitable for booting all systems. If you know for sure that you will be installing from USB on a computer with UEFI mode, select the option FAT32. Otherwise, you can use the option NTFS.
 Auto format it with FBinst
Then select the first Windows ISO image. Check the box next to Windows Vista/ 7 / 8 / 10 /Server 2008/2012 based ISO and then click the browse button ... right. Find in Explorer and open the ISO image you want to add.
 Selecting an image with Windows 7
However, if you select a large enough ISO and you are using the FAT32 file system, you may receive a notification that the ISO file is too large and will be split into two parts. It's okay, so press the button OK.

Double check that you have the correct USB selected at the top of the window, and that the correct ISO image is selected. Then click the button GO.
If you are using a large USB drive, you may receive a warning asking if you are sure you want to use this particular drive. Press the button Yes.
If the Auto format it with FBinst option was enabled (It should be enabled since we are uploading the first image), you will receive a warning that all data on the disk will be erased. Click the button Yes to continue.

WinSetupFromUSB will begin formatting the USB, and after a while will show a pop-up window asking you to enter a custom folder name for the ISO, with a limit of 1 to 7 characters. If you do not enter anything within 30 seconds, the folder name will be set by default.

Next, a similar window will open in which you need to set a custom string to display in the boot menu. This time, the name can be from 5 to 35 characters. Again, you have 30 seconds to start entering a name, otherwise the system will set it as default.

WinSetupFromUSB will then begin creating folders, adding ISOs to the USB drive, and configuring boot menu options. This may take a few minutes. The progress of work can be assessed in the status bar of the window.
 Work progress
After completing the preparation process USB storage WinSetupFromUSB will display a progress message. Click the button OK.

At this point, the process of recording the first Windows image can be considered complete. Next, without leaving the program, we continue adding the following ISOs to bootable usb. The adding process is no different from the original one described above, with the exception of some points:
- When adding the following ISOs to an existing one boot disk, make sure the checkbox is Auto format it with FBinst not installed. Otherwise, you will have to repeat all the steps from the beginning for the first image.
- Every next time you add images you need to check the box Advanced options to enable the option Custom menu names for Vista/7/8/10/Server Source. Otherwise, all items in the boot menu will look the same.
But this is where I end these instructions. The principle of adding images containing rescue and recovery disks is completely similar. Follow the same steps every time you add a new ISO to Bootable USB drive. You can return to the utility at any time and add something new to the same flash drive. The resulting boot menu does not stand out with its virtuoso design, but has a classic black and white appearance:
 The resulting boot menu
I recently wrote an article on how to create a multiboot flash drive. I think there is no point in writing about this a second time, just follow the link and you will see effective way, believe me.
Now I’ll tell you how to make a multiboot drive with several systems and completely different programs, most likely the article will turn out to be long, but this doesn’t matter, because everything effective options will be in one place.
How to create a multiboot flash drive using WinToHDD
An interesting program that, in addition to creating bootable flash drives, also has functions for copying the system and installing a new one. So that users understand how to use it, I will try to describe everything in simple and understandable language.
Before the process, you should move important files from the drive to another location, for example, to a hard drive.
You can download WinToHDD from here. Launch the utility and click on the “Multi-Installation USB” section.
A window will open where you need to select the flash drive from the drop-down menu. A message about formatting the flash drive will pop up, be sure to transfer important data. Next, we select the system and boot partitions, although there is only one flash drive, so they will be the same. Click on the “Next” button.

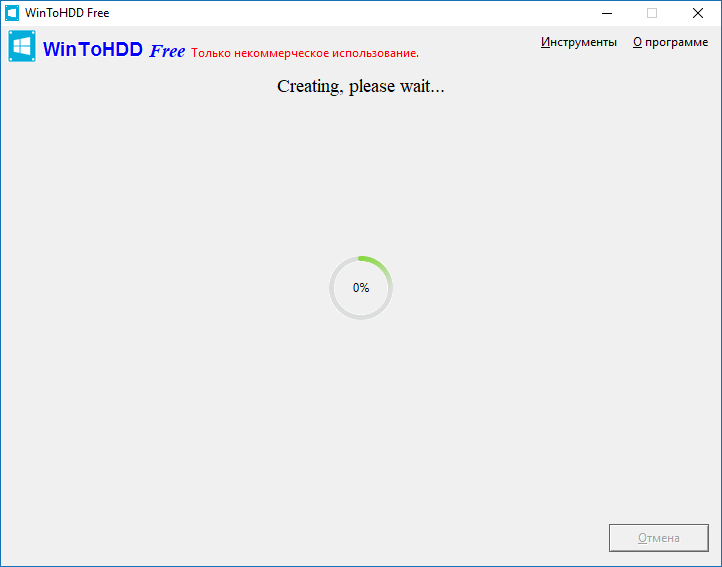
The writing of files related to the bootloader to the flash drive begins, an important operation in which it is better not to touch anything, but just wait.
What do you think needs to be done now? I hope you have already prepared operating system images. They need to be moved to a USB drive. That's it, we made a multiboot flash drive.

What to do with a flash drive made in WinToHDD
We created a bootable USB flash drive with multiple operating systems, which is very exciting. You should now boot from it. This can be done through the BIOS or Boot Menu, whatever is convenient for you.
The boot manager appears, where you select one of the presented items - 64-bit system or 32-bit.

The WinToHDD utility window will appear with the name of the system image. Let's get started new installation and select from the list the right system. Now click Next.
Next, we are asked to select or create the following partitions - boot and system. Here you must be a more experienced user and not mess anything up. If necessary, convert partitions to MBR or GPT.

If your BIOS is not UEFI, but the Legacy boot type, then you should convert the partitions to MBR and also format them to NTFS.
If you use BIOS UEFI, then convert the partition to GPT. All this is done on the command line.
Once you have specified the required partitions, you can click “Next” and wait for the system to install. You can experiment on a PC with this program if you found these instructions a little complicated, but we managed to create a multiboot flash drive.
Creating a multiboot flash drive using Easy2Boot
First you need to download several files; we will need them during our work:
RMPrepUSB– download from here: http://www.rmprepusb.com/documents/rmprepusb-beta-versions
Easy2Boot– download from here: http://www.easy2boot.com/download/
We launch the RMPrepUSB utility and look at the interface. Lots of functions and nothing is clear. It follows from this that the method will be a little complicated for novice users, but you should not give up this option. Don't forget to connect the flash drive.

Let's first look at those interface items that will be useful to us.
- We mark the option “Do not ask questions” - that is, no notifications with requests will appear;
- In the “Size” fields - enter MAX, “Volume Label” - enter any;
- IN boot sector select the first option related to Windows;
- In the File system section, check the “NTFS” and “Boot as HDD” items. You can also choose FAT32, but the option is slower and only supports a maximum of 4 GB file sizes.
- In the fifth section you need to select the path to Easy2Boot. Attention! There is no need to unpack the archive; we leave it as is.
- Press the button "Prepare disk". You should have a drive inserted and displayed in the very top field; if there are several disks there, then make no mistake and select the desired flash drive.
- After completing the operation of preparing the flash drive (it was formatting), you need to click "Install Grub4Dos". If a warning window appears, select “NO”.
It is advisable not to close the utility, because it will be useful to us later. When we open the flash drive, we will see several folders there. There is an “ISO” folder, and in it there are supposed folders for operating systems and some utilities.

What do we do next? You need to take the necessary images and transfer them to the WINDOWS directory, you can also move them to the appropriate folders antivirus utilities, programs for creating backup copies, working with disks, as well as checking for RAM errors.
Images do not have to be thrown only at WINDOWS folder. You can drop them into the root or ISO folder. When loading from a flash drive, they will still be displayed.
Here you copied necessary files to the drive, you need to return to the main RMPrepUSB window. Open the “Drive” tab and click on the option "Make All Files on Drive Contiguous", or press Ctrl+F2.


Create a multiboot flash drive using WinInstall4Grub4DOS
From this link you can download the WinInstall4Grub4DOS tool. Unzip it and run the file. A welcome window will appear, where we click on the “Next” button.

It's very good if you are prepared necessary images. You can select them by clicking on the “Select folder” button; the OS images must be located in some folder, the name must not have Russian letters.
Having specified the path to the system images, click “Next”.


After the next click on the “Next” button, you will see operations for copying, driver integration, and other things. The process can be lengthy and we are even offered to go have some tea, thanks for that.

To add data to system images, the FiraDisk script will run. In the window that appears, click OK.


Now let's see what's in the folder with all the images. Copies of them appeared there with the note “FiraDisk”.

Let's go to the WinInstall4Grub4DOS utility and select the “Save files” option. In Explorer, create an additional folder and name it, for example, “Utilities,” since this is where they will be written. You need to create it in the folder where the folder with the images is located.

If you are interested in what these utilities are, then click on the “Why are these files needed?” button.
Finally, we connect the flash drive to the PC, run HPUSBFW, located in the folder with the utilities, as administrator. A window will appear with a choice of flash drive, file system, preferably NTFS, and tick quick formatting. Start the formatting process. When finished, close the window.

In the utilities folder we find the archive with the GRUB4DOS_GUI tool. Let's run this file.
Move the checkbox to the “Disk” position and select the flash drive next to it. If nothing happens, then run the utility with elevated privileges. Click “Install”.

A command line will open, press the “Enter” button.

In the utilities folder, copy the MENU.LST and GRLDR files to the USB flash drive. If they are not there, then download them from the Internet, they are easy to find. Here's the link so you don't have to search.
Let's create a folder on the flash drive with some name and move the images there with the FiraDisk annotation. We haven't been able to create a multiboot flash drive yet because there are a couple of steps that need to be completed. Let's go!

Using the Wincontig program
One more thing. It is necessary to defragment the copied images. This can be done using WinContig, located in the utilities folder. Launch it and select images using the “Add files” button.

Click on the “Action” section and select “Defragmentation”. We are waiting for the process to complete.
The status should not be fragmented, this means something is wrong with the files, or you need to take a larger flash drive.

In the WinInstall4Grud4DOS window, click “Next”, so we will find ourselves in the section where we will do something.

In the “Menu generator for Grub4DOS” field, you need to specify the path to the disk where you have Windows images. Detailed instructions written in a file that opens by clicking the “What to do?” button.
After that, click “Make”.

After waiting a little, we will see the code that needs to be copied, for which there is a corresponding button.

We have created a multi-boot media with multiple operating systems. This process turned out to be long and hardly anyone will use it, but for general development it will do.
When booting from a flash drive, the GRUB4DOS bootloader will appear, with a black background and a list of operating systems. You can work on the design of the bootloader using ZXBFM__2.1b, but this is optional.

RESULTS
So, friends. I have created such a voluminous article for you. Now you know how to create a multiboot flash drive that has not only operating systems, but also various kinds of utilities. Some methods turned out to be simple, while others were complex or took a long time to implement. In any case, they are all effective if done correctly. Beginners may have problems, as there are a lot of pitfalls here. If you have a problem, be sure to write in the comments, I will try to help.
Problems

