Today, smartphone applications are becoming increasingly voluminous. But for Android users This is not a problem, because programs can be installed on a memory card. It is not difficult. But here's what to do if you don't need to install an application from scratch, but transfer it from internal memory smartphone to SD card? Let's figure it out.
Naturally, after installing the card in your smartphone, it will prompt you to format it into a suitable format. We wouldn’t focus on this if it weren’t for one “but”: the smartphone not only formats the card, but also encrypts it. So other devices (smartphones or PCs) simply won’t read it. Well, that's sorted out. Let's move on to how to move applications to a memory card on different versions Android OS.
Android 9
With this version of the OS, you can quickly and easily transfer applications to an SD card. The only limitation: you cannot transfer pre-installed programs from Google to the card. However, this applies to all versions of Android. To transfer a program from internal memory to an SD card, go to “Settings” - “Applications and notifications” - “Application information”.
Find the app you want to move in the list and tap it. Select "Storage" and click "Change". After that, select your memory card in the window that appears. The reverse transfer is carried out in exactly the same way.
Android 8
Overall, the process of moving an app to an SD card on Android 8.0 is about the same as in the later version. You need to go to “Settings” - “Applications and notifications” - “Application information”. Next, select the application, click “Change” and select a new storage location. However, it is worth noting that some programs do not support the ability to save to a memory card in the Android 8.0 version. That is, the conditional application X can easily allow you to save itself to an SD card if you have Android 9.0 installed, but on the eighth version of the green robot it will not allow you to do the same.
Android 7 and earlier
In these OS versions, the process of transferring an application to a memory card looks a little different. Go to Settings - Applications, then tap on the right application and click "Edit". Here you can choose where the program should be saved. But for obvious reasons, even fewer programs support this option in older versions of the OS.
How to Move Apps to SD Card Using Link2SD

Link2SD allows you to transfer several applications to a memory card at once and provides a ton of useful information
If your phone doesn't support moving apps to the SD card, but you still want to do it, there is a program that can help you with this. It's called Link2SD. And it will be useful not only in the above situation, but also if you want to move several applications at once, rather than doing it manually for each program.
On some Android phones, there is no way to transfer applications, various files, personal data, games on a memory card.
If your device is on this list, I recommend downloading a program for transferring files to a memory card from android phone.
There are many like this, but best program to transfer applications and everything else to an Android memory card, like AppMgr III (App 2 SD) for me.
It works perfectly on both older versions of Android and the latest ones: Android 6.0 and Android 7.0.
You can download the program for transferring files to a SD card “AppMgr III” on the play market or right here on this page (download link at the end of the post).
You can update it to the PRO version, but personally I don’t see any reason for this. The tools in the free version are quite sufficient.
How to use a program to transfer data to an SD card
Immediately after downloading and installing, the process of scanning the contents of your phone will begin for programs, files, data....
Then click on the three stripes at the top left.

A menu will open. Select Move Applications.

A section will open showing which applications you can move to the memory card.

This is an opportunity to disable and hide applications that you do not use. To do this, go to the menu again, but now select the item: “Hide applications”.

The hiding procedure is very simple and there is no point in describing it, but AppMgr III (App 2 SD) can do something else.
This is to clear the cache in one click, remove applications even in batches, sort files, adjust sound, vibration and notification backlight.
Other programs for transferring applications or games to an SD card
If, due to some circumstances, AppMgr III (App 2 SD) does not suit you, then there are other similar programs.
For example: Linr2SD, Files To SD Card, SD Maid, App2SD Tool, Install Apps On, App2SD &AppM and others. You can download it for free on the play market.
Developer:
http://android.a0soft.com
OS:
android
Interface:
Russian
In older versions of Android, without root rights, you could not use an SD card as internal memory. This feature appeared only in Android 6.0 Marshmallow (works on Android 7, 8 and 9) and allowed you to transfer installed applications to a memory card. To ensure that games and programs launch quickly and run smoothly, it is advisable to use a high-end SD card.
Some firmwares do not have the function, despite the appropriate Android version. But this does not mean that the memory card cannot be used as internal storage - the SD will simply have to be formatted using ADB.
After formatting the memory card, it will not be readable by other mobile devices. If you need to install SD in new smartphone or connect it to a card reader in a laptop, format the card as a portable storage device.
Setting up an SD card as internal memory
After connecting the memory card, a notification about the detection of a new SD card will appear in the notification area. Click "Setup" and format it as internal memory following the instructions. Files saved on the SD card will be deleted, so be sure to create a backup copy in advance.

The memory card is also formatted through the settings menu. To do this, go to “Storage” (in some firmware it is called “Storage and USB drives”, “Drives” or “Memory”) and click on the “SD card” item.

Expand the menu and select Storage Settings.

Click on “Internal memory” and in the next window click “Clean and format”. Be sure to save the data on the memory card before doing this, because it will be deleted.

If, after formatting is completed, a notification appears on the screen that the SD card is running slowly, then the memory card being used is of a low class. Such SD cards are not recommended for use because they work many times slower than drives in mobile devices. Applications transferred to a card with low read and write speeds may run slowly.

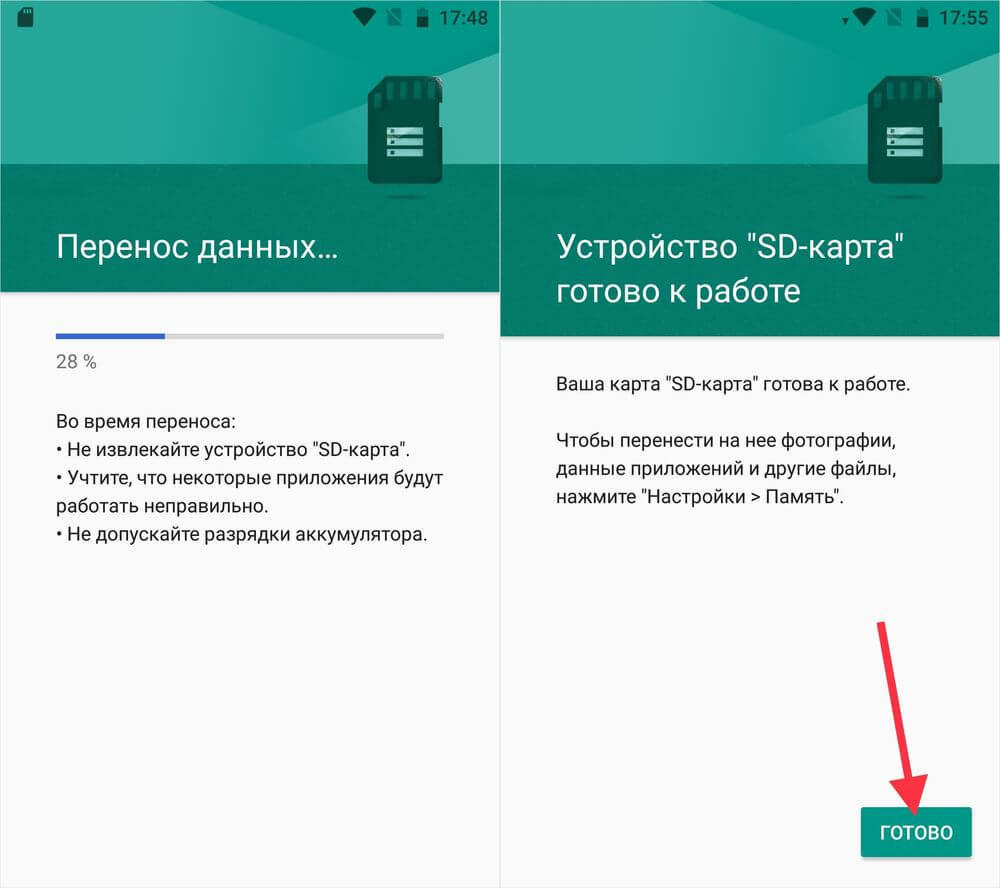
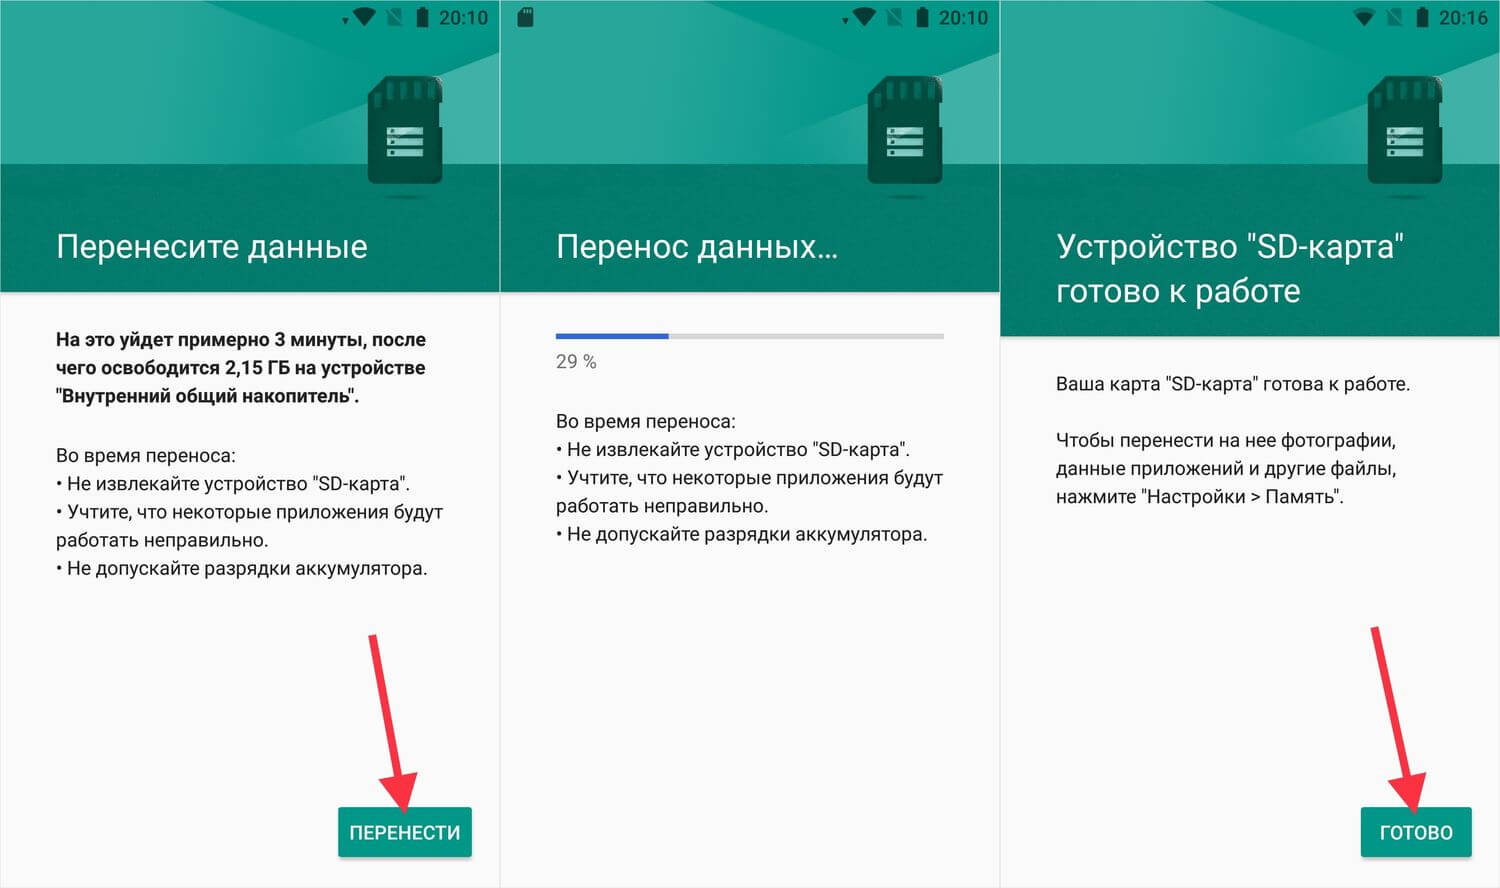
Next, you will be prompted to transfer some applications, photos and files to the formatted card. Select "Transfer Now", click "Next", and in the next window click on "Transfer".

The data transfer process will take some time. At the end a message will appear that the SD card is ready for use.
How to format a memory card using ADB
If the function to format a memory card is not available in the settings menu, despite the appropriate version of Android, it means that the mobile device manufacturer has not added this option to the system. At the same time, the ability to format a memory card has not gone away, but for this you will need ADB.
ADB (Android Debug Bridge, Android debugging bridge) is a tool that is included in the Android SDK and uses it to establish communication with the Android console. ADB works from the command line (cmd.exe) or from Windows PowerShell(available in the latest builds of Windows 10). Simply put, by connecting your mobile device to your PC via USB and activating debugging, you can control your smartphone from your computer using ADB commands.
To download ADB, follow the link, download the “platform-tools” archive and unzip it to the “C:” drive. ADB will be inside.

Also go to this page of the official Oracle website, check the “Accept License Agreement” checkbox and download installation file Java Development Kit, corresponding to the bitness of the operating system on the computer. Once the download is complete, run the installation.
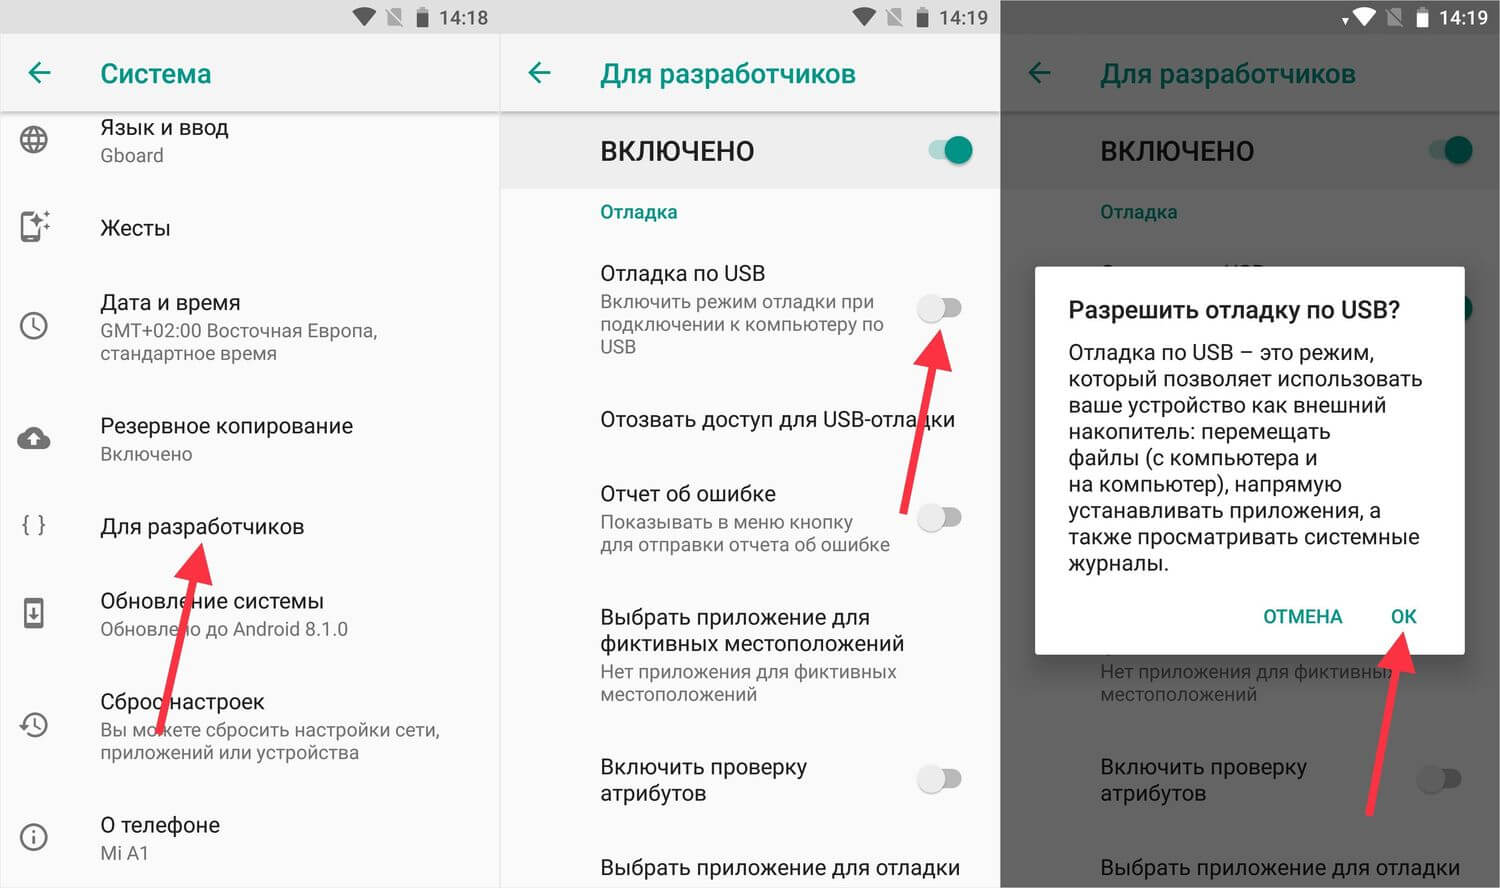
Enable USB debugging on your device. This feature is located in the hidden “For Developers” section. To make the section visible, open “Settings” → “About phone” (“Settings” → “System” → “About phone” in Android 8 Oreo and Android 9 Pie) and click on “Build number” 5-7 times.


After completing the steps, the “For Developers” item will appear in the settings menu (“Settings” → “System” in Android 8 Oreo and 9 Pie). Go to the “For Developers” section, activate the “USB Debugging” option and confirm by selecting “OK”.
Connect your smartphone to your PC via USB. If this is your first time, the following will be installed on your computer. USB drivers. Typically, drivers are downloaded automatically, but if this does not happen, download the driver from the device manufacturer's website or install a universal driver. If the driver does not have an installer, go to the “Device Manager” on your computer, select the device (the device will be detected incorrectly with a question mark or exclamation point), right-click on it and click “Update Drivers”. Select “Browse this computer for driver software,” specify the path to the driver folder, click “Next,” and wait for the installation to complete.


Now go to the “platform-tools” folder and hold down the “Shift” key and right-click on an empty area. From the list of options, select "Open a command window" or "Open a PowerShell window here" (on Windows 10). Will start command line or PowerShell.

Your smartphone will ask you to allow debugging from this computer. Select "OK" to confirm. If the request does not appear, it will happen later - during the execution of the first command.

Type the following command and press Enter (in PowerShell, add ./ before the command):

A “$” sign will appear in the console. Enter the command:
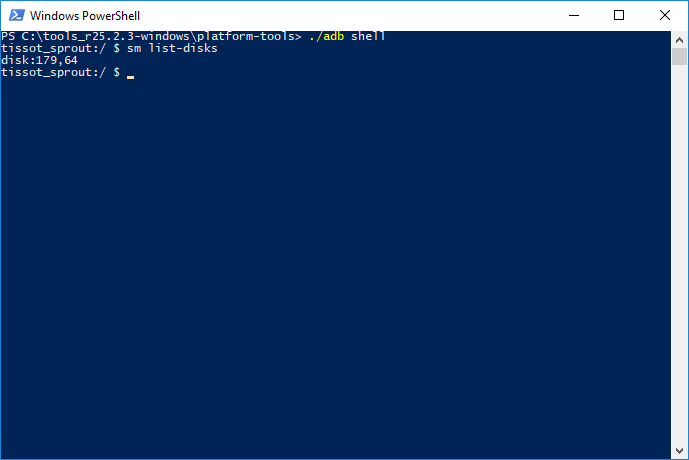
The view memory card ID will be issued disk:NNN,NN. Copy the following command and replace it with NNN,NN on the received numbers and run the command:

Now go to “Storage”, select the memory card, open its settings and click “Transfer data”.

How to transfer applications to a memory card in Android 6, 7, 8 and 9
After formatting the SD card, all that remains is to transfer the installed applications to it. Open Settings, select Apps & Notifications, click Show All Apps or App Details (if you don't see these options in the menu, skip) and click on the game or program you want to transfer.

Open "Storage" (or "Storage"), click "Change" and select a memory card.
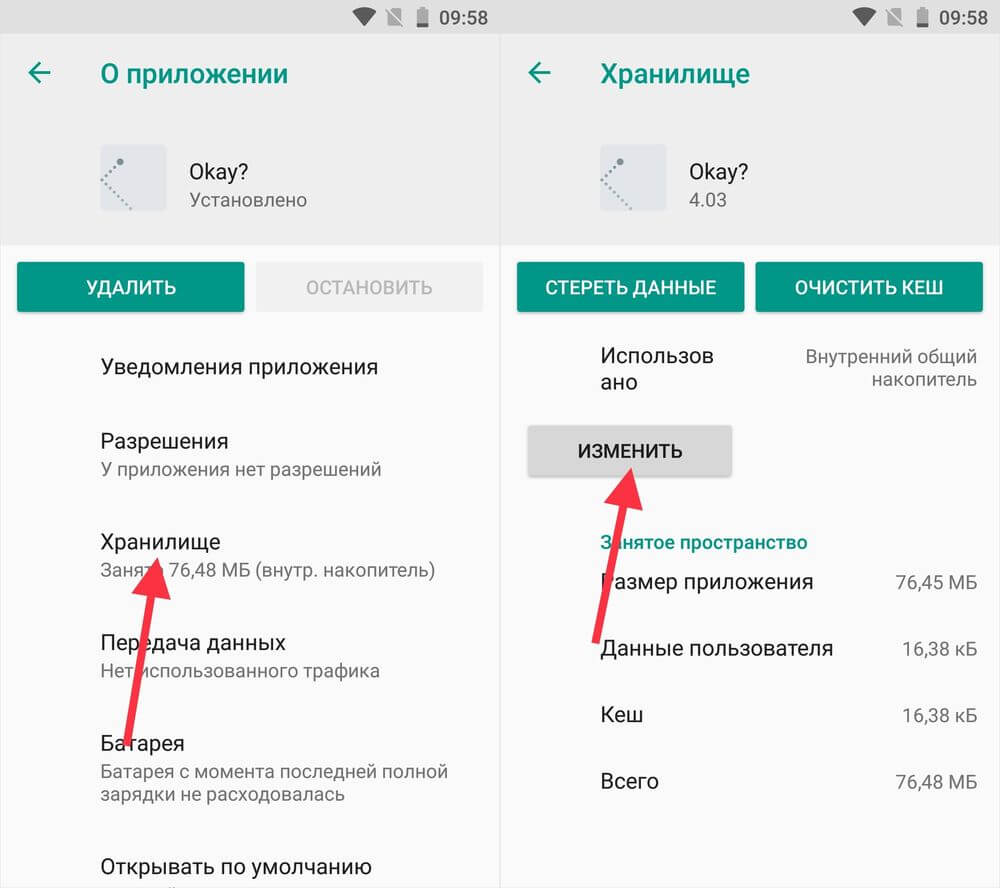
In the window that appears, click on the “Move” button and wait while the application is transferred.

AppMgr III (App 2 SD) – a program for transferring applications
If you don't want to manually move each app, download a program that makes the process easier. Using AppMgr III (App 2 SD), you can transfer an unlimited number of applications to a memory card in a couple of taps.
If your smartphone has Android 8 or 9 installed, grant AppMgr III the following permissions:

Then launch AppMgr III, highlight the applications you want to move and click on the folder icon.

In the next window, click on the “Play” button to start the transfer process.

If some applications cannot be migrated, this will be reflected in AppMgr III.
The green robot's "stomach" is smaller than a thimble. Especially on devices with little memory. I fed him a dozen or two super-mega-needed programs - and the place ran out. But... many of us have the opportunity to install a second “stomach” in the gadget and continue feeding.
Today we’ll talk about transferring applications from internal memory to an SD card in Android smartphones and tablets.
Which apps can be transferred and which ones can't?
Among mobile applications There are those that can be transferred between drives and those that cannot. When you transfer a program to external media, some components remain in the same place - in the permanent memory of the device.
If the program is relatively autonomous and not too fussy in terms of the location of files and data, it will remain operational. And if it is deeply rooted in operating system, when the work of other structures depends on it, the transfer can end in failure - not only this program will stop working, but also everything that interacts with it. For this reason, you should absolutely not try to move system applications.
Ability to transfer products to microSD third party developers not the same. It depends on whether the program author has provided for this possibility. They don’t write about this in the characteristics - everything is learned experimentally, but such experiments do not threaten serious consequences. If after transferring the program does not work, it is enough to return it to its place or reinstall it into the device’s memory.
Moving by system means
Modern versions of Android, starting from 6.0, support transfer software to cards without additional funds. They use a micro SD card as an extension of the internal storage, and the movement function is built into the firmware.
To transfer a program from the memory of a smartphone or tablet to a card in Android 6.0 and higher, do the following:
- Open system settings and go to " Device» – « Applications».
- Open the menu (properties section) of the desired program with a short touch.
- Tap " Storage", then " Change».

- In the window " Changing storage location» select « Memory card».

The instructions are applicable to devices of many brands and models, but adjusted for individual characteristics. Some manufacturers, for example, Samsung, instead of " Storage"You need to go to the section " Memory" Others have a button “ Move toSD" is located in the menu of applications that support this function. Well, others... simply didn’t bother and refused to implement the transfer function into the firmware of their devices.
The ability to transfer applications to SD cards “without intermediaries” also exists in very old versions of Android - 2.2 and lower, and everything that appeared later - up to the sixth version - requires third-party tools, which will be discussed further.
Mobile software for moving applications to SD
AppMgr III

Utility AppMgr III (App 2 SD) it is convenient in that it makes it possible to perform similar operations with several objects at once (batch management of installed software). This is not only a change in the installation location of the software, but also:
AppMgr III simplifies and speeds up many tasks for maintaining a mobile gadget, supports everything Android versions, starting from 4.1, however, it is officially incompatible with devices from certain manufacturers, in particular Xiaomi. Operations with some objects require root rights.
Link2SD
Exclusive feature of the utility Link2SD– moving absolutely all user applications to SD cards, even those that do not allow this. The truth is, nothing is said in the description about whether the developer guarantees their continued performance.

Other functions and features of Link2SD:
- Changing attributes of user software to system software and vice versa.
- Freezing unused software.
- Batch transfer of software to SD cards and device memory.
- Batch removal and reinstallation of programs, batch clearing of cache and data. Clear the cache of all installed software with one touch.
- Removing potentially malicious software.
- Manage device reboot.
- Create custom shortcuts.
- Sorting installed applications by various parameters, search and much more.
Link2SD is more omnivorous than AppMgr III: it runs on any version of Android, starting from 2.3, and generally supports Xiaomi devices (although, according to user experience, not all). Most operations require root rights; it does not work on some firmware without root. Free version The utility is quite good - functional and convenient, but plagued by intrusive advertising.
Files To SD Card

A simple utility FilesToSDCard designed for transferring files to a memory card different types– graphics, video, music and, of course, applications. In addition, it allows you to choose an SD card as the location for saving new files (by default, Android saves everything on the device).
Files To SD Card is used to unload the memory of mobile gadgets and Reserve copy data. Despite the fact that the manufacturer claims support for a limited number of devices: Lenovo A2010 LTE, Samsung GalaxyCore, Moto G, Vodafone Smart Prime 6, Nokia One and Sony Xperia M4, the utility runs on almost any smartphone and tablet under Android control 5.0 and higher. On most firmware everything works without root.
Move to SDCard

A program with a simple name " Move to SDCard» pleases users with simplicity and good results. In addition to the main function, which coincides with the name, the utility can:
- Move software from the card to the device memory.
- Sort applications by name, size, installation date.
- Display information about applications: installation location, date, time, size, name executable file(apk).
- Search for software on your device and on the Internet.
The utility is compatible with most brands and models of mobile gadgets, including very Chinese and very old ones (supports Android 2.3 and higher). Some features require root privileges.
File manager
File manager from the developer Best App is an improved explorer, a replacement for the standard file manager on Android smartphones and tablets. Changing where applications are installed is just one of its functions.

Other features of the File Manager include:
- Copying, pasting, cutting, moving, deleting, renaming, downloading - that is, all standard operations with files and folders.
- Integration with , OneDrive and DropBox.
- Access to open resources on the local network.
- Clearing cache, junk data, duplicates.
- Sorting objects into categories.
- Transfer files over Wi-Fi to others mobile devices, computers and Smart TV.
- Analyze and graphically display storage space usage.
- Archiving and unarchiving files. Supports all major compression formats: rar, zip, 7z, 7zip, tgz, tar, gz.
- Organizing and storing documents of various formats: doc, ppt, pdf and others.
The explorer is very lightweight and easy to learn, is not overloaded with redundant functions, and is undemanding in terms of hardware resources. Runs on Android 4.2 and higher. Some functions require root rights, but everything basic works just like that.
All-In-One Toolbox
All-In-One Toolbox– utility for comprehensive optimization and maintenance mobile system. Painless transfer of applications from internal memory to SD card and vice versa is also one of its functions.

Others useful features All-In-One Toolbox:
- Management of startup software (user and system).
- Removing unnecessary data (cleaning up garbage, caches, duplicates).
- Complete removal of programs with clearing of remaining files.
- Speeding up a device by releasing random access memory from running services and programs.
- Reduced battery consumption.
- Encryption of personal data.
- Display a list of large files.
- Explorer with the function of sorting objects by category.
All-In-One Toolbox – good tool to speed up and maintain smartphones and tablets with limited resources - small amounts of storage and RAM, not the most productive processor, weak battery. Runs on devices of any brand and model, perhaps with a few exceptions. Some functions require root rights and depend on the Android version.
As most often happens, this is not an exhaustive list of utilities with the ability to transfer applications to an SD card and back. There are hundreds of them, but each with its own quirks and character. I hope this short review will help you find exactly what you like and will also be tough for your Android device.
Probably, each of us has encountered the problem of insufficient memory or simply wanted to transfer applications to a flash drive, since the memory was already full, and games and applications cannot be transferred to MicroSD and the notification “Insufficient memory on the device, some functions may be limited” was annoying.
Even if I deleted many applications and games, there was still not enough memory. But how to increase memory without losing everything? Later in this article we will look at and find out how to solve this problem.
I want to warn you right away that neither I nor the site administration are responsible for your actions. You do everything at your own peril and risk.
P.S. The article uses the most simplified words for better perception.
To continue you will need:
- MicroSD Card with at least class 6 (preferably class 10) and larger than 4 GB
- (To create a second partition)
- (For transferring applications and games)
- (For transferring games with cache)
To increase memory, we will have to transfer your applications to the so-called second partition of the MicroSD card (for transfer you need ), and we will create it ourselves. If you already have a second section on your card, you can skip this item.
Creating a second MicroSD partition
1. Save all files on another medium (For example, on a computer)2. Disable MicroSD card along the path “Settings/Memory/Disconnect memory card”

3. If there is ROOT rights, install , if not -

4. After starting, click on “+” twice  5. Select “Ext4” in Part 2. If you have a device running Android 2.2-2.3, select “Ext 3”
 6. In Part 2, select the size, how much memory you want to allocate in MB from the card for applications and games (The more the better)
  7. Look at the first graph with a white bar, with the amount of memory remaining and enter these numbers in Part 1
 8. Check if you did everything correctly. If everything is correct, click on the menu button or the so-called “three dots in the corner”, and click on “Apply changes”
  The hardest part is over, you can reconnect the memory card (Settings/Memory/Connect memory card), transfer files back to the flash drive, but before that you can notice that the size of the memory card has decreased. This is how it should be, because we created the second section.
Setting up transfer to the second partition
We need to install the program (Google Play)
After installation, open the application. You should see a window like this. Select "Ext 4" or "Ext 3" for Android 2.2-2.3 and click on "OK".


After rebooting, open the application. You should see a list of applications.

Now we will look at what can be transferred and what is better not to transfer.
Let's just say that system applications should never be transferred. You never know what will happen. Therefore it is better to endure custom applications(The ones you installed yourself). I do not recommend transferring those applications that you actively use (For example, Browser or WhatsApp and the like).
And to make it more convenient, the application has sorting. To do this, click on “Exact three stripes” and select “Custom”.


A list of your applications should appear in front of you. Now you can select the applications that you want to move to the second partition and link them there. Click on “Three Dots”, then on “Several”, select the applications to transfer and click on “Send”.


A few minutes of waiting and you're done! You have more memory, and you can still download games and applications and transfer them. If you delve into the Link2SD settings, you can enable auto-link. This is a function that automatically transfers the application to the second section of the card, thereby making your life easier.

You can also change themes in the settings, buy the Pro version, and so on. But that’s not about that now. In general, we figured out the main problem. But, I want to tell you, Link2SD does not transfer game cache (Game cache is files in .obb format along the path Android/obb/“game package name”). So what should we do? Let's talk further.
Transferring game cache and data to a MicroSD card
Game caches can be transferred using a great program called . I’ll say right away that the cache is transferred to the flash drive itself, and not to the second partition.
Open the application, and swipe from the left edge of the screen to the right edge (Swipe) and tap on “Application Analyzer”


