Free program to change network settings. The program is intended for non-commercial use and free version allows you to create up to six profiles containing different network configurations.
Changing created profiles in NetSetMan (short for Network Settings Manager) is very easy - just select the tab with necessary settings and click the "Apply" button.
You make the necessary settings in separate profiles in advance, and then simply switch to the desired one when you change the connection method!
Key Features
NetSetMan allows you to change:
IP- computer address on the Internet.DNS- a system that associates domains with IP addresses.
Hosts - text file with instructions for redirection.
- IP addresses;
- DNS, WINS and SMTP servers;
- computer name and workgroup;
- Wi-Fi settings;
- network printers;
- entries in the Hosts file;
- some system properties (monitor operating mode, sound devices and power configuration).
In addition, NetSetMan can execute any BAT, JS or VB scripts, allowing you to change almost any settings accessible from the command line and/or through third party programs!
Comparison with analogue
NetSetMan has a paid PRO version, but the differences between them are minimal. In fact, by paying €18, you will receive:
Proxy- an intermediate server between the computer and the Internet.- the right to use NetSetMan on a work PC;
- activate an unlimited number of settings profiles;
- functions of changing proxy server, network domain and home page browser.
Therefore, it seems to me that it would be more successful to compare NetSetMan with the application third party developers, called WinAgents HyperConf:
In fact, the WinAgents HyperConf program is a kind of analogue of NetSetMan for system administrators, since it is designed not only for automatically changing network settings, but also for maintaining these settings in working order.
And the license for it is sold for at least 10 cars. Therefore, for the average user, working with NetSetMan will be preferable.
Installing the program
NetSetMan is installed like all programs: you download the archive, open it and run the installer, and then follow the wizard’s prompts.
During the first stages of installation, you will need to select the application language and accept the terms of the license agreement, after which you will be faced with the following choice:
There are three here possible options settings:
- The standard installation is the way NetSetMan will be implemented into the system like everyone else regular applications. That is, in the Program Files folder (by default), a directory with the program will be created, which will contain all the files necessary for work. In this case, the utility settings will be saved in the system registry.
- Update - allows you to install a newer copy of the program on top of the one you already have installed. This method will only be available if you have already used NetSetMan before.
- Extract files. This method allows you to simply unpack all program files into the directory you specify. In this case, nothing is written to the registry, and you can use NetSetMan as a portable application.
We'll probably finish installing the program in the standard way, although if you are a fan of portable software, you can complete the installation in a third way :).
Creating your first profile
After the installation of the program is completed, its working window will appear in front of us:
![]()
It consists of a menu bar (at the top), a row of buttons (to the right of the program name) and six tabs, which, in fact, contain all possible settings.
In order to create the first settings profile, you need to call the context menu of the required tab (for example, Set 1):
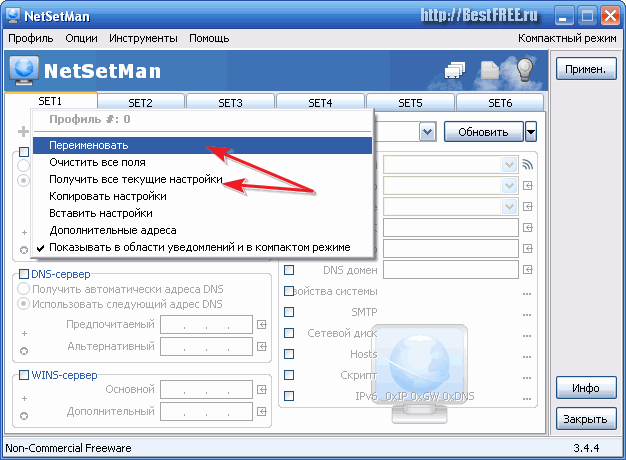
First of all, let's rename our tab to something convenient and understandable. To do this, click “Rename” and in the window that opens, enter a suitable name, for example, call the tab “Home” :).
After this, we will need to go to the context menu of the tab again and activate the “Get all current settings” item there.
This action will automatically fill in all fields with the settings that you currently use to connect to the Internet:

In addition, you can automatically fill in the required fields by clicking the arrow button located to the right of the required field (see screenshot above).
Working with the program
So, we have our first profile ready - it’s time to create another one so that you can switch between them.
I have a landline connection at home local network, so as an example I will give the settings that I have to use if I want to connect to the Network at my parents:

As you can see, for the Internet to work, we usually only need to know our IP address and the IP of our DNS server (which in this case is the modem). However, there are more complex cases, which NetSetMan will help us deal with.
MAC address(English) Media Access Control) - unique device number on the network.The first such case is the problem of changing the MAC address network card.
Usually this need does not arise, however, if you have to work in several local networks, where traffic is distributed to the physical addresses of network devices, then you will not be able to do anything without this function.
Officially, NetSetMan does not yet have such a feature (although the author announced its implementation in the next beta version), but it is possible to execute almost any script, which significantly increases the functionality of the program!
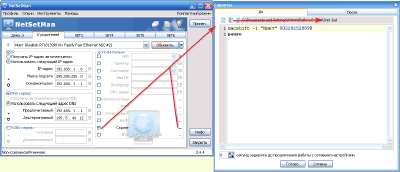
The script can be created in advance (and then simply opened), or you can write it directly in the window of a special built-in editor, to access which you need to activate the “Script” item in the desired program tab and click on the button to the right of the item name:
Let's look at working with scripts using a specific example. By default, the Command Line does not have a function for changing the MAC address, but it can be implemented using a third-party console program - macshift.
You will find this utility in the archive with the NetSetMan program. All you need to do is unpack the files "validmacs.h" And "macshift.exe"(third file is optional) to the root of the disk C:\ or to a folder C:\Windows.
Console(English) console) - window for entering text commands.Thus, you have the opportunity to change the MAC address of the network card through the console. Now the small matter is small - you need to write scripts.
The syntax of the macshift commands is very simple: macshift -i "Connection name" 2889-82-002B (required address).
We enter the line (changed to the MAC address you need) into any editor such as Notepad and save it as a BAT file.
Now all that remains is to open the created file in the NetSetMan script editor (see screenshot above). Moreover, the execution time of the script can be set both “Before” changing the settings and “After”.
Hosts file management
Next to the “Script” item there is the “Hosts” item. Activating it allows us to make changes to the system file of the same name, which is responsible for resolving and redirecting the addresses specified in it.
One way to use the edit function is this file There may be restrictions on access to some sites from your PC.
For example, I suggest “banning” the site vk.com :).
This can be achieved by assigning the local host address to the site (by default 127.0.0.1 ). We activate the “Hosts” item in NetSetMan and using the button on the right (with the ellipsis) we open the window for editing the system host file:

Now, following the syntax, on each new line we first write the local host address, and then, separated by a space, the address of the site to which we want to block access.
After generating the list, click the “Finish” button.
The most important thing is that NetSetMan does not touch the standard host file entries, but can both add and delete site addresses added through the program.
Thus, you can create a profile, for example, for your children, in which you can limit their ability to access certain sites!
Managing system properties
The last function that I would like to draw your attention to is “System Properties”. By activating this item in the NetSetMan window, you will be able, using a profile, to change not only network settings, but also some monitor, sound and power settings:

We've figured out the capabilities of NetSetMan, so it's time to try using the profiles we created. To do this, just go to the desired tab (profile) and click the “Apply” button. in the upper right part of the program window:

This will open a window in which all actions performed by the program will be displayed.
Above the list of actions is a progress bar for applying new settings, and above it is a “Cancel” button, which will change to a “Finish” button when the network configuration is complete.
Click the last one and you will have a completely reconfigured Internet connection at your disposal!
Additional tools and program settings
So, above we have already figured out the operating principle of the NetSetMan program and examined in detail some of its capabilities. Now it's time to get acquainted with some non-core but sometimes necessary functions. We'll talk about the buttons on the toolbar. There are only three of them:
- Profiles. This button opens the profile management window. Unfortunately, in the free version we cannot delete any of the six profiles, but we can rename them.
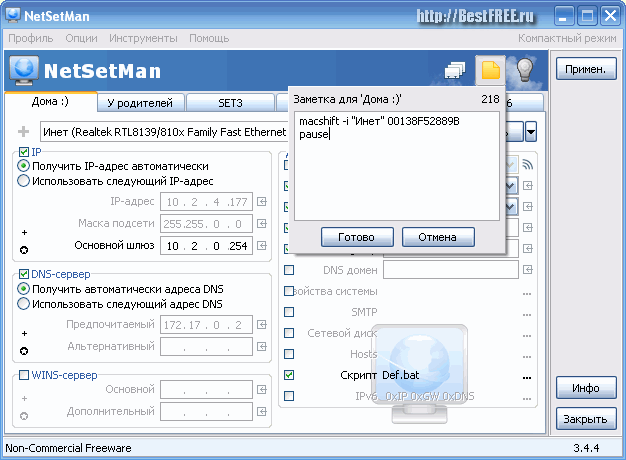
- Note. This button allows you to leave short entries (up to 256 characters) with comments on the active profile. Here you can, for example, insert the text of the script so that you can restore it if the file is lost (see screenshot above).
- Auto switch. This button opens a window in which we can configure automatic switching to a Wi-Fi profile when a signal from an open network is detected.
Without proper attention, we are left with only the menu bar.
The first item - “Profile” - activates a menu similar to the context menu described at the beginning of the section about creating the first profile. Therefore, there is no point in describing it separately, and we move on to the second point - “Options”:
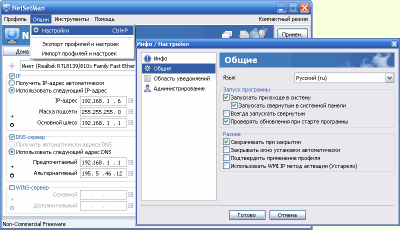
Here we have three sub-items:
- import;
- profile export;
- and the “Settings” itself.
For example, if you forgot to set the interface language to Russian or want to disable NetSetMan autostart, then you can do it here.
Also pay attention to the “Administration” tab. With its help, you can activate encryption of all data stored in the program!
The third menu item - “Tools” - contains some standard links to built-in system network connection management tools and more:

The last thing I want to talk about is the ability to work with NetSetMan in “Compact Mode”:

To switch to this mode, just click on the corresponding inscription in the upper right corner. It is worth noting that editing profile settings in this mode you can’t, but switching the network configuration is much more convenient (at least in my opinion) :).
Advantages and disadvantages of the program
- simplicity of the interface;
- convenient system for changing profiles;
- expanding the functionality of the program by executing scripts;
- the ability to quickly automatically obtain current settings;
- Access the most popular built-in Windows features.
Flaws:
- there is no built-in function for changing the MAC address of the network card;
- There is no built-in task scheduler.
Conclusions
If you are a modern laptop owner and often use it when traveling to access the Internet, then NetSetMan is an indispensable tool for you that will allow you to forever forget about the inconveniences associated with changing network settings.
If you yourself are not very good at configuration skills network settings, then you can always ask your friends or colleagues (for example, an office system administrator :)) to do this just once, and then always enjoy uninterrupted access to the Internet!
Afterword
IN modern world, probably, there are practically no people left who would not use one way or another computer equipment. Most people today have more than one PC at home... Moreover, the second computer is most often a laptop.
Still, if modern capabilities With almost universal access to the Internet, laptops are so far the most successful solutions for replacing a full-fledged office (and even multimedia) PC.
However, all the variety of options for connecting to the Internet has one (and sometimes very significant) drawback - the need to change the connection settings every time.
Let's say you use a laptop as a work machine at home, in the office and with friends. At the same time, at home you “sit” on an ADSL connection, at work on a “local” connection, and with friends on a “dedicated” connection. Your laptop also has Wi-Fi, which can be used to surf open networks...
And for each case, you have to go into Network Connections every time and tinker with the settings! Scary? Of course :) But today we learned how to rid ourselves of this nightmare once and for all with the help of a fairly simple, but practically irreplaceable utility, NetSetMan.
P.S. Permission is granted to freely copy and quote this article, provided that an open active link to the source is indicated and the authorship of Ruslan Tertyshny is preserved.
The CADE 2D vector editor for Windows was developed by a company specializing in working with CAD. The program allows you to easily create a detailed network diagram. One of the most useful features, in my opinion, is the ability to sign an IP address, serial number and the name of the manufacturer for each device on the network. CADE includes all the templates necessary for drawing up a diagram and is distributed absolutely free of charge.
Concept Draw Pro is one of the most powerful business tools for drawing diagrams, and not just for network diagrams. It takes a minimum of time to master the program - all operations are carried out by simple drag and drop. Concept Draw Pro includes complete set network symbols, and all aspects of the diagram can be personalized. The application costs $249.

Dia is open source diagramming software, the main disadvantage of which is its outdated interface and primitive character set. But the program is very easy to use without being distracted by any extraneous tasks. Dia is free and works on almost all desktop systems. Linux distributions.

Diagram Designer is another free utility with an outdated interface, but very easy to use, which will surely appeal to many users. Unlike Dia, the program offers much more wide choice symbols and icons. The only thing I didn't like about Diagram Designer was the need to draw connections between computers manually, because the program uses a free-form shape to do this. Apart from this small drawback, DD is a completely decent solution.

eDraw Max is one of the best tools on this list, with the exception of Visio, of course. The program is easy to learn, has a convenient, and, moreover, the most modern user interface from all the options listed. eDraw Max is a fully functional business diagramming tool for any purpose, not just network diagrams. The cost of the solution is $99.95 per license, and the more licenses, the cheaper each of them.

There are some incredibly bad programs, and GoVisual Diagram Editor is one of them. It is a difficult tool to use and produces less than satisfactory results. Although it can still be used to create a network diagram, it will not be particularly readable because the GoVisual Diagram Editor is missing some useful features- in particular, icons of network devices. But if someone needs a free diagramming program for any purpose, GoVisual is just the right option because it comes for free.

I would include LanFlow among the best. The program has an excellent interface, offers a rich selection of network objects and allows you to easily create local, telecommunications, external network diagrams, as well as computer diagrams. LanFlow even provides two different network diagram templates: 3D and black and white. To create a diagram, just select a template and drag suitable objects onto it, which can be grouped, deleted, and so on. A single-user license for the program costs $89, so LanFlow can rightfully be called one of the best budget alternatives to Visio.

Although NetProbe can be used for mapping, its primary purpose is to monitor network devices in real time. But the main advantage of NetProbe as a diagramming tool is that network devices can be added to the diagram as needed, even in advance. There is no need to do this manually - the built-in NetProbe component automatically scans the network and compiles a list of all devices available on the network. The Standard version is free, but can only track eight hosts. The Pro version costs just $40 for up to 20 hosts, while the Enterprise version, which can monitor up to 400 hosts, is priced at $295.

Network Notepad (literally "network notepad") is exactly what its name suggests - a notepad for drawing up network diagrams. But despite its apparent simplicity, the program has rich capabilities, including interactive functions (Telnet, network browsing, pinging, etc.). Network Notepad has a simple drag-and-drop interface and can automatically discover Cisco devices. The program is distributed free of charge.

Visio is, of course, the de facto standard in the Windows diagramming application market. The program makes it easy to create beautiful network diagrams and share them via a web browser. Visio includes a rich set of templates, including for data centers, help desks, network racks; for office consolidation, enterprise-wide network planning, data center or home office; for drawing up a fault tree, heating, ventilation, air conditioning plan, etc. Visio - best solution for drawing up network diagrams, and therefore it is not cheap: $249.99 for the Standard version, 559.99 for Professional and 999.99 for Premium 2010. You can read more about the capabilities of the versions at official page Visio.

| Materials |
Programs necessary for working on the Internet, including for browsing websites, receiving and sending mail or text messages, as well as for transferring files over the Internet.
Browsers
Browsers - special programs to browse the Internet.
Messengers
Programs for communication and communication over the Internet or local networks.
Mail clients
Programs for sending and receiving email.
Download Managers
Programs for managing file downloads, allowing you to resume them in the event of a connection break.
p2p clients
Programs for receiving files from networks using p2p technology.
FTP clients
Programs for transferring files via FTP.
Browser Add-ons
Various programs that are built into browsers and expand their functionality.
10. Classification and characteristics of computer viruses. Methods of protection against computer viruses.
Computer virus is a specially written, small-sized program (i.e., a certain set of executable code) that can “attribute” itself to other programs (“infect” them), create copies of itself and inject them into files, system areas of the computer, etc. .d., and also perform various unwanted actions on the computer. Much is known in various ways classification of computer viruses. One way to classify computer viruses is to divide them according to the following main characteristics:
habitat
features of the algorithm
methods of infection
degree of impact (harmless, dangerous, very dangerous)
Depending on the environment, the main types of computer viruses are:
Software viruses (affect files with the extension .COM and .EXE)
Boot viruses
Macroviruses
Network viruses
Software viruses is a malicious program code that is embedded inside executable files (programs). Viral code can reproduce itself in the body of other programs - this process is called replication. After a certain time, having created a sufficient number of copies, a software virus can proceed to destructive actions - disrupting the operation of programs and operating system, deleting information stored on the hard drive. This process is called a virus attack. Boot viruses- do not strike program files, A boot sector magnetic media (flexible and hard drives). Macro viruses– affect documents that were created in application programs, having the means to execute macro commands. Such documents include documents from the word processor WORD and spreadsheet processor Excel. Infection occurs when a document file is opened in a program window, unless the ability to execute macro commands is disabled in the program. Network viruses are sent from computer to computer, using for their distribution computer networks, email and other channels.
Computer viruses are classified according to their operating algorithms:
Worms (sent from computer to computer via computer networks, email and other channels)
Invisible viruses (Stealth viruses)
Trojan horses
Programs are mutants
Logic bombs
Currently the most common types malware include: worms, viruses, Trojan horses.
It is advisable to prevent viruses from appearing on your PC, but if your computer is infected with a virus, it is very important to detect it. The main signs of a virus appearing on a PC:
slow computer performance
freezes and crashes in the computer
changing file sizes
reducing the size of the free RAM
significant increase in the number of files on the disk
disappearance of files and directories or corruption of their contents
changing the date and time of file modification
And other signs.
Methods of protection against computer viruses One of the main ways to combat viruses is timely prevention. To prevent virus infections and Trojan horse attacks, you must follow some recommendations:
Do not run programs received from the Internet or as an attachment to an e-mail message without checking for viruses.
You should check all external drives for viruses before you copy or open the files they contain or boot your computer from such drives.
It is necessary to install an antivirus program and use it regularly to scan computers. Promptly update your antivirus program database with a set of virus signature files as soon as new signatures appear
It is necessary to regularly scan your hard drives for viruses. Scanning usually occurs automatically every time you turn on your PC and when you place an external drive in the reader. When scanning, an antivirus program looks for a virus by comparing the program code with the codes of viruses known to it, stored in the database
create strong passwords so that viruses cannot easily guess the password and gain administrator permissions. Regular archiving of files will minimize the damage from a virus attack
The main means of protecting information is backing up valuable data that is stored on hard drives
There are quite a lot of antivirus protection software available. Modern antivirus programs consist of modules:
Heuristic module – to identify unknown viruses
Monitor – a program that is constantly located in the PC’s RAM
A control device that runs anti-virus programs and updates the virus database and components
Mail program (checks email)
Scanner program – checks, detects and removes a fixed set of known viruses in memory, files and system areas of disks
Firewall – protection against hacker attacks
The most effective and popular anti-virus programs include: Kaspersky Anti-Virus 7.0, AVAST, Norton AntiVirus and many others.
List of sources used:
- browser - web browser (for example, Internet Explorer). The browser contains the following tools: a program for working with by email(reading, creating, editing and sending email messages); a program for working with a news server (subscribing to a news group, reading news, creating and forwarding messages), a text editor;
- HTML editors – editors designed to create web pages;
- graphical web tools – tools designed to optimize graphic elements of web pages;
- machine translators – software, used to view web pages in various languages;
- antivirus network programs – programs used to prevent software viruses from entering the user’s computer or spreading it across the company’s local network.
- service programs – programs that expand the capabilities of the OS, providing the user and his programs with a set of additional services;
- system maintenance – a system that facilitates diagnostics, equipment testing and troubleshooting in a PC.
- WS local resource management tools – functions for distributing RAM between processes, scheduling and dispatching processes, managing processors in multiprocessor machines, managing peripheral devices and other functions for managing local OS resources;
- means of providing own resources and services in common use – server part of the OS (server). These tools provide, for example, file and record locking, which is necessary for their sharing; maintaining directories of names of network resources; processing requests remote access to your own file system and DB; request queue management remote users to their peripheral devices;
- means of requesting access to and use of remote resources and services – client part of the OS (redirector). This part recognizes and forwards requests to remote resources from applications and users to the network. In this case, the request comes from the application in local form, and is transmitted to the network in another form that meets the server's requirements. The client part also receives responses from servers and converts them into a local format, so that for the application the execution of local and remote requests is indistinguishable;
- OS communication tools, with the help of which messages are exchanged on the network. This part provides addressing and buffering of messages, selection of the message transmission route over the network, transmission reliability, i.e. is a means of transporting messages.
Solomenchuk V. Internet: Short course. – St. Petersburg: Peter, 2002.
Guk M. IBM PC hardware. / St. Petersburg, St. Petersburg, 1999
Kaspersky E. Computer viruses in MS-DOS. / M., “EDEL” - “Renaissance”, 1992.
Explanatory dictionary of computer technology. / St. Petersburg, LLP “Channel Trading LTD”, 2000.
Workshop on economic informatics: Textbook in 3 parts - M.: Perspective, 2002.
Basics of working on personal computer: Tutorial/ ed. prof. A.V. Yurkova. – St. Petersburg: NIIMM, 2004.
Khoroshilov A.V., Seletkov S.N. World information resources: Textbook. – St. Petersburg: Peter, 2004.
Potapkin A. Basics of Visual Basic for the Microsoft Office package. M., 1996.
Dubnov P.Yu. Access 2000. Database design. Eco 2000.
Reitinger M., Much G. Visual Basic 6.0. Student library. BHV 2000.
Kopylov V.A. Information law. M., “Yurist”, 1997.
Kolesnichenko O.V., Shishkin I.V. PC hardware. St. Petersburg: BHV-Petersburg, 2004. – 1152 p.
Stang D., Moon S. Secrets of network security. / K., “Dialectics”, “Information Computer Enterprise”, 1996.
Platonov Yu.M., Utkin Yu.G., Ivanov M.I. Computer Science (with CD). Series "Student's Library". – M.: SOLON-Press, 2004.
Network software- This is software that allows you to organize the user’s work on the network. It is represented by general, system and special software (Fig. 6.5).
Rice. 6.5.
General network software includes:
TO system software include:
operating system - an obligatory part of the system software, guaranteeing effective
operation of the computer in various modes, organizing the execution of programs and the interaction of the user and external devices with the computer;
Special network OS designed for network management. According to its organization, this type of network operating system can be divided into peer-to-peer (Peer-To-Peer Network) and with dedicated server (Dedicated File Server Network).
Peer-to-peer operating systems include such network operating systems as NetWare Lite, Personal NetWare (Novell), Windows For Workgroups (Microsoft), LANtastic (Artisoft).
Network operating systems
IN network OS There are several parts:
Built-in OS administration tools are not always convenient or often do not have sufficient functionality, so the system administrator's arsenal is replenished over time with useful utilities, add-ons and scripts that significantly simplify everyday tasks. It is doubly gratifying when the solution found not only helps to cope with a specific problem, but is also distributed free of charge.
Advanced IP Scanner
The system administrator must know everything about the systems running on the network and quickly gain access to them. Advanced IP Scanner, designed for fast multi-threaded scanning of a local network, helps to cope with this task. AIPS is provided completely free of charge, without any reservations. The program is very simple and easy to use. After starting, AIPS checks the IP addresses of the network interfaces of the host on which it is installed and automatically enters the IP range into the scanning parameters; if the IP does not need to be changed, then all that remains is to start the scanning operation. As a result, we get a list of all active network devices. For each, all possible information will be collected: MAC address, network card manufacturer, network name, user registered in the system, available shared resources and services (shared folders, HTTP, HTTPS and FTP). Almost all scanning options can be customized, such as changing the speed or excluding scanning of a certain type of network resource (shared folders, HTTP, HTTPS and FTP). You can connect to any resource with one click; you just need to mark it in the list. AIPS is integrated with the Radmin program and during the scanning process it finds all machines running Radmin Server. The scan result can be exported to a file (XML, HTML or CSV) or saved in “Favorites” (drag-and-drop supported). In the future, if you need to contact the desired client computer, you do not need to scan the network again. If the remote device supports Wake-on-LAN, you can turn it on and off by selecting the appropriate menu item.
NetWrix, a company specializing in developing solutions for auditing changes in IT infrastructure, offers ten free and very useful utilities designed to significantly simplify the administration of Windows OS. For example, NetWrix Inactive Users Tracker allows you to solve one of the pressing security problems - the presence of inactive accounts that no one uses for some time (fired employees, business trips, job transfers, temporary accounts, etc.). HR personnel rarely warn the IT department about changes, and such an account can easily be used by an attacker. The utility periodically checks all accounts in domains and reports those that have not been accessed for a certain time. IN Free versions As an action, it is possible to specify only a warning by e-mail (it is enough to set the SMTP parameters), the admin performs all other operations manually, although a warning is sufficient in our case. Available in the paid version: automatic installation random password, deactivation account and moving to another OU, OU filter to search for accounts. A PowerShell cmdlet get-NCInactiveUsers is separately offered, which allows you to get a list of inactive users (the “lastLogon” attribute is checked) and simplify the writing of corresponding scripts.

WinAudit Freeware
WinAudit is a free utility from Parmavex Services that allows you to perform a full system audit. Does not require installation, can be executed in command line mode. The program has a simple and localized interface; it can be launched on all Windows versions, including 64-bit. Data collection takes approximately a minute (the duration of the process may vary depending on the operating system and computer configuration), and the resulting report consists of 30 categories (customizable). As a result, the administrator can receive data about the system, installed software and updates, indicating the version and vendor, connected devices; a list of open network ports (number, service, program, etc.) and open folders; active sessions; security installations; access rights to the periphery; information about accounts and groups; list of tasks/services; startup programs; log entries and system statistics (uptime, memory, disk usage). You can also search certain files by name. For example, to find music and videos on the user’s hard drives, it is enough to specify the appropriate extensions (avi, mp3, and the like). The result can be opened as a web page, exported to a file of many popular formats (txt, XML, CSV, PDF) or to a database (using a wizard, all popular ones are supported: MS SQL, MS Access, MySQL, Oracle and others), send by e-mail and print.

Accounting for computers using CheckCfg
The problem of accounting for office equipment and software used is acute in any organization. It can be solved in different ways, one of the options is offered by developer Andrey TatukovCheckCfg. This solution periodically collects data about hardware, OS and programs, including CPU type, amount of RAM, disk space, S.M.A.R.T. status. and so on. At the same time, CheckCfg easily copes with several hundred computers. The result is displayed in a convenient tree form, and local directories are easy to access. Each PC can be assigned an inventory number, and if necessary, it is easy to generate a report in RTF format.
CheckCfg is a whole complex of programs. CheckCfg is responsible for directly collecting data about the computer, which runs when the OS starts and writes the result to a file. Information is managed and archived using the Sklad accounting program, which processes the files created by CheckCfg and saves them into its database, after which reports can be generated. Using the Sklad_w program, you can conveniently view current computer configurations and basic data on office equipment (by IP addresses, CPU, Memory, software). To analyze changes in the PC configuration and notify the administrator about this, another utility is used - Doberman. Perhaps the setup will not seem entirely trivial, since you have to manually create the necessary configuration files, but the detailed description on the site and the available templates allow you to figure everything out without any problems.
MailArchiva Open Source Edition
Some mail servers, like MS Exchange, have mail archiving functions that allow you to find old messages if necessary, including to identify leaks of confidential information when investigating incidents. In other cases, you have to provide these functions yourself. A possible solution is the development of MailArchiva, compatible with most modern mail servers(Lotus Domino, MS Exchange, MDaemon, Postfix, Zimbra, Sendmail, Scalix, Google Apps). Archiving via SMTP, IMAP/POP3, WebDAV and through Milter protocols is supported (the program has a built-in SMTP and Milter server, IMAP/POP client). To avoid collecting all mail, you can create any archiving rules. Three levels of access to saved data are implemented - user (only your own mail), administrator (settings and your own mail) and auditor (all mail, can be limited by rules). The Open Source version of MailArchiva also includes intuitive search functions, including attachments (Word, PowerPoint, Excel, OpenOffice, PDF, RTF, ZIP, tar, gz). MailArchiva runs on Windows, Linux, FreeBSD and Mac OS X.
Performance Analysis of Logs
In case of problems with system performance, detect the bottleneck using standard Windows Performance Monitor is quite difficult without experience. In order to figure out what metrics need to be taken and how to correctly interpret the result, you will need to carefully scour the documentation. The PAL (Performance Analysis of Logs, pal.codeplex.com) utility greatly simplifies the search for bottlenecks. Once launched, it looks at logs and analyzes them using built-in templates. Currently there are settings for most popular MS products - IIS, MOSS, SQL Server, BizTalk, Exchange, Active Directory and others. After launch, the administrator in the PAL Wizard activates the necessary counters by simply selecting a template from the list of proposed ones, indicates the current server settings (number of CPUs, etc.), the analysis interval and the directory for saving the result. After some time, a detailed report will be issued in HTML and XML, containing a description, counter name and indicators (Min, Avg, Max and Hourly Trend). The report can then be easily copied into any document. But you will still have to further understand the collected parameters yourself. Although if PAL shows that the characteristic is in the green sector, there is no need to worry. The request itself is saved in the PowerShell script PAL.ps1, which can be saved for later use. Templates are XML files; Taking any of them as an example, you can create your own version. The built-in PAL Editor is available for editing parameters in the template.

Officially supported by Win7, but works on all OS from MS, starting with WinXP (32/64). To install you will need PowerShell v2.0+, MS. NET Framework 3.5SP1 and MS Chart Controls for Microsoft .NET Framework 3.5.
Create an access point with Virtual Router
The situation when a computer with a Wi-Fi card needs to be turned into an access point is by no means uncommon today. For example, you need to quickly deploy a WLAN or expand your Wi-Fi coverage area. Initially work wireless card was provided in only one of two modes: point-to-point, when clients connect to each other, or as an access point. In Win7/2k8 (except Win7 Starter Edition), it became possible to virtualize network connections (Virtual Wi-Fi technology), which allows you to create several Wi-Fi modules with your own settings using one physical Wi-Fi adapter. In this way, the computer can be connected to Wi-Fi and at the same time act as an access point (SAPoint, Software Access Point). The connection to such a virtual hotspot is protected using WPA2. You can turn a PC running Win7/2k8R2 into an access point using the Netsh console utility, through the Network Control Center and shared access, or using the Virtual Router application, which has an intuitive GUI and very simple settings. After starting Virtual Router, you just need to specify the SSD and password for the connection, and then activate the access point. If necessary, you can also stop the hotspot by pressing one button. Additionally, the window displays the current connections to the point; for each you can set its own icon and change some parameters.
Managing RDC connections - RDCMan
For remote management of servers and PCs running under Windows control, the Remote Desktop Connection snap-in is intended. If you need to establish many RDP connections with different settings, then working with it becomes inconvenient. Instead of methodically saving individual settings for each remote computer You can use the free Remote Desktop Connection Manager RDCMan tool to automate this process. After launch, you should specify the RDP connection settings, which will be used by default and inherited by all connections. Here we set general credentials, gateway, screen settings, security settings and much more. Next, we create the required number of system groups (for example, by purpose, location, OS version), for each of them you can specify specific connection settings. And the last step is to populate the groups with systems. To add a server you only need to enter domain name, if any parameter differs from the group settings, it can be redefined immediately. If necessary, systems can be easily moved between groups by simply dragging and dropping. If there are many systems, it is easier to create a text file, specifying one name per line, and then feed the workpiece to the utility. Now, to connect, just select required server and in context menu Click the “Connect” item. You can activate multiple connections at the same time and switch between them.
Free Active Directory Tools
Managing Active Directory settings using standard tools is not always easy or convenient. In some situations, a set of utilities Free Active Directory Tools, developed by ManageEngine, will help. The kit consists of fourteen utilities launched from one shell. For convenience, they are divided into six groups: AD USer Report, SharePoint Report, User Management, Domain and DC Info, Diagnostic Tools and Session Management. For example, running Empty Password User Report will allow you to get a list of accounts with empty passwords, GetDuplicates will get accounts with the same attributes, CSVGenerator will save Active Directory account data to a CSV file. Other features: report last logon time, retrieve data from AD based on a query, report on SharePoint installations, manage local accounts, view and edit domain password policies, get a list of domain controllers and their roles, manage their replication, monitor them work ( CPU load, RAM, hard drives, performance, etc.), terminal session management and much more.
Comodo Time Machine
The ability to restore the system using the System Restore component is built into Windows, starting with XP, but its functionality, to put it mildly, is limited, so it is often used for backup third party applications. Free Comodo utility Time Machine(comodo.com) allows you to roll back the OS to any previous state. Moreover, it will work even if the OS has completely stopped loading. During the process, CTM creates recovery points (manually or on a schedule), all changes are entered into them system files, registry, and user files. This is a big advantage over System Restore, which saves and restores only system files and the registry. The first copy has the maximum size; the remaining copies store only changed files. In order to save free disk space, you should periodically create a new checkpoint by deleting old archives. To make it possible to restore the OS, information about the CTM is written to the boot sector; To call the corresponding menu, just press the Home key. You can also restore the OS state according to a schedule, for example, configure the behavior of the utility so that every time you reboot, an automatic rollback to a “clean” version of the system is performed. This will be useful, for example, in an Internet cafe, where users leave a lot of garbage in the system. In addition to completely restoring the OS, the utility provides the opportunity to obtain more from the archive earlier version any file. Search is implemented, so you can find the necessary data without any problems.
Amanda
The task of centralized backup data from workstations and servers running Windows and *nix can be resolved using AMANDA Advanced Maryland Automatic Network Disk Archiver). Initially, the program was created to work with tape drives, but over time the developers proposed a mechanism called “virtual tapes” (vtapes), which allows you to save collected data to hard drives and CD/DVDs. AMANDA is a convenient add-on to the standard Unix dump/restore programs, GNU tar and some others, so its main characteristics should be considered based on the capabilities of these basic utilities. It works according to a client-server scheme. All available authentication methods are used to access computers: Kerberos 4/5, OpenSSH, rsh, bsdtcp, bsdudp or Samba password. To collect data from Windows systems, a special agent or, alternatively, Samba is used. Compression and encryption (GPG or amcrypt) of information can be performed both directly on the client and on the server. All settings for reservation parameters are made exclusively on the server; the delivery includes ready-made templates, so it’s quite easy to understand.
Core Configurator 2.0 for Server Core
The initial setup of a server running Win2k8/R2 in Server Core mode is done in the console using commands. To simplify the task, OS developers added an interactive script SCONFIG.cmd to R2, which allows you to configure basic system parameters. An alternative is available on Codeplex - a wonderful configurator Core Configurator. For it to work you will need the components NetFx2-ServerCore, NetFx2-ServerCore and PowerShell. After running Start_CoreConfig.wsf we get a menu, in it we find several items that provide access to basic settings that would have to be managed from the command line: product activation, setting screen resolution, clock and time zone, network interface, setting permissions for remote RDP connections, managing local accounts, Windows Firewall settings, enabling/disabling WinRM, changing the computer name, working group or domain, setting up roles, components, Hyper-V and running DCPROMO. If you check the “Load at Windows startup” checkbox, the program will load along with the system.
Exchange 2010 RBAC Manager
Exchange 2010 introduces a new role-based access model that allows you to finely control the level of privileges for users and administrators depending on the tasks performed. The only negative is that built-in management tools using PowerShell cmdlets may not seem convenient and understandable to everyone. More advanced capabilities are available in the free Exchange 2010 RBAC Manager tool (RBAC Editor GUI, rbac.codeplex.com), which offers a clear graphical interface for configuring the properties of all roles. Understanding its features will not be difficult even for a beginner. The program is written in C# and uses PowerShell. To work you will need Exchange 2010 Management Tools installed.
PowerGUI
As soon as it appeared, the PowerShell command shell won the sympathy of Windows admins, who had long been in need of a tool that would automate many tasks. With the first versions of PowerShell, Microsoft developers were unable to offer a more or less functional editor, so several third-party projects filled the niche. The best of them today is PowerGUI, which provides a convenient graphical interface for effectively creating and debugging PowerShell scripts. At the same time, the authors offer ready-made sets of scripts for solving many problems - they can be used in your developments.
Multi-Tabbed PuTTY
The free PuTTY client is well known to administrators who need to connect to remote hosts via SSH protocols, Telnet or rlogin. This is very convenient program, which allows you to save session settings for quick connection to the selected system. The only inconvenience is when large quantities connections, the desktop turns out to be loaded with a lot open windows. This problem is solved by the Multi-Tabbed PuTTY add-on, which implements a tab system.
INFO
PuTTY was originally developed for Windows, but was later ported to Unix.Conclusion
Often there is no need to rack your brains over solving a certain problem: most likely, other administrators have already encountered it and offered their own option - a specific utility or script for which you don’t even have to pay.
Problems

