The Internet is an integral part of our life. Lack of network is a serious problem for the user. You don't always have time to call your provider, but fortunately, you can troubleshoot problems yourself. Below you will read about common causes of Internet problems and how to fix them.
Possible reasons for the lack of Internet on Windows 7
There are several reasons for the lack of Internet. Some of them relate to computer drivers and its equipment, others affect system errors and the lack of correct network settings.
The most common reasons for lack of Internet:
- mechanical damage to the cable or ports;
- absence network card or its drivers;
- incorrect connection settings on the computer or router;
- presence of virus software.
Internet may also be absent due to debt on personal account or due to a line failure. Before attempting to troubleshoot problems, check to see if these issues are causing them.
How to check network status
Among the problems with the Internet, we can highlight those that are most common and occur periodically for most users. Resolving them can be very simple. The first thing to do is check the network status.
You can do this in two ways:
In both cases, your network status will be described below your network icon.
Unidentified network without internet access
If the computer “sees” the network and connects to it, but does not gain access to the Internet, the network status will be called “Unidentified network. Without access to the Internet." What to do in this case?
 The computer “sees” the network and connects to it, but does not gain access to the Internet
 Reboot the router
If you have a router installed, the first thing to do is reboot it. It may simply not have time to update the data, and because of this, access to the network will be lost. The reboot is performed in the following order:
- First, the router is disconnected from the network. It is important to unplug the cord from the outlet, and not to reboot using the button on the equipment - you need to stop the flow of electricity for a while.
- Then the router should be left turned off for 10–15 seconds.
- After this, the router is connected back to the network and wait until the indicators on it light up.
After the indication appears on the router, you can check whether Internet access is available. Usually, after a reboot, the Internet appears within 7–10 seconds.
Checking network settings
Network settings are data that allows the computer to connect to the network distributed by the provider. These settings are issued by the company providing Internet access (usually they are specified in the service agreement). Sometimes the settings on your computer go wrong, and because of this, the device cannot connect to the Internet.
In order to check the network settings, you need to open “Protocol Properties”. You can do it like this:
- Go to “Control Panel” through the “Start” menu.
 "Control Panel" is located in the right "Start" menu
 - Select "Network and Internet".
 In order to find required section, you should select the “Category” view option in the upper right corner of the screen
 - Open the "Network and Sharing Center" section shared access».
 In the Network Control Center you can check the connection status, create a new network, and carry out almost any action with your Internet connection
 - On the left, find the “Change adapter settings” section.
 Find the section "Change adapter settings"
 - In the list of networks, select the one you need, right-click on it and find the “Properties” item. Only an administrator can open Properties.
 Desired network will be called “Connecting via local network" or "Ethernet"
 - In the list, find the item “Internet Protocol Version 4”, select it by pressing the left mouse button once. After this, the “Properties” button under the list is activated, you need to click on it.
 Selecting an item is done by clicking the left mouse button once. There is no need to uncheck the box next to the item.
When the window is open, you still need to understand what settings should be entered. There are three options:

Let's figure out what the IPoE and PPPoE protocols are, but we won't go into terminology. It is enough to understand what protocol is used on your communication line. To do this, just look at the network settings issued by the provider (specified in the contract).
The settings can be the following:
- password and login are used on the PPPoE protocol,
- IP address, subnet mask, gateway and DNS are used on IPoE.
If you are using PPPoE and you are connected directly, that is, you are not using a router, after checking the settings through the protocol properties, you need to recreate the network.
- Return to Network and Sharing Center.
 This way only PPPoE connection is configured. To configure a wired IPoE connection, use the protocol properties
 - Open the “Create and configure a new connection” item.
 Switching items is done by single-clicking the left mouse button
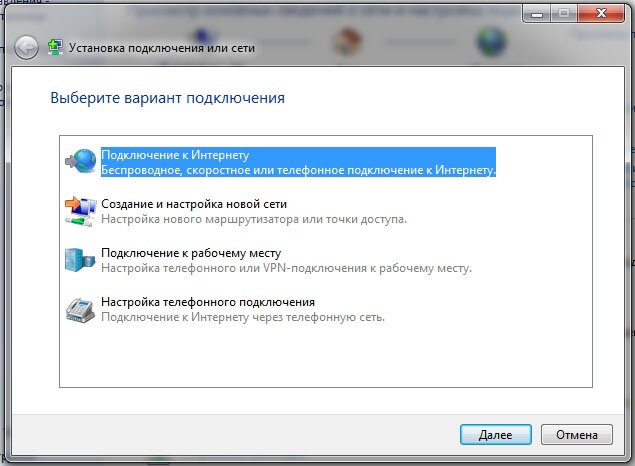
 - Select "Create and Configure" new network" and click "Next".
 The selected item will be highlighted with a bright blue background
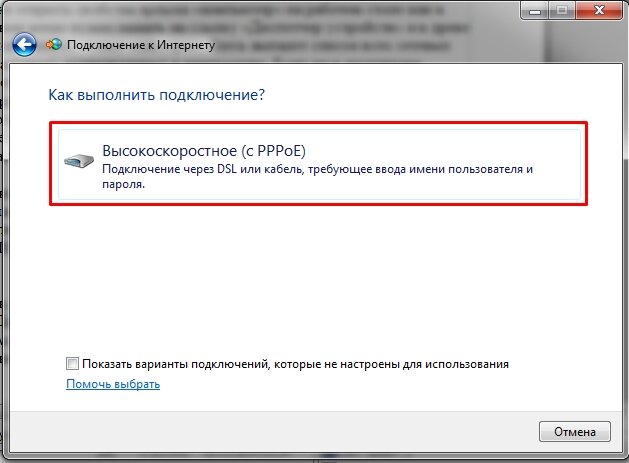
 - Click on the "High Speed" option.
 Waiting for search available connections may take a few minutes
 - If an error appears, select “Create the connection anyway.”
 This error appears quite often, but a connection can still be created
 - Next, you will need to enter the network settings, as well as the network name - this is the name of the connection. You can use the name of the provider company or something else.
 The connection name is its name, and the username and password are the network settings. It's worth noting that the password has nothing to do with the Wi-Fi key
After this, the network will be reconfigured, and you will only have to check whether you have access to the network.
Video: checking network settings on your computer
Resetting TCP/IP Settings
Sometimes problems can be caused by internal system errors. TCP/IP - set network protocols, responsible for data transfer. You can reset it as follows:

Checking drivers
The reason for the lack of access may be outdated drivers (usually this problem is associated with a recent update of the operating system). Let's check their condition.

In addition, by right-clicking on the driver name, you can select “Uninstall”, and then restart the computer. Then when you turn on the system will automatically install the missing driver.
 After removing the drivers and restarting the computer, the system will automatically install suitable drivers
 If there is an exclamation mark next to the driver icon, you will need to completely reinstall the drivers and check the functionality of the network card installed in the computer.
The default gateway is not available
Network diagnostics will help you detect the following problem. Right-click on your connection icon and select “Troubleshooting”.
 By right-clicking on the icon you can open the “Network and Sharing Center”
 If you receive a message about the gateway being unavailable after performing a system diagnostic, the following steps may help.
Prohibit disabling the network adapter to save energy
Sometimes the system turns off the network adapter - the device that allows you to connect to the Internet - to save power. Try disabling this option.
- Find "Device Manager" through the search bar in the Start menu.
 Opening "Device Manager" through search is not the only way, but it is the most convenient
 - Expand the “Network Adapters” tab, select the one you need, and right-click on it.
 IN context menu click on “Properties”
 - Select "Properties" and open the "Power Management" tab.
 Changing these settings will help solve the problem of the Internet disconnecting after the computer goes into sleep mode
 - Uncheck the box next to “Allow the computer to turn off this device to save power” and save your data.
 After changing the settings, do not forget to save them by clicking on the “OK” button
Updating or reinstalling drivers
You can also update drivers through Device Manager: expand the Network Adapters tab, right-click on the network driver and select Update or Uninstall, then restart your computer.
If the action does not help, you can download drivers from their manufacturers' websites and install them yourself. Typically, manufacturers offer to download drivers from file format".exe", so to install you will only need to run the downloaded file and accept the agreement.
Video: how to reinstall drivers yourself
When connecting to the Internet through a router, error 651 occurs
This error occurs when trying to connect using the PPPoE protocol. It is rare, but it happens that users create a new high-speed connection while the provider is using the IPoE protocol. Therefore, first of all, make sure that you are using the PPPoE protocol.
After this, you will need to recreate the connection. The process is described in detail in the “Checking network settings” section (all you need to do is create a new connection through the “Network Control Center”). If this doesn't help, read on.
Disabling antivirus
Sometimes antivirus programs block access to the Internet. Often the solution to the problem is to disable the antivirus. Right-click its icon in the Control Panel and select Disable. Sometimes antiviruses block access to the network even in a “sleep” state, so you can try not only disabling, but also completely removing this software. If this action helps, please report the situation to antivirus technical support.
Problems with the router
The cause of the problems may be several problems related to the router:
- incorrectly connected cable;
- incorrectly entered settings.
First try the following:
- Disconnect the router from the network.
- Without connecting the router, unplug the network cable from it and plug it back into the WAN/INTERNET port, making sure that the plastic clip on the plug clicks when connected.
- If the cable goes from the router to the computer, disconnect it from the LAN connector on the router itself and from the network card connector on the computer, and then connect it back.
- Connect the router to the network.
If access does not appear, check the network settings entered on the router. In order to log into the router, you will need to use any browser (in address bar) enter “192.168.1.1” or “192.168.0.1”. Sometimes the address at which you can log into the router is different, so if you cannot log in through the specified addresses, check the information in the instructions.

Files cannot be downloaded from the Internet
It may also happen that Internet access is active, but files are not downloaded. This problem is usually associated not with the Internet itself, but with the computer and software.
What you can try:
- try to download a file from another source - perhaps you are unable to download something simply because the resource does not support downloading;
- try downloading through other browsers;
- check your computer for malware using any official antivirus.
Multimedia does not work on the Internet
It happens that the Internet works, but video or audio materials are not played. What to do in this case? First, check if the files downloaded to your computer are playable. Perhaps the cause of the problem lies directly in the computer's sound settings. If files are played from your computer, but not from the Internet, read on.
The first thing you need to do is understand why this problem occurs. It may be a browser error or lack of plugins. To get your computer working properly, do the following:

PPPoE diagnostics
Additionally, in order to find out the causes of errors when using PPPoE, you can use the Troubleshooting Center. Then the system will independently check for errors and offer possible solutions.
PPPoE (Point-to-Point Protocol over Ethernet) is a communication protocol over an Ethernet network that operates on a point-to-point basis and provides the user with a number of capabilities: encryption, authentication and data compression. It is necessary for the user authorization system, which makes it easier to track the time of provision and payment of network services.
Right-click the network connection icon and click the Diagnose Problems button. After this, an analysis will be performed, Windows will try to cope with the difficulties on its own, and then prompt you to perform several actions.
Error 619
Restart your computer and disable all security systems: antiviruses and Windows Firewall. The latter is disabled in the following way:

Error 633
There is only one solution:
- Restart your computer.
- Try connecting to the Internet again.
- Create a new connection.
Error 638
Main causes:
- damage network cable;
- malfunction of drivers or network card;
- incorrect connection settings;
- problems with network equipment(router);
- presence of viruses on the computer.
First of all, do two things: check the integrity of the cable and the presence of indications on the router. Never neglect these steps when you have problems with the Internet, so as not to waste time trying to solve a problem caused by mechanical damage.
It is clear that if the cable is damaged, you need to call the provider. But if there is no indication on the router (which indicates that the device is de-energized), you should try to reconnect the router to another outlet before replacing it.
After checking the functionality of the router and the integrity of the cable, check your computer for viruses with any antivirus program.
If the above does not help, recreate the network connection - check the correctness of the entered settings both on the router through its settings, and on the computer itself through the protocol properties. Both actions are described in detail in the previous paragraphs of the article.
Error 691
The only reason for error 691 to occur is an incorrectly entered password and login (network settings). Therefore, the first thing you need to do is recreate the connection. The process has already been described earlier - you need to go to the “Network Control Center”, select the “Create a new connection” option and then enter the correct network settings. After this, restart your computer and check your internet connection.
If the action does not help, report the problem to your provider. There may have been a line failure that caused the error.
Error 720
The easiest way to solve this problem is to reinstall operating system. To do this, just download from the site Windows file operating system on a disk (or purchase a disk in a store) and run it on the computer.
You can also try updating the TCP/IP protocol. The action is described above, but you can also perform a deeper operation by completely reinstalling the stack. Reinstalling the stack yourself is dangerous - you will have to work with system files, and their damage will affect the operation of the computer. Therefore, try simply updating the stack, and if the action does not help, contact your provider or professional technician for help.
Video: connection errors via PPPoE connection and their elimination
Network cable not connected
If, when checking the connection status, a message appears that the network cable is not connected, the first thing to do is actually check that it is connected correctly and is not damaged. If possible, try using a different network cable.
Make sure the cable is connected correctly. On the router, the network cable must be connected to the WAN or INTERNET port, and the cable leading from the router to the computer must be connected to the LAN connector. There is usually only one port on a computer, so it will be difficult to make a mistake.
 The WAN or INTERNET port is used to connect a network cable to the router, and the LAN ports are used to route cables to computers
 Next, check the status of the router (if you have one). Its indicators should light up as usual. If there is no indication, reconnect the router to another outlet, try resetting the settings on the router (using the “Reset” or “Reset” button) and entering them again. You should reset the settings only if you are confident that you can configure the router yourself.
Also check the status of the drivers network adapter and try updating them.
Video: checking the port on the network card and the WAN port on the router
Additional check of security settings
Security settings can also be to blame for many of these problems. This applies to the case when the PPPoE protocol is used. Therefore, if the proposed operations do not help solve your case, try checking your connection security settings.
- Open the "Network Connections" section.
- Right click on your connection.
- Open the “Security” section and set the use of “Unsecure Password” in the list that opens.
These are the main ways to diagnose connections on Windows 7 and troubleshoot problems. Do not forget that the reason for the lack of Internet may be a simple debt or a breakdown on the line. If the methods described above do not help you, contact your provider so that technical staff can diagnose and solve the problem on their end.
On the computer, after each reinstallation of OS Windows 7, you have to reinstall all programs, drivers and connect peripherals. But in the age unlimited internet, a person cannot imagine his existence without it. Therefore, the problem of connecting to the global network after reinstalling the operating system always remains relevant.
Connecting to the Internet via routers
Owners of routers (routers) are luckier, since all settings are stored directly on a separate device, so reinstallation is not a problem, and you just need to make sure that the network between the PC and the router is correctly configured. On Windows 7, you can check this in the Network and Sharing Center ( Start - Control Panel - Network and Internet - Network and Sharing Center). Next, in the left menu, follow the link “Change adapter settings”

and check that the “local network connection” item is active for the main network adapter:

You can check the name of the main network card in Device Manager. The easiest way to find it is to hold down the WIN+Pause key combination (the combination is supported in all versions of the OS, including Windows 7, Windows 8 and Windows 8.1).


and in the device tree you need to find the “Network adapters” sub-item. Here a list of all network cards (including virtual ones) installed in the computer will appear.

Another question is when there is not a single network card here, but there are unknown devices - install drivers for your network equipment.
If this does not help, check that you are installing the appropriate software. In the worst case, the network card does not work and needs to be replaced.
When the network connection to the router is established, the Internet connection is activated automatically.
Direct Internet connection using Windows 7 as an example
If you don’t look at the fact that now most providers provide Internet services without using a login and password (binding by MAC address is used and you just need to insert the cable into the PC), let’s take a closer look at how to set up and connect a computer to the Internet using a login and password (PPPoE protocol).
First you need to check how the network card works (checking the network connection). Next, go to: “Start - Control Panel - Network and Sharing Center.”
Here we select the item according to the picture:

In the next step, select “High-speed (with PPPoE)”:
After selecting the connection type, a window will appear with fields that need to be filled in accordingly and click the “Connect” button:
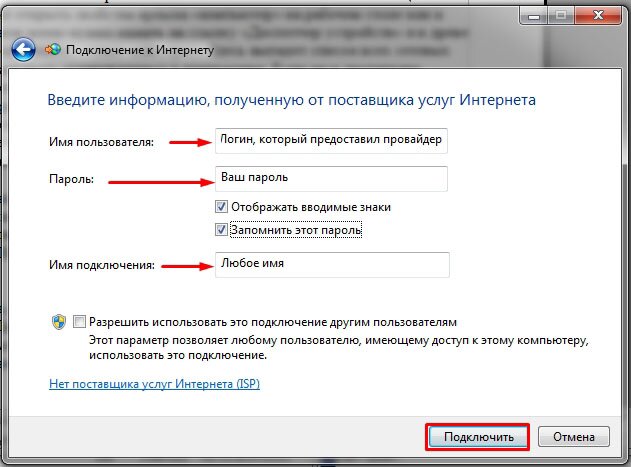
After filling in all the fields, the computer will attempt to connect using the previously entered data:

If no mistakes were made at the setup stage, you will be able to connect your Windows 7 computer to the global network right away. If, after all the steps, the Internet does not work, you need to delete the created connection and repeat the process again.
Another way to set up a direct connection on Windows 7
Some providers work using another parameter called “Service Name” to distribute the load between servers. It improves connection stability, but adds hassle to ordinary users.
If your desktop computer or laptop is connected to the Internet, then this may occur. unpleasant moment when you have access will be lost to the network, and the network connections icon in the notification area will be crossed out with a red cross. When you hover your cursor over it, a message will appear explaining everything. "No connections available". This happens especially often when using a Wi-Fi adapter. Let's find out how to solve a similar problem if you are using a PC with Windows 7.
There are quite a few reasons that can cause the problem we are studying:
- Real lack of available networks;
- Damage to the Wi-Fi adapter, router or modem;
- PC hardware failure (for example, network card failure);
- Software glitch;
- Lack of current drivers;
- Damage to the operating system;
- Virus.

Oh so trivial reason, we will not talk in detail about the real lack of available networks. This can only be “cured” by returning to the Internet accessibility zone or changing the connection method to one that is valid in the given area. There is also no point in talking too much about hardware faults. They can be eliminated either by a hardware repair technician or by replacing a failed part or equipment (Wi-Fi adapter, network card, router, modem, etc.). But we’ll talk in detail about the other reasons and ways to eliminate them.
Method 1: Standard diagnostics
First of all, if you experience the error discussed in this article, follow these simple steps:
- Unplug the Wi-Fi adapter from the computer connector and then connect it again;
- Reboot the router (it is better to do this by completely disconnecting it from the power supply, that is, you need to remove the plug from the socket);
- Make sure you have your Wi-Fi hardware switch turned on if you are using a laptop. It turns on different models laptops in various ways: either using a special switch on the case, or using a specific key combination (for example, Fn+F2).
If none of the above helped, then it makes sense to carry out a standard diagnostic procedure.


Unfortunately, this method helps in a fairly limited number of cases. Therefore, if you are unable to resolve the problem when using it, then proceed to the following methods, which are described below.
Method 2: Enable Network Connection
It is likely that the cause of the error may be a disconnected connection in the network connections section "Control Panels". Then you need to activate the corresponding object.
- Click "Start" and open "Control Panel".
- Go to section "Network and Internet".
- Go to "Network Control Center...".
- In the left part of the window that appears, click on the inscription "Changing adapter settings".
- The window that appears shows all configured for this computer network connections. Find an item that is relevant to you and look at its status. If set to "Disabled", then you need to activate the connection. Right-click on the object ( RMB) and select "Turn on".
- After activating the connection, the problem described in this article will most likely be resolved.


Method 3: Removing the adapter from Device Manager
If you connect to the Internet via a Wi-Fi adapter, then one of the ways to solve the problem is to disable it in "Device Manager", and then reactivation.
- Go to "Control Panel" by the method that was considered in the description Method 2, and then open the section "System and Security".
- Click on the one posted in the group "System" element "Device Manager".
- Will start "Device Manager". In the list of equipment types that opens, click "Network adapters".
- In the drop-down list, find the name of the equipment that you use to connect to the Internet. Click on it RMB. Carefully examine the context menu that appears. If it contains a clause "Engage", click on it. This will be enough and that's it further actions described in this method, you won't need to perform. The device was simply turned off, and now you have turned it on.

If the specified item is not present, then this means that the device is likely to malfunction. Therefore, it needs to be temporarily deactivated and then turned on. Click in the context menu "Delete".
- A dialog box will open warning you that the device will now be removed from the system. Confirm your actions by clicking "OK".
- The procedure for deleting the selected device will be performed.
- After that in horizontal menu click "Action", and then from the list that opens, click "Update configuration...".
- A search will be made for devices connected using the technology "Plug and Play". The network adapter will be reconnected, and its drivers will be reinstalled.
- Next, restart your PC. Perhaps after this the connection availability error will disappear.


Method 4: Reinstalling drivers
One of the reasons for the error we are studying is that incorrect or outdated network adapter drivers are installed in the system. Most often it occurs when connecting the device for the first time or after reinstalling the OS. Then the drivers should be replaced with a current analogue. It is advisable to use exactly those copies that were supplied on a CD or other media along with the device itself. If you do not have such media, you can download the required object from the official website of the adapter manufacturer. Using similar software from other sources does not guarantee a solution to the problem.
- Go to "Device Manager", using the same algorithm of actions as in the previous method. Open the section again "Network adapters" and click RMB by name desired device. In the list that appears, select "Update drivers...".
- Next, the shell for selecting the update method is activated. Select an option “Search for drivers...”.
- In the window that opens, you must specify the media and directory where the drivers will be installed. To do this, click "Review…".
- The shell opens "Browse folders". Here you need to indicate the folder or media (for example, CD/DVD) where the drivers supplied with the device or pre-downloaded from the official website are located. After selecting a directory, click "OK".
- After the directory address is displayed in the driver search window, you can proceed to install them by clicking the button "Next", but before doing this, make sure that opposite the parameter "Including subfolders" the checkbox has been checked.
- The necessary drivers will be installed, and the problem with the lack of Internet connection will probably disappear.


But what to do if for some reason you do not have the driver media that came with the device, and the company’s official website does not work? In this case there is additional features install necessary drivers, although they are recommended to be used only in the most extreme cases, since they do not 100% guarantee interoperability between the OS and the adapter. You can use the following options actions:


If your Internet does not start at all, then you will have to search and download from another device.
Method 5: Enable the service
If you use Wi-Fi to connect to the Internet, the problem we are investigating may occur due to a service outage "WLAN Auto Configuration". Then it needs to be activated.
- Go to the section "Control Panels" called "System and Security". This is discussed in the description Method 3. Click on the title "Administration".
- In the list that opens system tools choose "Services".

"Service Manager" can be activated in another way. To do this, dial Win+R and enter in the displayed area:
Then apply button click "OK".
- "Service Manager" will be open. To quickly find an element "WLAN AutoConfig Service", arrange all services in alphabetical order by clicking on the column title "Name".
- Find the name of the service you need. If the status is not set opposite its name "Works", then in this case it is necessary to activate. Double-click on her name with the left mouse button.
- The service properties window opens. If in the field "Startup type" set value "Disabled", then in this case click on it.
- A drop-down list will open where you need to select "Automatically". Then click "Apply" And "OK".
- After returning to the main interface "Service Manager" select the name "WLAN AutoConfig Service", and on the left side of the shell click "Run".
- The service will be activated.
- After this, the status will be displayed opposite its name "Works" and the problem with lack of connections will be solved.


Method 6: Checking system files
If none of the above methods help, then there is a possibility that the integrity of the system files has been compromised. In this case, it is necessary to perform an appropriate check and then restore if problems are found.
- Click "Start" and select "All programs".
- Open the folder "Standard".
- Find the element with the name "Command line". Click on it RMB. From the list of action options that appears, choose to run as administrator.
- Opens "Command line". Type into its interface:
Then click Enter.
- The procedure for scanning the integrity of system elements will be launched. Information about the dynamics of its passage will be displayed right there in the window. « Command line» in percentage terms. While this process is running, you should not close the current window, but you can minimize it. If violations in the structure are detected, a procedure for restoring missing or damaged files will be automatically performed.
- If, after completing the scanning procedure, a message appears informing you that recovery is impossible, repeat the entire process again, but this time you will need to.


Method 7: Eliminate viruses
The cause of the problem of the lack of available networks may be a virus infection of the computer. Some malware Internet access is specially disabled so that the user cannot use external assistance to remove them, while others simply arbitrarily “kill” or modify system files, which ultimately leads to the same result.
To remove malicious code, there is no point in using a standard antivirus, since it has already missed the threat, which means it will not react to the virus, and may also be infected by this time. Therefore, we recommend using specialized anti-virus utilities that do not require installation. One of best programs of this class is . It is best to check from another device or when starting from LiveCD/USB. This is the only way to ensure the maximum likelihood of detecting a threat.

If antivirus utility will discover malicious code, then in this case, follow the tips that will be displayed in its interface. There is a possibility that the virus has already damaged system files. Then, after eliminating it, it is necessary to carry out the appropriate check discussed in the description Method 6.
As you can see, the source of the problem with the availability of connections, and therefore with the performance of the Internet, can be a lot of different factors. They can be both external (real lack of network) and internal (various failures), caused by both the software and hardware components of the system. Of course, before fixing a problem, it is recommended to establish its exact root cause, but, unfortunately, this is not always possible. In this case, simply use the methods described in this article, checking each time whether the malfunction has been eliminated or not.
This article will talk about what to do if Window 7 does not connect to the WiFi network. The fact is that although this operating system is more stable than its predecessors, various errors may still occur that must be corrected manually.
Before moving on to connection problems and their solutions, you need to understand what WiFi is and how the technology works. This will allow you to fix some problems faster.
The fact is that to connect to such a network you need an access point. Its functions are usually performed by a wireless router. And therefore, first of all, if there are no available connections to the WiFi network in Windows 7, you should pay attention to the router.
As a rule, this is the reason. But of course, there are other problems. So, let's take it in order.
Checking the router
Everything is very simple here. If the laptop does not see available connections, then you should go to the menu WiFi settings router and check if the wireless network is turned on. To do this, you need to connect to the router using a regular Internet cable. After that, open a browser (any) and enter 192.168.0.1 in the address bar. Press "Enter". Next, a window will appear asking you to enter your password and login. As a rule, the default key and login are admin, admin, respectively.
How to easily find out the IP address of a WiFi router: Video
If you changed this data, then enter your values. Next we get to the settings menu. We are interested in NetworkWireless settings. In settings wireless network you need to check the box next to “Enable Wireless Router Radio”. That's it, setting up the router is complete. And if your laptop with Windows 7 still has problems with WiFi, then you should move on to setting up the operating system.
Why doesn't my computer see available wireless networks?
There can be many reasons for this, as well as solutions. Fortunately, Windows 7 is user-friendly and has many options for diagnosing and fixing problems. But we will consider only the most common ones.
The first thing you should check is the status of your WiFi wireless connection. To do this, you need to open the Network Control Center. To do this, click on the network icon in the tray and select “Network and Sharing Center” in the window that appears.
A menu will open in which all network-related settings are made. Here we are interested in the “Change adapter settings” item. In the window that opens, you need to find a shortcut called “Wireless Network Connection”. If this connection has gray, this indicates that it is turned off. To enable it, you need to right-click on it and select “Enable”.
Windows 7 won't connect to Wi-Fi: Video
The wireless network icon does not appear in the tray
Users often ask the question, what to do if the WiFi icon does not appear in the tray in Windows 7? This can only mean one thing - the module wireless communication turned off or not working. occurs, as a rule, using the key combination Fn + adapter power button. On different laptops, this button may be located in different places.
For example, on Asus laptops– this is the combination Fn+F2, on Lenovo – Fn+F5. The WiFi power key itself is indicated by a corresponding image. In addition, on some models, to activate the wireless connection module, separate key. In this case, just press it.
So, after turning on the wireless adapter, Windows 7 should automatically start searching for available networks. If this does not happen and the tray icon does not appear, then you should check that the drivers are working correctly.
What to do if a laptop with Windows 7 does not see Wi-Fi: Video
Checking drivers
You can check the software in Windows 7 in the task manager.
You can launch it by clicking on the “My Computer” shortcut, which can be found on the desktop, in the Start menu or in Windows Explorer, with the right mouse button. In the window that appears, click “Properties”. Next, a menu will open in which you need to open “Device Manager”.
In the window that appears, we are interested in network adapters. If you do not find this, then there are no drivers for the device and you need to install the driver for this module. If there is such an item, then open it. Typically, the wireless adapter is called Wireless Network Adapter. The device may also be designated exclamation point. This indicates that the driver is not working properly and needs to be updated or reinstalled.
It's very easy to do. As a rule, the laptop comes with a special disk that contains all necessary programs and drivers. If there is no such disk, do not rush to get upset. The necessary software can always be downloaded from the Internet, since manufacturers have taken care of supporting their customers.
To do this, find the official website of your laptop manufacturer and write the exact name of the laptop (exact model) in the search. Next, download the necessary drivers and install them. It is worth noting that it is not recommended to install software downloaded from third-party sources, as such drivers can be unstable and sometimes even pose a threat to the integrity of the system.
How to reinstall the WiFi driver: Video
It is also important to know that sometimes, even when installed driver, the adapter cannot be turned on because it uses additional keyboard functions. This means that along with the software for the network adapter, you should also download the driver for the keyboard, as well as the recommended utility for managing the wireless module.
WiFi network is a brilliant achievement in the field of networking resources and is a wireless connection to the Internet. Thanks to this connection method, people were able to use the Internet for free in all places that distribute WiFi. Millions of people have already experienced the benefits of this connection.
Convenient wireless network for everyone, its advantages
Firstly, connecting to a wireless network is possible in almost all rooms, this is especially beneficial for those areas where it is impossible to connect using the common wired method.
Secondly, wireless Internet makes life much easier for active users of the World Wide Web. Not being tied to a computer desk and the ability to connect multiple devices at the same time played a role. Thirdly, all existing operating systems support WiFi (Windows 8, 7, XP; Vista, Mac and Android). Accordingly, you can access the network not only from a computer and laptop, but also from smartphones and tablets, most of which have a built-in module for connecting to a wireless network. Among the advantages of the network, we can also highlight the maximum speed, it reaches 300 Mbit/s. The wireless is heard WiFi network via a router connected to the provider's network via a wire. Let's look at the question of how to connect WiFi and what you will need.
Internet availability from an Internet service provider
Despite all the advantages of this network, there are still disadvantages that users of operating systems face. Windows systems 8, Windows 7 and Windows XP. WiFi This fact brings a lot of inconvenience to wireless network users. One of the reasons for the lack of network may be due to cable problems. There may also be a server failure. Therefore, before searching for a missing WiFi connection, you should check the availability of the Internet from your Internet service provider. Notify your ISP about the problem and have company administrators check for line breaks or other problems. However, if everything is fine with the Internet, but Windows was unable to connect to WiFi, then you need to check the router settings.
The device does not see available connections
Check if all the lights on the router are on and if the computer is connected to the wireless network. If your computer doesn't show the network, try restarting it.

If Windows is unable to connect to WiFi on your laptop, check if it's working wireless adapter. If the adapter does not connect, you need to reinstall the corresponding driver network Windows 7 and Windows 8 support the network driver update feature. However, to do this, you need to find this driver on your computer.
How to find and update the network driver on your computer?
If you don't know which network driver is on your computer, you will need to go to the “Computer Management” section, to do this, right-click on the “My Computer” icon, select “Management” from the list provided. A list of possible functions will appear on the left side of the screen.

You need to select “Device Manager” → “Network Adapters”. You will be presented with a list of network drivers. Right-click on them and select → “Update drivers”. If there are no changes during the update, try downloading another network driver suitable for your operating system and reinstall it. Remember that you must download any software only from trusted or official sites.
Safe storage
For one reason or another, drivers may fail at some point. It is for this reason that it is recommended to store all the programs needed for your computer on a separate removable media. “Any program can be downloaded from the World Wide Web,” you say. But what if the software that is used to connect to the Internet fails? In such a situation, a disk or flash drive with drivers will help you out.
The problem is caused by a serious system failure
When you finish reinstalling the driver, the connection should appear in the toolbar. If this does not happen, try rebooting the router and the device itself on which you are trying to connect to the wireless network. After this, when correct settings everything should work. Otherwise, you need to figure out what the problem is. You need to try connecting to the network from another device, if it catches the network, then the problem is in your operating system. Since reinstalling the driver does not display WiFi, Windows will most likely have to be reinstalled as well. Well, this is the saddest version of events. Everything could be much simpler. However, if no device sees your available network, the problem lies in the router itself, in its settings.
The system shows a connection error
If your device displays available networks, but when you try to connect, the connection does not occur or the system notifies you of an error, then the cause may be an incorrectly selected mode in the router settings. For normal operation of the network, it is necessary that the mode be mixed B/G/N. You can check or change it in the router settings. To do this, in the router interface, in the Wireless section, you need to select the mode that interests us.
Access area
One more possible reason absence wireless connection may be coverage area WiFi signal. The Windows access point may simply not be getting a signal to your computer. To make sure this is the case, look at the wireless network icon. It is located in the lower right corner of the screen in the toolbar. If not all bars of this indicator are displayed, try moving the router closer to the computer and try to access the Internet again.
Automatic connection
Check that the key is correct, you may be typing characters with the key enabled Caps Lock. If you entered the wrong WiFi key, Windows 7 will try to connect again after a certain time. This process will continue until you again select yours from the list of available networks and enter the correct password.
Get rid of unnecessary things
In the practice of wireless connections, there is a moment when, it would seem, a person has entered the network access key correctly, but the system still displays a message that Windows was unable to connect to WiFi. The fact is that the system remembers any changes in the router settings and tries to apply them when starting a new connection. In this case, try removing previously used networks on your computer, tablet or laptop.

To do this, you need to take some steps. By clicking on the wireless connection icon, you need to select the “Network and Sharing Center” section. Next, click “Manage wireless networks.” All unclaimed connections must be removed from the list. After completing this procedure, try connecting to WiFi again. If this method did not help, and WiFi distribution still does not occur? Windows means it can't find your IP address. In this case, it is necessary to change the specified wireless connection settings.
Prerequisite for wireless network
Windows could not connect to WiFi (or there is no Internet access) - these are perhaps the most common wireless network problems. To find out the reason, you need to go to the properties of the network you are trying to connect.

To do this, just left-click on the network adapter icon and in the list of available connections that appears, right-click on your network. Next, select the network and the “Status” category. If the “IPv4 connections” column says “Without network access” or “Without Internet access,” you should check the correctness of the addresses involved in the connection. To do this, in the same window, click on the “Properties” button. Select → “Protocol.. according to version 4” → “Properties”. You must confirm receiving the IP address and the requested server automatically.
If you have already entered data into manual mode, before switching to automatically receiving an address, remember the existing ones, perhaps they will be useful to you. Keep in mind that if the DNS server is incorrectly specified, there may be a problem with opening pages on the Internet, and Skype programs and ICQ can work normally.
Distributing WiFi from a laptop. Windows
In order to distribute a wireless network directly from your laptop, you need to download and install special program WiFi connection version v2.4.1, which will allow you to do this. This program suitable for everyone Windows versions. How to connect WiFi using it?

So, first, launch the program, after which you need to go to the settings and create a network name (preferably in Latin letters) and a password. For security purposes, the password must have at least eight characters. After filling in all fields, confirmation is required by clicking the OK button. Next step: you need to go to the properties of the existing network, in the “Access” section, check the box next to the “Allow other users to use the network” command. Select your created network from the list provided and click OK. It is also necessary in network connections in the section "Change additional parameters» Enable network discovery in all available tabs.
As an option to resolve the problem of lack of WiFi, you can reconfigure the router.
All access points without exception have a reset button - press it and hold it for a few seconds. After this procedure, the router will return to factory settings. Next, you will need to enter the router address (192.168.0.1) in the search bar of your browser, and then go to the device interface. The program will immediately prompt you to change your login password - do this and log into the router interface using your password. Next, select the “Connect Internet” → “Add new” function. The Internet Setup Wizard will prompt you to select a connection type. After which the program will ask you to enter your username and password to connect to the Internet. This information is provided by your ISP. After filling out all the data, you must save the information. After which it is advisable to restart the operating system of your computer.

If none of the above solutions to the problem helped you, use the following advice. Unplug the router for a while. After 8-10 minutes, turn it on again; this procedure very often has a positive effect.
Review

