Despite the fact that recently solid state drives They are increasingly conquering the niche of the main memory module of computers and laptops; their market share is not so large. Good old mechanical hard drives have a much lower cost, which is why they are still popular. However, they have the ability to fail, like any other equipment. This article is devoted to the question of how to check a hard drive for serviceability at home, without resorting to the help of service centers. Moreover, options will be given here that will make it possible to restore the functionality of a partially damaged hard drive.
A little about the hard drive itself
Classical hard drive A laptop or computer consists of several so-called “pancakes” with a ferrimagnetic coating, on which information is written using heads, and with their help it is read. These discs rotate at high speeds, ranging from 5400 to 10,000 rpm. For comparison, the same rotation speed is found in an industrial cutting tool, commonly referred to as a “grinder”. Impressive?
It is during rotation that reading or writing occurs. But if you hit or push the hard drive during operation, the heads can make an almost imperceptible scratch on the surface. And although it is small, the clusters in this area become unreadable, and the computer tries to access them again and again. As a result, after unsuccessful attempts to read information, it freezes. How can I check my disk for such areas?

Testing software Victoria
One of the popular testing utilities hard drives is Victoria. Although it can be launched from under operating system, today we will learn how to check a hard drive for serviceability through BIOS. The website of the manufacturer of this utility has information on how to do it boot disk or a flash drive with it. In the BIOS of a laptop or computer, you need to set it to boot from removable media, after which, when you turn on your device with the bootable media connected, you will see the interface of this program. Select your hard drive by pressing the "P" key on your keyboard and start scanning it using the "F5" key.
Now you can go and do your business. Depending on the disk size, scanning will take from 1 to 3 hours. As a result, on the right side you will see a legend of the disk map, which will indicate the number of sectors of each type. If there are sectors that take more than 1.5 seconds to read, or bad sectors in the frame below, it means that the hard drive is faulty and needs to be restored or replaced. So, you already have one way in your arsenal on how to check the health of the hard drive on a laptop or computer.

Testing via HDD Regenerator
You will have to prepare bootable media in the same way by downloading the utility from the developers’ website. This utility is easier to use, but takes a little longer to work. It is believed that this is the best method, since it is easier to check the hard drive for serviceability; moreover, it provides more information.
To start checking, select your disk by entering its number from the list. After this, you will need a menu item called Normal Scan. In the next submenu, select Scan, but do not repair. Then everything follows the standard pattern: you can go about your business. After a period of time, you will receive a hard drive map on which you can see exactly which areas are damaged. If the drive is good, the entire card should be white, with no "D" or "B" letters. What other test can you use to check if your hard drive is working properly?

One of the difficult options is MHDD
Working with this utility is very similar to the previous option. As in other cases, you should first prepare bootable media to launch it without starting the operating system.
After starting, you will need to select the desired hard drive, if you have more than one. The selection is made by entering the desired number from the list. After this, initialize the disk using the “F2” key and enter the SCAN command. It starts scanning the surface of the hard drive. If necessary, you can scan not the entire surface, but a specific area of clusters.
The program interface is reminiscent of the Victoria we already know. As is the case with it, the result should not be any sectors that could not be considered a program or took too long to read.
Now you know all the common ways to check the health of your hard drive. There is no point in installing these programs on your computer; a bootable USB flash drive is enough.

Recovering a hard drive using Victoria
Of course, knowledge about the malfunction alone is not enough; you need to fix it. But it is physically impossible to cure problem sectors. The programs simply block the hard drive's access to problem areas, so they are completely erased from the map, and it does not access them.
In the case of the Victoria program, before starting the scan after pressing the “F5” key, you simply need to specify one of the recovery options in the fourth line of the window. As a result, not only scanning will occur, but also problem sectors will be re-partitioned, and you will put your disk in order if it has not completely failed. Now you know not only how to check your hard drive for serviceability, but also how to restore it.

Recovery using HDD Regenerator
The very name of this program says that it is designed to treat problematic disks, and this is actually true. In order for sectors to be re-partitioned during scanning. When starting, in the last menu, instead of Scan, but do not repair, select Scan and repair. This operation It will take a little longer, but all problem areas of the surface will be erased.
It is worth noting that if the recovery lasts more than 5-6 hours, then most likely the disk has completely failed and cannot be restored. This applies to all recovery programs.

Scanning using BIOS without utilities
Some laptops and computers can check the hard drive and RAM without additional utilities. Therefore, in the question of how to check a hard drive for serviceability through the BIOS, you can not complicate your life by preparing bootable media, but use standard tools.
However, they may not always be intended for recovery. To be fair, it is worth noting that they will still allow you to make an initial diagnosis without unnecessary problems, which means you definitely shouldn’t neglect them.
What about removable hard drives?
Drives of this type are also mostly mechanical devices packaged in a special pocket. So how can you check if your external hard drive is working properly? All the same methods apply to them, except for the Victoria program, since it will not be able to detect it. The main thing is to connect it to the USB connector of your computer or laptop before turning it on, so that it can correctly recognize it. After this, the procedure does not change, you can simply check it. Or run a script to restore damaged clusters.
Now you know all the ways to check your hard drive for serviceability without the help of professionals. This information will help you save a lot of money on trips to service centers, because hard drive failures are one of the most common in computer technology.
Now you will learn about a small, but very useful program HDD Scan. As the name suggests, this program is designed to scan the hard drive on a computer.
But, in addition, the program is capable of carrying out a COMPLETE diagnosis of the hard drive, assessing the condition of any data drive (it supports IDE / SATA / SCSI hard drives, RAID arrays, external drives USB/Firewire and even flash cards)!
HDDScan will allow you to find out the number and even the firmware version of the hard drive installed on your computer and find damaged sectors of any scanned hard drive.
The program will show how exhausted the hard drive's resource is, what problems the hard drive being tested has, and more! This utility will allow you to fix hard drive surface errors.
It has a very nice modern interface design
Here: you can download a program for checking hard drives (gcontent) download HDDScan (/gcontent)
And below on the page you will see a video tutorial on working with this scanning program and hdd recovery(hard drives).
Checking hard drive sectors
This is no longer a problem even for beginners. In general, HDDScan is practically indispensable program! In terms of quality of work and functionality, at the moment there are almost no analogues to it.
Since the good old and time-tested programs for checking hard drives, such as MHDD and Victoria (read more in the article: How to fix bad sectors on a disk in Windows) are no longer able to recognize modern hard drives, much less perform their comprehensive diagnostics...
After you download this program to your computer, unzip it.... enter the folder with the program and run the executable file, which is mentioned at the beginning of the video lesson.
You don't have to install the program (that's another plus!), and it takes up negligible space on your hard drive. But despite this, it is so functional that one can only wonder how we managed without it before :-)))
How to check your computer's hard drive for functionality
Interface HDD programs Scan done on English. However, the program is so easy to use and will be understandable even for novice users.
Well, after watching this video tutorial on working with this utility to check hard drives that are currently connected to the computer, there will be no questions left :-)))
Turn on the speakers and press "Play"....
Checking hard drive sectors for errors
Quite often, many computer users experience deterioration performance characteristics hard drives during use.
Even in the best scenario, this leads to a decrease in performance and the appearance of faulty areas on the surface of hard drives, but this can also cause the loss of all information located on the hard drive!
Specialized programs and utilities for diagnosing and restoring data on computers are designed to help in such cases. hard drives like the one shown here free program HDDScan.
Checking the external hard drive
Using the HDD Scan program, you can easily scan not only internal, but also external hard drives that are connected to your computer.
It is designed to check hard drives under Windows. The utility works from the Windows operating system - this means that you do not need to bother creating any boot floppy disks.
Very convenient! It is simply advisable to disable the antivirus and programs running in the program while starting and running the program. background and resource occupiers, such as download managers.
HDD hard drive recovery
As you probably noticed when watching the video, starting from the 14th minute it is shown how you can try to fix it, that is, simply remove the bad sector of the hard drive if you do not want to replace the hard drive completely (buy a new one).
We start testing the surface with the “full erase” parameter. This usually helps to get rid of these types of bad blocks on the surface of the hard drive.
Attention! Before doing this, copy all important data from the HDD you want to test. In general, if you want to try to recover bad sectors on the disk, then watch the video tutorial again from the 14th minute.
Conclusion: in the best possible way carry out a complete diagnosis of the hard drive today with the HDDScan program, which works from Windows environment and at the same time allows you to perform a comprehensive assessment of the reliability and condition of the surface of any hard drive, including even external USB drives.
To store information on most personal computers and even servers use hard drives. They are quite reliable, but over time, magnetic drives become unusable. In most cases, the service life of the disk is 5-10 years. Each user must be able to diagnose the HDD in order to determine the need to replace the part and perform a data backup. You will learn everything about verification from this article.
Symptoms of hard drive problems
Malfunctions or imminent death of the hard drive may be accompanied by typical symptoms. We recommend paying attention to the following symptoms:
- The appearance of uncharacteristic sounds during operation. There may be clicks, crackles, or metallic clanging. In such cases, the problem is usually mechanical in nature.
- “Brakes” in the operation of the system. Windows loads too slowly, some files do not open, and errors occur when installing programs.
- The appearance of blue “screens of death”. In such cases, an error code is always written, which can be used to determine the source of the problem.
- Spontaneous shutdown or reboot of the computer. As a rule, in such situations it is damaged boot sector HDD.
Please note that computer freezes can also occur due to insufficient RAM.
Ways to check the hard drive
HDD diagnostics is an important task. There are several ways to do this. Operating system tools allow you to analyze your hard drive, but they are not always effective. Optimal solution- usage specialized utilities, which were created specifically for this task.
Via command line
Windows operating systems have a standard utility that can analyze the status of the hard drive. To do this you will have to run command line:

In the command parameters, specify the drive letter and two specifiers. The first - F is responsible for automatic error correction, and R performs information recovery. Be prepared that the verification may take several hours. If you are using a laptop, be sure to charge it. At the end you will get statistics on how many sectors are damaged.

Using Windows Explorer
If you prefer using familiar windows, you can run the scan through Explorer. To do this, users should follow a number of steps:

During this operation, the system will perform the following checks:
- basic file system structure;
- security descriptors;
- file name associations;
- USN magazine.
To find out the scan results, you need to go to the "Event Viewer" menu, and then to Windows log find the verification log.

Via Windows PowerShell
The latest Windows operating systems have an additional utility similar to the command line, which was created for convenient system administration. You can also use it to test your hard drive. To start, you need to perform several steps:

The system will scan and automatically fix if possible. If there are no errors, the message NoErrorsFound will appear.
Using Windows 10 Tools
The latest operating system from Microsoft has advanced functionality, so it can independently diagnose a wide range of problems. Using the built-in security center, you can check the status of the HDD. Additionally, go to storage diagnostics. How to use these functions will be described below.
Security and Service Center
This is a special section in the “ten”, which is responsible for maintaining the operating system. As a rule, all necessary checks are performed automatically after a certain period of time. You can access this section through the control panel. Next, if necessary, open the “Maintenance” tab and find the “Disk Status” line. Opposite it should be the “OK” option. If it is not there, then we recommend conducting a thorough analysis of the condition of the hard drive.

Storage Diagnostic Utility
The developers of Windows 10 also created an additional utility for checking the hard drive - storage diagnostics. It is launched via the command line (how to open it was described in the sections earlier). Next, enter the command and press Enter.
The procedure may take 2-5 hours (depending on the HDD capacity). At some points the process will appear to be stuck, but it is strongly recommended that you do not interrupt the scan. Once the process is complete, navigate to the path to save the report and open it (the file will have evtx permission). It will provide the following information:
- chkdsk check data and error information;
- registry files containing data about connected drives;
- Event Viewer Logs.
Experienced specialists are required to correctly interpret the information presented in the report. The report will be uninformative for ordinary users.
Third party programs
For professionals and ordinary users third party developers have created many useful, functional and easy-to-use utilities for checking the status of your hard drive. With their help, you can get comprehensive information about the status of your HDD. The most popular of them will be described below.
Victoria
This is the most popular free software from qualified specialists. Its wide functionality allows you to get almost any information about the hard drive. The parameters are displayed in a form convenient for the average user, so you don’t have to study anything additional to make a conclusion about the state of the HDD. The utility is distributed on a Freeware basis, i.e. absolutely free.
Download the software to your computer and follow the instructions:

All sectors will be marked different colors depending on the response speed. Gray sectors are not dangerous. Green sectors are allowed in quantities of several hundred (up to 2-3 thousand). For example, on a completely new 1TV hard drive their number is about 1 thousand. Orange sectors are at their limit. No more than 100 pieces are allowed. Red and blue cannot be restored. They need to be “closed”, limiting reading from them.

When scanning, you can set the operating modes:
- Ignore is a classic check without further action.
- Remap – replacing unreadable sectors with reserves if available.
- Restore – restore damaged sectors programmatically.
- Erase – overwriting unreadable sectors. Attention, erases information.
As you can see, the utility is informative and easy to use even for beginners.
HDDScan
Another useful software to scan the hard drive. It has less functionality, but a more friendly interface compared to the previous version. The utility is completely free, but allows you to get SMART parameters and detailed information about the state of the sectors.
To start the verification procedure, follow these steps:

The colors for the sectors are identical to those described above. The scanning menu does not provide functions for correcting sectors.
DiskCheckup
The software supports work with almost all types of hard drives (SATA, USB, FireWire). It has small but sufficient functionality. Through the application, you can check the SMART parameters, as well as conduct a full test on the Disk Self-Test tab. The main disadvantage of the program is the complexity of the results for the average user. The status is indicated by the “OK” line and numerical parameters. Considering that they are all in English, it will be difficult to understand.

MHDD
This is highly specialized software for advanced users. It is used if the system does not start and the OS does not load to the desktop. To run MHDD software, you must burn it to a CD or flash drive as an image. You can even run the utility with the entire operating system. To do this, you need to select a flash drive or CD as the boot drive when using a floppy drive.
After the menu appears, you just need to select the desired hard drive and enter the command to check. The software is controlled in the same way through commands as on the console, or using the function buttons of the keyboard. Not recommended for use ordinary users without the appropriate skills.

Crystal Disk Mark
This utility allows you to evaluate the speed of writing and reading information from your hard drive. In its interface, the user can select the write/read type, local disk and the size of the file that will be read and written. After finishing the test you will receive information at speed.

You will not be able to evaluate these results yourself. We recommend finding a similar HDD model online to compare its testing with your test data. If the results with identical settings are almost the same, then there is no need to worry. If there are strong differences, we recommend analyzing the hard drive through Victoria.
HDD Regenerator
Functional utility for HDD scanning and recovery. A special magnetization reversal algorithm allows you to eliminate quite serious problems with hard drive. To launch the software you should:

The advantage of this utility is the ability to quickly correct errors and close bad sectors.
Seagate SeaTools
Specialized software from Seagate product developers. Allows you to obtain basic information about the disk, perform preliminary and full scans. We recommend using this utility in cases where the above for some reason does not work, and you own a hard drive from Seagate.

Western Digital Data Lifeguard Diagnostic
Special software in English for checking company disks Western Digital. It is more suitable for advanced users, but ordinary users can also perform quick diagnostics. For example, you can check the status of SMART parameters.
The utility also allows you to conduct simple and advanced tests, but the information content of the results for typical users leaves much to be desired.
Disk Utility on macOS
Operating room users MacOS systems also have a standard hard drive utility. Its functionality includes:
- creating and transforming images;
- mounting and unmounting disks and other media.
- activation and deactivation of logging mode;
- HDD integrity testing and file recovery;
- erasing, formatting and partitioning disks;
- cleaning up debris;
- adding a partition table;
- checking the S.M.A.R.T status of the hard drive and much more.
To start you need in the utilities on system disk find the application and then launch it.

Prevention measures
To maximize the life of a hard drive, users can do a variety of things, including:
- Defragmentation. This procedure arranges all file blocks in order, making access to them as fast as possible, accordingly, the head travels less distance to open the file and wears out more slowly.
- Install a quality power supply. Power surges have a detrimental effect on any equipment. If important data is stored on the HDD, take care of a high-quality power supply to prevent damage to the hard drive due to power surges.
- Avoid vibrations and shocks. Winchesters are extremely vulnerable to impacts. When transporting your computer, make sure that the hard drive will not be subject to vibration.
- Clean the system. Freezes due to unstable software or viruses can cause increased load on the disk; accordingly, it will use its resource faster.
- Eliminate external magnetic fields. Many people install the system unit with other powerful equipment that has magnetic field. If you want to ensure maximum data safety, do not place the system unit next to equipment that emits a powerful magnetic field.
Never forget to do backups. Any hard drive will eventually become unusable, and it is not always possible to recover data. Regular checks will allow you to determine the future demise of the HDD in advance and take action, for example, purchasing a new one.
Report content
Copyright infringement Spam Incorrect content Broken links
Experienced users are well aware that the health of the hard drive can be affected by even minor influences, for example, voltage surges, mechanical shocks and shocks, static voltage, etc. The hard drive mechanism itself can damage the surface of the drive where information is stored. Below is a guide on how to properly check your computer's hard drive for serviceability.
Main symptoms of a damaged hard drive
Already during the startup of the PC, it may buzz loudly or make cracking sounds. Such noise should immediately alert the computer owner and make him think about diagnosing the hard drive. It is recommended that before testing this important element of your PC, you copy all important and personal files to external media or another computer, since the test itself will place a significant load on the hard drive.
Before launching the test program, you must take care to ensure good cooling of the hard drive, for example, open the case cover system unit and clean the internal equipment from accumulated dust. The source of grinding noises during the operation of a hard drive is the contact of its read head with bad sectors. If no measures are taken, their number will gradually increase and may lead to the loss of HDD performance.
Verification procedure
Experts have developed many different special utilities to test the functionality of this important PC element. The procedure can also be carried out using the built-in Windows tools.
Using Windows tools
The operating system allows you to analyze the hard drive. This method is not very reliable, but it is useful for the user to know how to use it. In addition to analyzing the surface of the hard drive, OS tools can, if possible, correct some errors.
The sequence of actions algorithm consists of the following stages:

Using Seagate SeaTools utility
This has already helped a significant number of PC owners solve the problem. convenient application. It is free, fully Russified and effectively copes with the diagnosis of hard drives from most manufacturers. It is available for download at seagate.com.
 The application has an intuitive interface. Having opened the utility, you will immediately see a displayed list of hard drives with which you can perform all the necessary tests. As a result, the user will be presented with a report, and most importantly, the program can restore faulty sectors.
The application is also freely distributed, but only works for equipment from one specific manufacturer, Western Digital. However, since they are widespread in the Russian Federation, this program can help a significant number of users.
 The functionality is similar to the program described above. You can install it from the official resource “support.wd.com”.
Allows you not only to do free check broken HDD, but also obtain detailed S.M.A.R.T. information, as well as carry out a large number of different equipment tests.
 In addition, the utility works effectively with flash drives, RAID, SSD.
This program should be discussed in more detail, since it currently provides high accuracy of testing results. The utility is available for installation on the “softportal.com” page.
The following sequential steps must be taken:

Note: It is not recommended to check the “Erase” box, as this will erase all files. 
Conclusion
Winchester is one of the weakest points modern computer. Its normal service life does not exceed five years, but clearly indicate exact time impossible.
Therefore, the only way out is to regularly check it and diagnose the condition.
– the most unreliable component of a modern computer. As a rule, modern models They last up to 3 years, after which they have to be replaced. The worst thing about this situation is that it is very difficult to predict exactly when the hard drive will fail. Because of this, inexperienced users often lose important data. In this material we will talk about how to check a hard drive for serviceability and correctly assess its condition.
Serviceability check based on data from “S.M.A.R.T.”
If you want to check your hard drive for serviceability, then the first thing you need to do is install the program. This free program collects all available information about the drive and, based on it, provides an assessment of its technical condition. If the drive is fully operational, then its “technical condition” will be indicated as “Good”. If there are any problems with it, then you will receive an “Alarm” rating, but in cases where the HDD is on the verge of death, the program gives a “Bad” rating.
Also in the CrystalDiskInfo program you can view the source data of the “S.M.A.R.T.” system. (the program uses them to assess those conditions). To figure out what a particular parameter means, you can use . There is a table with detailed description all parameters of the “S.M.A.R.T.” system. In addition, in the CrystalDiskInfo program you can see the number of starts, the number of hours worked, the exact name of the model and even serial number drive.
Checking the health of the hard drive under load
If the S.M.A.R.T. system does not show any problems, then the hard drive can be checked for serviceability by creating heavy load. To do this, simply try to write to the drive large number small files (a couple of megabytes in size). For example, you might try to copy a large folder of photos onto it.
- If the disk is good, then the copying process should proceed without any incidents. In this case, the copying speed should be more or less stable throughout the entire copying process (with the exception of a slight drop in speed immediately after the start of copying).
- If the hard drive is faulty, the copy speed will fluctuate greatly (from normal to very slow). In some cases, the copying process may freeze or be interrupted. Some files may not be copied, and the system will report errors. In particularly advanced cases, a cracking or grinding sound may be heard, and the drive may turn off ().
If the file writing test went well, then try testing how data reading works. To do this, try copying data from the disk you are testing.
Checking for errors in HD Tune
The next stage is verification serviceability of the hard disk using specialized programs. Such programs allow you to check your hard drive for errors and identify existing problems, even if they do not appear during normal use. Let's start checking with the free program (or its paid version HD Tune Pro).
In order to complete hard check disk for errors, launch the HD Tune program, go to the tab and click on the “Start” button.

After this, the HD Tune program will begin checking the hard drive for serviceability. During the verification, you will be able to observe this process. Normal areas of the hard drive will be marked green, and damaged ones are red.

On a fully functional hard drive there should be no damaged (red) blocks at all; the entire surface should be marked green.
Checking for errors using Victoria 3.5
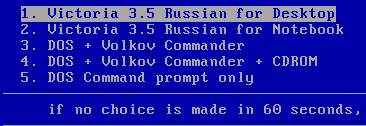
To get the most precise check you need to use the program, you can download it as an iso file, for example (here is version 3.5, which is best suited for checking outside the operating system). The downloaded iso file must be written to a CD (or flash drive) and the computer booted from it. After booting your computer from this CD, you will need to select one of the versions of the Victoria program. For desktop computers you need to select the version “Victoria for Desktop”, and for laptops, respectively, “Victoria for Notebook”. Other options in this menu launch the DOS operating system and Volkov Commander.
To start checking the entire surface of the hard drive, press the F4 key. After this, a menu with settings should appear. Here you need to select “Ignore Bad Blocks” and "Linear Reading". It should be noted that you need to use the Victoria program very carefully, since using some of its functions can delete data on the drive. For example, this can happen when you enable the “Write (erase)”, “Write from file”, and “BB = Erase 256 sect” options.
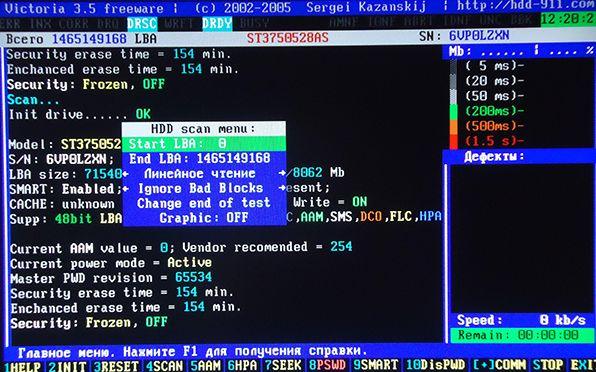
To start scanning, you need to press the F4 key again. After this, all you have to do is wait until the verification is completed. At the end, if the hard drive is fully functional, you should see a screen like this.

If the hard drive has any problem areas, orange and red blocks will appear on the scanning screen. The more such blocks, the worse the condition of the HDD surface. If the number of red blocks is large, this means that the hard drive is faulty and it is time to replace it. Detailed information about the problems found can be viewed on the right side of the screen, in the “Defects” window.
Error checking in Victoria 4.46
If you do not want to burn an iso image and boot from a disk from a computer, then you can use the Victoria 4.46 program, which works from the operating system Windows systems. You can download this version of the program, for example, .
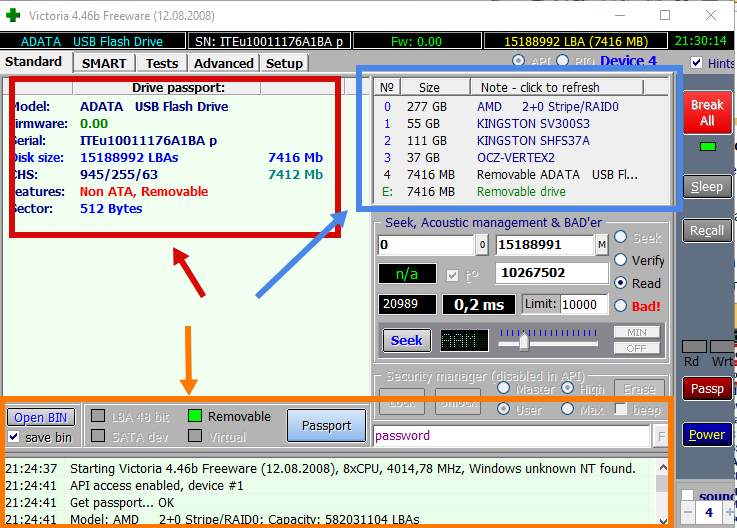
After downloading, you will receive an archive that will need to be unpacked into any folder. To run the Victoria 4.46 program, open the folder with the contents of the archive and run the program vcr446f.exe. After launch, you will see the main Victoria window, it will look something like the picture below.
You should start studying the program from the “Standard” tab. Here on the right side of the screen there is a list of hard drives that Victoria was able to identify, information about the currently selected drive is displayed at the top left (if you wish, you can select another), and at the bottom there is a log of events, errors and other information.
To check your hard drive for errors, you need to open the “Tests” tab. Here you must first click on the “ Passp” button (to get information about the drive), and then on the “ Start” button (to start the check).
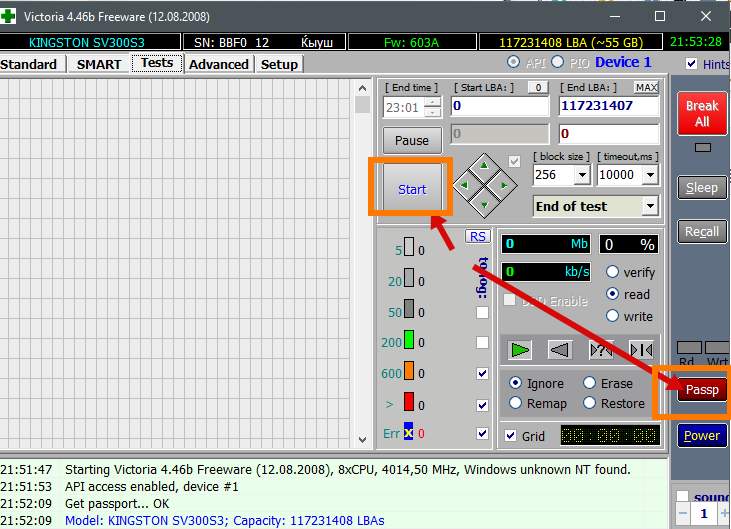
After this, you just need to wait until the program finishes checking your hard drive.
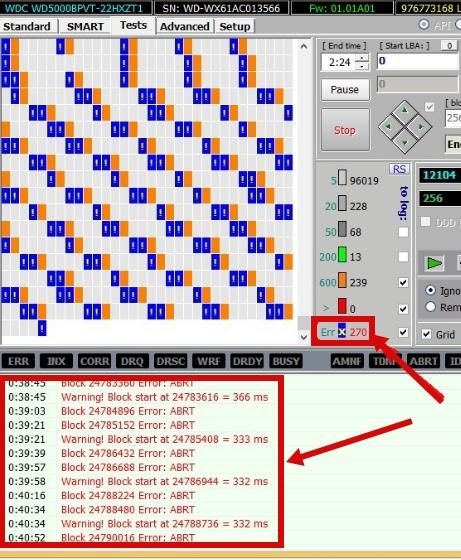
During the scanning process, the Victoria program will find faulty and problematic drive blocks, the number of which will be displayed in the column on the right, as well as at the bottom of the screen.
Results of checking the health of the hard drive
A fully functional hard drive should pass all the tests described above without any problems. CrystalDiskInfo should be rated Good, manual read and write tests should pass without difficulty, and HD Tune and Victoria should not detect any problems. If everything is exactly like this for you, then most likely your hard drive is fully functional and will work for a long time.
But, of course, there are no guarantees here and cannot be. Therefore, the only way to reliably protect your data is backup. The most important data (personal photos, videos, documents) should always be stored on multiple drives.
Review

