A professional image editor is usually used to work with photographs. Adobe Photoshop . This is a fairly complex program, and learning all the intricacies of working with it will take a long time, but to easily and effectively process your photos, you only need to master a few basic techniques. Let's look at the data techniques working with photographs.
Dodge Tool/Burn Tool
The main function of this tool is to lighten or darken certain areas of the image. In other words, this tool “draws” darkening or lightening. There are only two main tool settings
"Range"
This tool can be used on dark, light and neutral areas of your photo. If you need to lighten dark areas when processing a portrait, then set the mode « Shadows" V « DodgeTool" and apply the tool to the desired area, lightening only the dark areas. In this case, light areas are not affected.
« Exposure"(Power of influence)
When processing photographs it is important correct installation impact forces. Should not be used « DodgeTool" at 100% - try an application strength of 7-10% for shadows and 10-20% for neutral areas. In this case, the application of impact force is selected individually for each image.
Scope of application "Dodge/Burn" very wide. With its help, you can lighten the iris of the eyes, focusing the viewer’s attention on the eyes. The tool is also used to darken the lines of the face shape, especially in male portraits, to add volume and contrast to the lines of the cheekbones and chin, which makes the male face more strong-willed and tough. Brighten backlit areas with "Dodge Tool" will make your photos look more vibrant and contrasty.
Clone Stamp

This tool can be called the most effective image retouching tool. The main function of the tool is to copy a specific area of the image. It can be used to retouch wrinkles in a photograph, replacing them with copies of areas with smooth skin. The main parameters of the tool include the following:
« Mode"(Mode)

The operating modes of the stamp are very diverse. For example, mode "Lighten" will replace only the darker areas of the image, and the mode « "Darken" vice versa. To determine how each mode works, you should conduct some experiments with them.
« Opacity"
This mode allows you to set the transparency or opacity of your retouch (100% – opaque, 0% – completely transparent). For photo retouching, use 10 – 30% to avoid obvious retouching.
This tool is actively used to retouch wrinkles, swelling and bruises under the eyes. With its help, you can even simply remove an unwanted object from your photo.
Black & White

You can find this wonderful tool by clicking « Image–>"Adjustments", or simply by creating an adjustment layer ( Adjustment layer).
The main function of this tool is to correctly convert a color image to black and white. At the same time, you can change the black and white image of each color, giving your photos originality and unforgettable beauty.

This tool also provides a unique opportunity to obtain a very interesting solution for color photography. After applying the “ B&W", just turn on layers mode "Overlay" and, controlling transparency and color modes " B&W", create your own unique photo. And turning on the checkbox "Tint" makes it possible to tint the image in the desired color.
Shadow/Highlights

This tool is also found on the tab "Image->Adjustments" and is designed to darken overexposed areas and pull light out of shadows. It also does a great job of creating a sense of greater depth in a photo.
By the way, here’s how it’s created in !
1. You can delete the current layer by holding Alt and pressing L 3 times.
2. Working with the Move Tool, you can select any layer by clicking on a part of the object with Ctrl pressed.
3. Double clicking on the top blue bar in any palette window will collapse it.
4. Double click on the gray background will open a dialog box to open the file, Shift+double click will open Adobe browser Bridge.
5. Tired of the gray background around your image? Take Paint tool Bucket Tool (Bucket), hold Shift+click on the gray background and it will change to whatever color you chose as the foreground color.
6. To select all layers press Alt+Ctrl+A.
7. Caps Lock will change your cursor to a clearer cross.
8. Press the F key and you can select one of 3 different screen modes, which will allow you to make the work area larger.
9. To draw a straight line using a brush or pencil, single-click at the start point, then hold Shift+click at the end point.
10. Pressing Ctrl will turn any tool into a Move Tool as long as you hold it.
11. Ctrl+Alt+click will create a copy of the image and move it as the mouse moves.
12. Pressing Space will turn any tool into a Hand Tool as long as you hold it.
13. Ctrl+Space+click will zoom in on the image, Alt+Space+click will zoom out.
14. Pressing Ctrl and “+” or “-” will change the image scale in percentage.
15. If you use the Eyedropper Tool (Eyedropper) with Alt pressed, this will allow you to take a color sample for the background color.
16. Measure Tool (Ruler) –– make a line, and then hold down Alt and create another line from the end of the first –– this will help you determine the angle between them.
17. Use Ctrl+Alt+Z and Ctrl+Shift+Z to undo and redo a series of actions.
18. Alt+Backspace and Ctrl+Backspace will fill the image with the foreground and background colors respectively. Shift+Backspace will bring up a dialog box for filling the image. Alt+Shift+Backspace and Ctrl+Shift+Backspace will fill the image with the foreground and background colors respectively, while leaving the transparent areas transparent.
19. If you hold down Alt and call free transformation using Ctrl+T, it will be performed on a copy of the object. Ctrl+Shift+T will repeat any recent transformations.
20. You can easily increase the size of the canvas using the Crop Tool, stretch it beyond the canvas and click OK.
21. Ctrl+J will create a copy of the current layer.
22. Ctrl+Shift+E will merge all visible layers into one, Ctrl+Shift+Alt+E will merge a copy of visible layers into one new layer.
23. When using the Marquee Tool (Selection), hold down Alt to make the starting point the center of the selected area.
24. Ctrl+D to remove selection, Ctrl+Shift+D to return selection.
25. When you create a selection using the Marquee Tool, hold Space to move the selection, release to continue selecting.
26. Pressing Shift and “+” or “-” will change the layer’s blending mode to: Normal, Dissolve, Multiply, Screen, Overlay.
27. If the Brush tool or any other tool is selected, the transparency of the layer can be changed by pressing the corresponding number on the keyboard:
– when you press one number
– to set a more precise % of transparency [hold 7 and then 2, which will result in 72%].
28. Hold Alt and click on the eye icon next to the layer icon in the Layers palette to hide all other layers except the current one.
29. A color sample can be taken not only from an image in Photoshop, but also outside the program. Reduce the Photoshop window so that you can see the image on which you want to determine the color, take the Eyedropper Tool (Eyedropper), click inside Photoshop and, without releasing it, move it outside the window.
30. Select the layer, hold down Alt and click on the border between the top and current layer to create a Cliping Mask, i.e. the top layer will be visible within the bottom one, and the bottom one will replace the mask.
31. While holding Alt, click the "Create a new layer" button on the Layers palette to display a dialog box with settings for the new layer.
32. Select the layer and, while holding down Alt, click on the trash can in the layers palette, i.e. The layer will be removed without any questions asked. Make selections for transparency where you want, go to the Channels tab and press Ctrl+click on the "Create new channel" button, i.e. An alpha channel will only be created for the selected areas.
33. File > Automate > Contact Sheet II –– will create small previews for each file opened in at the moment in Photoshop, in a separate document in a row and signs them.
34. The Move Tool has an option in the settings for auto-selecting the layer "Auto Select Layer" depending on the location of the click.
35. Working with the Move Tool, pressing Alt+Shift+right-clicking on various image objects located on different layers will allow you to select all these layers.
36. When working with the Grid, drag the top left corner where the Grid scales are located, and they will start at the point where you release the mouse button. Double clicking in the upper corner will reset the reference point to its original position.
37. Having created a path using the Pen Tool, you can hide/show it again using the combination Ctrl+Shift+H.
38. Keyboard navigation can often be more effective than a mouse:
Home = scroll to top left corner
End = scroll to bottom right corner
PageUp = scroll up one page
PageDown = scroll down one page
Ctrl+PageUp = scroll left one page
Ctrl+PageDown = scroll right one page
Shift+PageUp = scroll up 10 pixels
Shift+PageDown = scroll down 10 pixels
Ctrl+Shift+PageUp = scroll left 10 pixels
Ctrl+Shift+PageDown = scroll right 10 pixels
39. Ctrl+Tab will switch you between different image windows.
40. F12 will return the state of the image as it was when it was last saved.
41. Hotkeys for Channels: RGB, CMYK, Indexed color
Ctrl+"~" = RGB
Ctrl+1 = red
Ctrl+2 = green
Ctrl+3 = blue
Ctrl+4 = other path
Ctrl+9 = other path
Ctrl+"~" = CMYK
Ctrl+1 = light green
Ctrl+2 = pink red
Ctrl+3 = yellow
Ctrl+4 = black
Ctrl+5 = other path
Ctrl+9 = other path
Ctrl+1 = Indexed
Ctrl+2 = other path
Ctrl+9 = other path
42. By holding Ctrl on the Navigator palette you can stretch the red rectangle, thereby scaling the image.
43. Hold Alt and click on any step in the history, i.e. the step will be copied.
44. Press Alt and drag a step from one Action to another, get a copy of the action.
45. In the Lens Flare filter (Filter > Render > Lens Flare), you can set exact coordinates by holding Alt+clicking on the preview window.
46. Holding Shift+Alt will transform the object proportionally –– from the center.
47. If you have the Move Tool selected and you want to copy something, then simply hold down Alt and drag the image. By holding Shift+Alt you can easily move the object along the Grid guides.
48. If you want to straighten the horizon or uneven edges after scanning, then take the Measure Tool (Ruler), draw a line along your curve, then go to Image> Rotate Canvas> Arbitrary, Photoshop will set the rotation angle values itself, just click OK and image rotated
49. If you create something in Illustrator, copy and paste it into Photoshop, it will ask you in what form to paste: pixel or Shape.
50. To display the Rules panel, press Ctrl+R.
51.To ensure that the image is clearly centered Ctrl+A, Ctrl+X, Ctrl+V.
52. Ctr+E will merge the current layer with the underlying one.
53. If the Brush Tool is selected, you can control the diameter of the brush using the [ and ] buttons.
54. Double clicking on the Zoom Tool will return the image scale to 100%, and on the Hand Tool it will stretch the image to fit the screen area.
55. Working with text:
Ctrl+H will hide the selection of the selected characters.
If you have characters selected, click on the font type selection line and you can use the arrow keys on your keyboard to select the font type.
Alt+left or right arrow will change the space between characters to 10.
Ctrl+Alt+left or right arrow will change the space between characters to 100.
56. Ctrl+Alt+T will create a copy of the object you want to transform.
57. Ctrl+Alt+right, left, up or down arrow will copy the current layer and move it 1px.
58. Change the active layer when help Alt+[ or ].
59. Move the active layer up or down using Ctrl+[ or].
60. To hide Grid guides, press Ctrl+
61. Ctrl+[plus key] will zoom in on the image, Ctrl+[minus key] will zoom out. Ctrl+Alt+[plus key] will increase the zoom and size of the window, the same for Ctrl+Alt+[minus key].
62. Using the Polygonal Lasso Tool, press Backspace to undo the last step.
63. Press X to switch the foreground and background colors.
64. Press D to reset the foreground and background colors to the default colors: black and white.
65. To display the Brushes settings palette, press F5.
66. To display the Layers palette, press F7.
67. Ctrl+clicking on the layer icon in the layers palette will create a selection of the layer’s contents.
68. If you want to see the contents of the layer mask, then hold down Alt and click on the layer mask.
69. Alt+click on the layer mask icon to create a black mask.
70. When using the Polygonal Lasso Tool, hold Shift to create angled lines in 45 degree increments.
71. To move around the visible part using the grab, use the spacebar while in selection mode (V).
72. Ctrl+Shift+N will create new file, with a dialog box displayed; Ctrl+Shift+Alt+N will create a new layer in the working file.
73. Back to brushes, the [ and ] keys will decrease and increase the diameter of the brush, and Shift+[ or ] will change the hardness of the brush.
74. Press Alt to make the Burning Tool act as the Dodge Tool, and vice versa.
75. Stamp Tool clones areas of the image (Alt+click –– to determine the area for copying). This also works if you have multiple images open in Photoshop and you can also clone any areas from other images, you just need to position the images within view of the screen.
76. Ctrl+click on the layer icon to create a selection of an object on this layer. If you need to select more than 1 object on several layers, additionally hold down Shift.
77. To combine palettes into one, drag the tab of any tab on another palette to the other tabs and it will move.
78. When creating text, pressing Enter will create new line To finish writing, press Ctrl+Enter or Enter on the numeric keypad.
79. You can move the layer to any other open image in Photoshop, i.e. a copy of the layer will be created. Hold Shift while dragging and the contents of the layer will be inserted clearly in the center.
80. Create new document V Photoshop size 500x500px, create a new layer, take the Brush Tool, select a standard round brush, of any diameter and put a point at the top center (position as at 12 o'clock). Press Ctrl+Alt+T, this will create a copy of the point and allow you to transform it. Pull the point in the center of the transformed object Pivot Point and set it clearly in the center of the image, enter a rotation angle of 30 degrees at the top and click OK. Now the trick is to press Ctrl+Shift+Alt+T 10 times and you will see what happens.
81. Shift+click on the blue top bar of the toolbar or palettes, it will move them to the side border of the window.
82. How to select a group of layers without using the layers palette? We know how to select one layer from step 81, and you can add another layer to the group by holding Ctrl+Shift and clicking on a part of the object located on another layer.
83. You can delete several layers at once by simply dragging a group of layers onto the trash can icon on the layers palette; we know how to select a group from step 82.
84. Press Tab to hide the toolbar and palettes, Shift+Tab will hide only the palettes.
85. After applying a filter, its effect can be softened using the Fade function by pressing Shift+Ctrl+F.
86. You can copy a layer mask by dragging it with Alt pressed onto another layer.
87. You can easily get a horizontal one from the vertical Grid guide by selecting the Move Tool, holding Alt and clicking on the guide itself. And vice versa.
88. Saving a document using Save for Web information about the document is lost; use Save As to save the information.
89. For better organization layers – group the selections by pressing Ctrl+G.
90. To display the Rules panel, press Ctrl+R
Learn to process your images quickly and efficiently with the course "Quick photo processing in Photoshop from A to Z" Course link:
When reading articles about Photoshop, I am often surprised by how many authors complicate the solution of essentially simple processing tasks. Many “monumental” writers suffer from this, such as Dan Margulies. But this can be forgiven for him - his task is to write about all the subtleties and nuances of the processing process, to consider it from all angles and sides. Although it is precisely this feature of the presentation of material in his books that repels many readers.
In fact, the roots of such methods of “sharpening in 40 steps” grow from a very simple thing - the people who write these tutorials have never worked with a large volume of photographs. That is, as a rule, they have a couple of photographs and are ready to spend an evening or two in the process of processing them. But when you have constant orders, and from each photo shoot you need to seriously edit several dozen frames, you begin to think about simpler and convenient ways processing.
We'll talk about them today. I'll tell you about five simple but very effective Photoshop tools, which I constantly use in my work.
Before processing photos in Photoshop, I always work with the frames in a RAW converter first. This is where I do the main color correction and primary photo processing. Essentially, I create a “skeleton” of processing, and in Photoshop I work with the details of the photo.
So, we have worked with the photo in the RAW converter and open it in Photoshop. Photoshop greets us with a huge number of processing tools for all occasions. But we will talk about the simplest and most effective of them.

The main function of the Dodge Tool/Burn Tool is to lighten/darken individual areas of the image. Essentially, you can “draw” darkness or vice versa – lighten the photo. It's very simple, try it: I'm sure you'll appreciate this tool. Dodge/Burn Tool has only two, but very important settings.
Range — Select the application area
You can use this tool on dark (Shadows), light (Highlights) or neutral (Midtones) areas of the photo. For example, you need to lighten the dark areas of the chin (when processing a portrait), and leave the light areas untouched. In this case, we set the Shadows mode in the Dodge Tool, and it will lighten only the dark areas of the places where we apply it.
Exposure - force of impact
It is very important to set the force correctly. Many people, when experimenting with Photoshop, try Dodge/Burn 100%. And by darkening the image, you get black “holes,” and by brightening it, you get complete overexposure. Of course, having received such a result, they no longer return to this tool. But Dodge/Burn is a subtle tool. If you are working on shadows or highlights, try an application force of 7-10%, if with neutral areas - 10-20%. For each case, the force of influence is selected separately, but after working a little with this tool, you will begin to feel what kind of power is needed in each specific case.
Usage
Dodge/Burn has many uses:
- Brighten your iris
Just apply the Dodge Tool to the iris - this is the easiest way to brighten it. Thus, you focus the viewer’s attention on the model’s eyes.
In all these portraits, I highlighted the iris of the eyes precisely in order to draw the viewer’s attention to the eyes and add psychology to the frame.

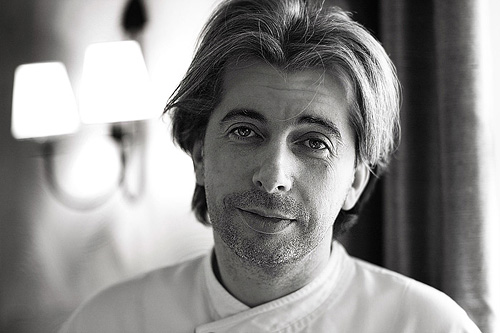
- Darken the lines of the face shape in a man's portrait
Cheekbones, jawline, nose line, eyebrows - any facial lines, if darkened a little, will acquire greater volume and contrast. The man in the photo will look tougher and stronger-willed.
I use this technique when processing almost all male B/W portraits. This technique is not always suitable for color, as it “ruins” the colors, but on a B/W picture it works just fine.

In a female portrait, this technique must be used very carefully, since a woman will only be adorned by emphasizing those facial lines that give her femininity. Otherwise, you will get a portrait of a masculine creature.
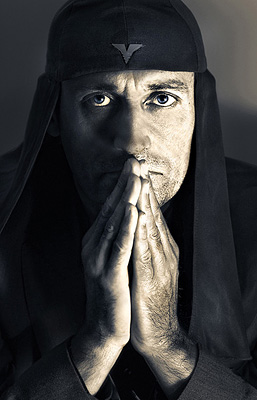
- Brighten backlit areas
Backlight in itself is a wonderful thing. But if you use the Dodge Tool to enhance its effect, the picture will become even better. This looks especially great in concert photographs, when the musicians are illuminated by good backlight.

- Whiten your models' teeth
Using the Dodge Tool is the easiest and most effective way to whiten teeth in a photograph. A little later I will definitely write a separate lesson about proper teeth whitening using the Dogde Tool.
2. Clone Stamp

There are several tools for retouching images in Photoshop, and each of them is good in its own way. But “Stamp” is the most versatile tool to use.
Its function is to take a certain area of the image and copy it. Thus, we can, for example, retouch wrinkles - simply “replacing” them with areas of smooth skin. To do this, press Alt and select the area from which the image will be taken, and then, simply by clicking on the desired areas of the image, we will copy it to them.
In stamp settings, it is important to pay attention to two parameters:
Mode
These are the modes in which the stamp will operate. For example, in Darken mode, the stamp will only “replace” lighter areas than the selected area. Essentially, you can darken the light areas of the image, which is why the name of the mode is Darken. And, accordingly, in the Lighten mode, the stamp will only work on the darker areas of the image, brightening them.
Clone Stamp has many modes of operation - experiment with them, I'm sure you will get interesting results.
In my opinion, it makes no sense to describe the operation of each mode - in Photoshop, for all tools, essentially the same principles of operation of the modes apply, only changing slightly to suit the specifics of a particular tool.
Opacity means opacity. Simply put, the lower the percentage you set in this setting, the more transparent the “work” of the stamp will be. For example, at 100% the stamp will completely replace the selected area, and at 50% it will be translucent. For face retouching, as a rule, 10-30% is used, otherwise the stamp mark will be too clearly visible.
Using Clone Stamp
- Retouch
Retouching in all its manifestations is the main purpose of the stamp. First of all, the stamp is used for skin retouching - removing wrinkles, dark circles under the eyes, swelling and other beautiful creations of Mother Nature.

You can also retouch, for example, an unwanted object in the frame. Unless, of course, it takes up half of the photo.
It is very convenient to use a stamp to eliminate small overexposures. For example, your model has a small spot of overexposure on the tip of her nose. We take the stamp, set the Darken mode and in a couple of clicks we darken this spot.
3. History Brush

History Brush is a time machine for photo processing. You can take any stage of processing and use a brush to paint from it according to your image.
History Brush is fraught with enormous possibilities. I have already written in detail about the operation of this tool in a separate article. In it you will find a detailed lesson on using history brush and learn how to sharpen only the areas of the image you need.
Of course, increasing sharpness is not the only area of its application. In future articles, I will tell you how to work with color in a photograph using the History Brush.
4.Black&White
The Black&White tool is located in the Image—>Adjustments tab. Or you can simply create an Adjustment layer on the photo.

The main function of the Black&White tool is the “correct” conversion of a color image into black and white. Correct because you can change the black and white display of each of the colors. This way you can get a beautiful and “tasty” b/w picture.
But the functionality of B&W is not limited to this.
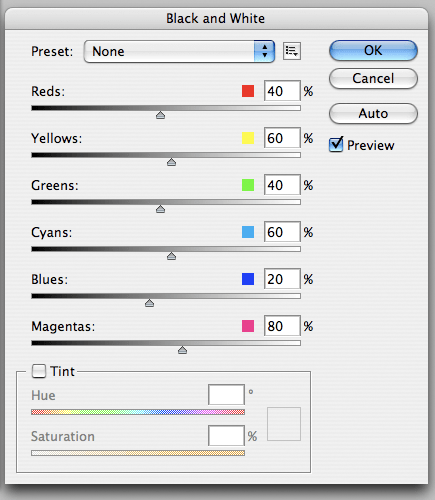
Using this tool you can get a very interesting and colorful picture. Let's apply B&W to our image, and then turn on the layer mode Overlay.
Now, by manipulating the B&W controls and layer transparency, we can get a very interesting picture. For greater clarity, I set the Opacity of the layer with B&W to quite high - 62% and turned the Greens, Cyans, Blues and Magentas levers to maximum.
As we can see, the picture immediately became richer and more contrasting (click on the picture to enlarge).

Now let's pay attention to the tick Tint. By turning it on, we can tint the image in the color we need.

Usage
There are a lot of options for using B&W both when working with color and when processing B&W.
In one of the following articles, using the example of processing several photographs, I will talk about all the main nuances of working with Black&White.
5.Shadow/Highlights

Shadow/Highlights is also located in the Image—>Adjustments tab (by the way, there are a lot of interesting tools there, I advise you to experiment with them all)
This tool is designed to darken highlights and pull highlights out of shadows. In addition to the most obvious use - eliminating overexposure and underexposure, S/H also works great for creating a feeling of greater depth in the picture. We can add dark undertones to light areas, and light tones to dark areas. Thus, the picture will become more voluminous and deep.
For example, in this photo using S/H I added volume to the puppy’s fur and the picture immediately became more interesting.

In fact, Shadow/Highlights is an absolutely indispensable tool for any serious editing. Almost any photo can be made better if you use S/H wisely.
I would like to talk about all the S/H settings and its functionality, but this is really a topic for a separate article. In the future, I will definitely return to the Shadow/Highlights topic, but for now just try to experiment - try different settings and see the result. In my experience, this method is the most effective for learning new things.
As we can see, all these tools are very easy to use, but at the same time incredibly effective. Try experimenting with them and you will feel how many possibilities they provide when processing.
I think it’s worth making a series of articles about simple but very effective tools in Photoshop. And in the next article I will talk about tools for serious work with color in photography.
1. Press Tab to hide the toolbar and palettes, Shift+Tab will hide only the palettes.
2. Double click on the gray background will open a dialog box to open the file.
3. To select all layers press Alt+Ctrl+A.
4. Caps Lock will change your cursor to a clearer cross.
5. Press the F key and you can choose from three different screen modes, which will allow you to make the work area larger.
6. To draw a straight line using a brush or pencil, single-click at the start point, then hold Shift+click at the end point.
7. Pressing Ctrl will turn any tool into a Move Tool as long as you hold it.
8. Pressing Space will turn any tool into a Hand Tool as long as you hold it.
9. Pressing Ctrl and “+” or “-” zooms in and out of the image.
10. If you use the Eyedropper Tool (Eyedropper) with Alt pressed, this will allow you to take a color sample for the background color.
11. Use Ctrl+Alt+Z and Ctrl+Shift+Z to undo and redo a series of actions.
12. You can easily increase the size of the canvas using the Crop Tool, stretch it beyond the canvas and click OK.
13. Ctrl+J will create a copy of the current layer.
14. Ctrl+Shift+E will merge all visible layers into one, Ctrl+Shift+Alt+E will merge a copy of the visible layers into one new layer.
15. Ctrl+D to remove selection, Ctrl+Shift+D to return selection.
16. Shift and “+” or Shift and “-” will change the layer’s blending mode to: Normal, Dissolve, Multiply, Screen, Overlay, etc.
17. If the Brush tool is selected, the transparency of the tool can be changed by pressing the corresponding number on the keyboard.
18. Hold Alt and click on the eye icon next to the layer icon in the layers palette to hide all other layers except the current one.
19. Select the layer, hold Alt and click on the border between the top and current layer to create a Cliping Mask
20. While holding Alt, click on the “Create a new layer” button in the Layers panel to display a dialog box with settings for the new layer.
21. While holding Alt, click on the “Create a new channel” button on the channels panel to create an alpha channel.
22. The Move Tool has an “Auto Select Layer” option in its settings, depending on where you click.
23. When working with the Grid, drag the upper left corner where the Grid scales are located, and the starting point for them will be in the place where you release the mouse button. Double clicking in the upper corner will reset the reference point to its original position.
24. Having created a path using the Pen Tool, you can hide/show it again using the combination Ctrl+Shift+H.
25. Ctrl+Tab will switch you between different image windows.
26. While holding Shift+Alt, the object will be transformed proportionally, from the center.
27. If you have the Move Tool selected and you want to copy something, just hold down Alt and drag the image. By holding Shift+Alt you can easily move the object along the Grid guides.
28. If you want to straighten the horizon or uneven edges after scanning, then take the Ruler Tool (Ruler), draw a line along your curve, then go to Image > Image Rotation > Arbitrary, Photoshop will set the rotation angle values itself, just click OK and image rotated
29. To display the Rules panel, press Ctrl+R.
30. Ctr+E will merge the current layer with the underlying one.
31. If the Brush Tool is selected, you can control the diameter of the brush using the “[” and “]” buttons.
32. Double clicking on the Zoom Tool will return the image scale to 100%, and on the Hand Tool will stretch the image to fit the screen area.
33. Change the active layer using Alt+[ or ].
34. Move the active layer up or down using Ctrl+[ or ].
35. To hide the Grid guides, press Ctrl+H.
36. Press X to switch the foreground and background colors.
37. Press D to reset the foreground and background colors to the default colors: black and white.
38. To display the Brushes settings palette, press F5.
39. Ctrl+click on the layer icon in the layers panel will create a selection of the layer’s contents.
40. If you want to see the contents of the layer mask, then hold down Alt and click on the layer mask.
41. Alt+click on the layer mask icon to create a black mask.
42. For better organization of layers, group the selected ones by pressing Ctrl+G.
43. Ctrl+Shift+N will create a new file, displaying a dialog box; Ctrl+Shift+Alt+N will create a new layer in the working file.
44. When the Brush Tool is active, the [ and ] keys will decrease and increase the diameter of the brush, and Shift + [ or ] will change the hardness of the brush.
45. Press Alt to make the Burning Tool act as the Dodge Tool, and vice versa.
46. When creating text, pressing Enter creates a new line; to finish writing, press Ctrl+Enter or Enter on the numeric keypad.
47. You can move the layer to any other open image in Photoshop, i.e. a copy of the layer will be created. Hold Shift while dragging and the contents of the layer will be inserted clearly in the center.
48. After applying the filter, its effect can be softened using the Fade function by pressing Shift+Ctrl+F.
49. You can copy a layer mask by dragging it with Alt pressed onto another layer.
50. You can easily get a horizontal one from the vertical Grid guide by selecting the Move Tool, holding Alt and clicking on the guide itself. And vice versa.
Any photo processing can be compared to developing film - without this, you won’t be able to get an impressive result. In the simplest case, the frame is edited by the camera. We don't even notice it. But in-camera algorithms do not always work perfectly. Firstly, the camera's capabilities are limited (the processor is not as powerful as in a computer). Secondly, automation cannot accurately predict your creative ideas, so it will produce an average result.
By the way, the author’s ideas are not always realized even in ideal shooting conditions. For example, when photographing in low light, we often get “noisy” shots. What to do if the camera can’t cope with noise on its own? In this situation, you should resort to post-processing in a photo editor.
In this article we will look at how to remove noise from an image. This is one of the first operations with which photo retouching begins. We will be working in Photoshop CC. All screenshots were taken in operating system MacOS, but in Windows windows and the settings dialogs look similar.
There are several ways to remove noise in Adobe Photoshop; we will look at the two simplest ones.
We recommend duplicating the original layer and performing all operations with noise on a copy of the layer. If the correction turns out to be very strong, you can always reduce the transparency of the layer or add a mask to it to remove the effect from certain areas of the image.
To duplicate a layer, use the keyboard shortcut Command+J or select menu item Layer → Duplicate Layer.
Removing noise in a RAW converter
You should start working with noise at the RAW conversion stage. This is what will allow you to get an image of maximum quality without loss of detail. By the way, sometimes it is better to leave a little noise, but preserve details in the image, than to get a “clean”, but blurred and undetailed picture.
But even if you are processing an image that has already been converted or taken in JPEG format, you can use the Adobe module Camera Raw for conversion, it works great on any images.
To launch Camera Raw, you must either open the RAW file in Photoshop or use the menu item Filter → Camera Raw Filter/"Camera Raw Filter".
In Adobe Camera Raw, noise reduction controls are located on the Detail/"Detailing".

Noise is usually divided into two components: color (Color) and brightness (Luminance). The color component is visually expressed in the form of multi-colored grains and can be removed quite well. The brightness component is grain. And here, when making adjustments, the main thing is to find a balance between the moment when noise interferes with the perception of the image, and the moment when the photo becomes “plastic” due to excessive blurring of details in the process of dealing with noise.
Often it is enough to remove only the color noise. The brightness is left because it is more similar to film grain and does not interfere with the perception of the image. Work with noise removal should be carried out at 100% magnification of the image and select the values of all parameters based on the structure and size of the photo.
Let's now look at the parameters that you can influence when removing noise in Adobe Camera Raw.
Color noise:
Color- the impact force of the tool. The higher the value, the greater the effect on the color component. 0 - the impact level is 0, the parameter is not applied.
Color Detail saves color details on border areas. High values protect fine, detailed color boundaries, but may cause color spots. Low values provide better noise control, but may cause color loss. Anything outside this radius will be perceived as noise and choked.
Smoothness/“Smoothness of color” helps combat remaining color artifacts. Raise the values if the color spots do not go away.
Luminance Noise (default off):
Luminance- force of influence.
Luminance Detail- everything outside this radius will be perceived as noise and choke. The lower this value, the greater the loss of detail and the softer the image becomes, but more noise is removed. Increasing the value of this parameter preserves more detail, but also leaves more noise.
Contrast/“Brightness contrast”- adding local contrast in border areas while preserving details. If you increase the values, the noise will return, but the image will become more contrasty.
All these and many other photo retouching techniques are discussed and described in detail in the course at Fotoshkola.net.
Here are 100% frame fragments at different stages of noise removal:


Removing noise using the Reduce Noise filter
The second way to remove noise is to use a filter Reduce Noise: Filter → Noise/"Noise" → Reduce Noise.
Let's take a photo taken at ISO 12800 with pronounced noise.

This filter has two operating modes: Basic/"Basic" and Advanced/"Advanced". And any set of parameters can be saved as a preset by clicking on the icon in the header of the parameter block. Then the selected settings can be used for all photographs in a series or for all photographs taken at the same ISO value.

The following parameters are available for adjustment here.
Settings

