MHDD – diagnostic utility hard drive, which allows you to check for various damages and then eliminate them. The utility will become an effective tool if you suspect problems with work hard disk.
Often, using MHDD and other similar programs, you can return your hard drive to normal operation. The first sign of problems with hard drive– emergence blue screen upon attempt Windows startup. In advanced cases, you may not be able to access reinstalling Windows, because The BIOS may simply stop seeing the hard drive.
It is worth noting that MHDD works exclusively from a boot disk, so after you download the program from the link at the end of the article, it must be burned to disk.
1. Create boot disk or a flash drive with the program, and then boot from it.
2. As soon as the program is launched, you will need to select the drive with which further work will be carried out. The selection is made by pressing the key with the number corresponding to the hard drive number.

3. In the next window you will need to enter the command "scan" (without quotes) or press the key F4 . To start scanning, you will need to press the F4 key again.
4. The scanning process itself will begin, during which you need to observe the right area of the program, in which the delay in milliseconds will be displayed. You should be wary if the numbers around the last two values are too high.

5. Scanning can take quite a long time - from several hours to several days. Once the scanning is completed, on the right side of the program you will be able to evaluate the statistics, where bad blocks will be indicated in the “UMC” column.
6. To proceed directly to the hard drive recovery procedure itself, enter the command at the bottom of the window "erase" and press Enter.
Next you will need to enter a number that will indicate the first sector that will be restored, for example, 0 , and then press Enter. In the same way, you will need to specify the last sector (type the number indicated in brackets and press Enter).
To start the procedure you will need to enter an English letter Y and press the Enter key.

Please note that as a result of this operation, all information contained on the hard drive will be permanently deleted. Therefore, we recommend that you first copy important files from your hard drive to another location.
As a rule, the cleaning and recovery procedure takes even longer than scanning, so you will have to be patient.
When the hard drive recovery procedure is completed, perform the scanning procedure again to ensure the success of the steps performed.
Please note that in this moment The MHDD developer website is not working, so below is a link to download the utility from a third-party resource.
Use this software"as it is". MHDD is a very powerful and, at the same time, very dangerous program. No one can be held responsible for any harm caused by the MHDD program.
About the MHDD project
MHDD is a small but powerful free program that is designed to work with drives at the lowest level (as possible).
The first version was released in 2000 by me, Dmitry Postrigan. It was capable of scanning the surface of the drive with IDE interface in CHS mode. My main goal is to develop diagnostic software for drives that people would trust.
Now MHDD is much more than a diagnosis. You can do anything you want with MHDD: diagnose drives, read/write random sectors, manage the SMART system, password system, noise management system, and also change the drive size. And that's not all, since MHDD has a so-called ATA/SCSI terminal, which allows you to send any command to a drive with a SCSI, IDE or Serial ATA interface. Moreover, you can write scripts, thus creating your own procedures.
What's inside the MHDD
mhdd.exe Executable program mhdd.hlp This file is used by the SMART command help system cfg/mhdd.cfg MHDD stores configuration in this fileDuring the first launch, the program will create a file log/mhdd.log. This is the main log file. All your actions and test results will be recorded in this file.
How it works
Let's imagine how it works operating system MSDOS when it needs to read a sector from the drive. MSDOS will simply "ask" the BIOS to do this. Then, the BIOS looks in its tables for the port addresses of the desired drive, performs the necessary checks, and then begins communicating with the drive. After everything is finished, the BIOS returns the result to the operating system.
Let's look at the diagram. Here's how a regular DOS program works with a drive:
MSDOS BIOS program IDE/SATA controller Drive
Now let's take a look at how MHDD works:
MHDD IDE/SATA Controller Drive
Main difference: MHDD does not use BIOS functions or interrupts. Thus, you don't even need to define the drive in BIOS Setup. You can even turn on the drive after MSDOS and MHDD have loaded, since MHDD works directly with the drive registers and does not pay attention to such “little things” as, for example, partitions, file systems and BIOS restrictions.
Attention:
Never run MHDD from a drive that is located on the same physical IDE channel (cable) to which the drive under test is connected (cable, channel). You will have significant data corruption on both drives! In this regard, by default, MHDD does not work with the PRIMARY channel, since most users have MHDD there. To unblock the Primary channel, run MHDD, then exit, then edit the MHDD.CFG file. Or use the key command line /ENABLEPRIMARY.
MHDD uses a DOS ASPI driver to access SCSI devices. If you do not plan to work with SCSI drives, then you do not need any drivers.
Hardware requirements and supported hardware
Platform:
- Intel Pentium processor or better
- 4 megabytes of RAM
- DR-DOS, MSDOS version 6.22 and higher
- Any boot device(USB, CDROM, FDD, HDD)
- Keyboard
IDE/SATA controllers:
- Any integrated into north bridge(port addresses: 0x1Fx for the primary channel,
0x17x for secondary channel) - PCI UDMA controllers (automatically detected): HPT, Silicon Image, Promise (not all), ITE,
ATI may be different. Even some RAID controllers are supported (in this case
MHDD works with each physical drive separately) - UDMA/RAID controllers integrated into motherboard in the form of a separate microcircuit Drives:
- Any IDE or Serial ATA with a capacity of at least 600 megabytes. LBA mode
is fully supported, however, I removed the CHS code from MHDD in versions 3.x - Any IDE or Serial-ATA with a capacity of no more than 8388607 terabytes. LBA48 mode
fully supported - Any SCSI drive with a sector size from 512 to 528 bytes
Diagnosable IDE drive must be switched to MASTER mode. All SLAVE devices must be disabled.
Other devices
- Any SCSI removable media device, for example, CDROM, tape. Maximum supported sector size is 4096 bytes
Downloading the MHDD installation package
You need to decide which package you need: a CD image, a floppy image, or just an archive. You can burn a CD image using any software that supports burning ISO images. Your CD will be bootable.
First start. Important information
Some people think that MHDD is a very difficult program. They assumed that MHDD should be very simple, but when they ran it for the first time without reading the documentation, they were disappointed. MHDD is very difficult and dangerous program. It is much easier for those who are familiar with the internal structure of drives to master MHDD.
It is very important to understand that you will have to spend several hours, and possibly days, before you get meaningful results from MHDD. I highly recommend trying to test several drives without defects before you start working with faulty ones.
When you launch the program for the first time, it will create a new file./cfg/mhdd.cfg. The IDE Primary channel is disabled by default.
You will see a drive selection menu. Choose any device you want. You can call up this menu at any time by pressing SHIFT+F3.
Now you can click F1 and use any MHDD commands. Please, be extremely attentive when working with MHDD the first few times.
I would recommend starting with the EID, SCAN, STOP, CX and TOF commands. Some of them have keyboard shortcuts assigned to them, e.g. F4 for the SCAN command.
Take a look at registers. Any IDE or Serial ATA device must report DRIVE READY and DRIVE SEEK COMPLETE, so you should see the DRDY and DRSC flags. The BUSY flag signals that the drive is performing some operation (for example, reading or writing). Some flags such as WRITE FAULT and TRACK 0 NOT FOUND are deprecated and you should never see them. The INDEX flag is also obsolete, however, it may occasionally blink. The DATA REQUEST (DREQ) flag indicates that the drive is requesting data transfer.
If you notice the ERROR flag, look at the error register. You will be able to determine the type of error that occurred. Look ATA/ATAPI standard for further information about instructions and registers.
Using MHDD Commands
Surface scanning
Scanning any device is only possible if it can be identified using the ID or EID commands (or by pressing F2). To scan, type SCAN and press ENTER, or use F4. You will see a menu where you can change some settings. By default, the starting sector is zero (start sector). The final sector is equal to the maximum possible (end of the disk). All functions destructive to user data (Remap, Erase Delays) are disabled by default.
Press F4 again to start scanning. MHDD scans drives in blocks. For IDE/SATA drives, one block is equal to 255 sectors (130560 bytes).
How scanning works
1. MHDD sends the VERIFY SECTORS command with the LBA number (sector number) and sector number as parameters 2. The drive raises the BUSY flag 3. MHDD starts the timer 4. After the drive has executed the command, it lowers the BUSY flag 5. MHDD calculates the elapsed time time drive and displays the corresponding block on the screen. If an error (bad block) is encountered, the program displays the corresponding letter that describes the error.
MHDD repeats steps 1-5 until the final sector. If you need a scanning protocol, you can find it in the log/mhdd.log file.
If the scan reveals errors, the first thing to do is copy all the data from the drive. You then need to perform a full surface erase using the ERASE command, which erases every sector on your drive. The drive will recalculate the ECC fields for each sector. This helps get rid of the so-called “soft-bad” blocks. If erasing does not help, run the scan with the REMAP option enabled.
If you see that every block contains an error, do not attempt to erase the drive or scan with the REMAP option enabled. Most likely, the drive's service area is damaged, and this cannot be fixed with standard MHDD commands.
Viewing SMART Attributes
You can dial SMART ATT or click F8 to view attributes. What do they mean?
Perhaps the most important attribute for a modern drive is the “Reallocated Sectors Count” (Raw value). This value tells you how many remapped sectors there are on the disk. A normal drive has a raw value of zero. If you see a value of more than 50, the drive has problems. This could mean a defective power supply, vibration, overheating, or simply a defective drive.
Take a look at attribute 194 - temperature. Good values lie between 20 and 40 degrees. Some drives do not report temperature.
The UDMA CRC error rate attribute means the number of errors that occur when transmitting data over an IDE/SATA cable. The normal raw value of this attribute is zero. If you see a different value, you need to replace the cable immediately. Also, overclocking greatly affects the number of errors of this type.
Other attributes are usually not so important. Look ATA/ATAPI standard for getting additional information about SMART attributes and tests.
Drive identification commands
Try the commands ID And EID to view information about your drive. Look ATA/ATAPI standard for more information.
Erase groups of sectors or an entire disk
You can use the ERASE command. If your drive was recognized in BIOS Setup (or POST), MHDD will attempt to use BIOS features to erase the drive in UDMA mode. If you do not want MHDD to try to use the BIOS, use the /DISABLEBIOS option.
Reducing storage capacity
Use the HPA command to limit the storage capacity. The program will ask for the new number of available sectors. In order to remove established restrictions, use the NHPA command. Perform a power cycle on the drive before using the NHPA command. In accordance with ATA/ATAPI standard, you can change the storage capacity only once per drive cycle.
Password protection management
Use the PWD command to lock the drive using the USER password. In accordance with ATA/ATAPI standard, you need to turn off and on the drive for the changes to take effect.
MHDD has two commands to unlock drives: UNLOCK and DISPWD. UNLOCK unlocks the drive before the first shutdown. In order to disable the password system, you must first use the UNLOCK command, and then the DISPWD command (the password must be known).
The master password is set by the manufacturer and can be used for unlocking.
Reading sectors into a file
You can read just a few sectors or an entire disk into a file or set of files. Try the TOF command. The program skips bad sectors. If you plan to create an image larger than 1 gigabyte, it is better to use the ATOF command, as it can automatically “slice” the images.
Writing sectors from a file to disk
Use the FF command to write sectors to disk. You will be asked to enter the number of the first sector to record and the number of sectors to be recorded in a row.
Managing the noise characteristics of the drive
Almost all modern drives support Acoustic Management.
You can reduce the noise level made when the heads move by reducing the speed at which they move. Use the AAM command to configure.Drive configuration
Using the CONFIG command, you can view and change the drive configuration, for example, maximum UDMA mode, support for Security, SMART, AAM, HPA systems, support for LBA48 mode. It is also possible to change the disk size. Some manufacturers reduce the disk size by changing the configuration; you have the opportunity to restore the original capacity.
Batch running commands
You can write a very simple batch file (see the BATCH directory for an example) where you describe everything you want to do. Press F5 when you want to run such a file for execution.
ATA/SCSI terminal, scripts
Please take a look at the SCRIPTS directory. There you will find several examples with detailed description how it works. To run the script, use a dot followed by the file name. For example, to run the test script that comes with MHDD, enter:
MHDD>.test
Other commands
Click F1. You will see quick help for all MHDD commands. For more detailed information, please use the MAN command.
Command Line Options
/NOPINGPONG Mute some sounds /DISABLEBIOS Disable erasure (ERASE) through BIOS /DISABLESCSI Disable SCSI module /ENABLEPRIMARY Connect the Primary IDE/SATA channel /RO This key is used to run MHDD on write-protected media. It disables attempts to create temporary files, and also disables logging.© 2005 Dmitry Postrigan
- Any IDE or Serial ATA with a capacity of at least 600 megabytes. LBA mode
 The most accurate way is to check them through DOS using the MHDD program. In this case, the HDD will not be loaded third party programs and processes, only one program will access it, this will reduce response time and provide reliable results.
What cannot be said about, which, working under Windows, may produce not entirely correct results. This is due to the fact that while the utility is running, third-party services and processes are running that access the hard drive, increasing response time.
This means that if you run the test and continue to use your computer at this moment, you will see a large number of slow or inaccessible sectors in the test results. And we don’t need this at all.
What is this program
MHDD – professional free verification solution hard drives for errors and defects. It boasts very broad functionality, allowing you to carry out not only basic and advanced scanning, but also perform HDD recovery.
Since the installation does not take place on the computer, but on USB drive, MHDD is suitable for all OS, including Windows 7 and 10 (32 and 64 bit). It is distributed absolutely free of charge, the interface is quite simple, although entirely in English.
And now, I propose to move on to detailed instructions on its use.
Where can I download
First you need to download latest version MHDD from the official website developers, always in .ISO format, saving it to your computer. By default, the “.zip” archive is downloaded, do not forget to unzip it.

ISO is a special format for recording on a flash drive or disk, intended for subsequent launch via DOS.
The utility is also included by default in popular free Live CDs: Hiren’s Boot CD, Ultimate Boot CD, 2k10 Live CD and others.
Creating a bootable USB flash drive with MHDD
To write to a flash drive we will use a special free program"UltraISO". It is free and distributed in Russian. Therefore, download and install it first.

Save the settings and restart the computer again.
Instructions for use
Now let's talk about how to use the MHDD program correctly.

Next, all hard drives connected to the computer will be displayed. Each HDD will have a serial number located to the left of its name. Enter the required number and press “Enter”. In my case, this is the number “2”. To redefine the disk with which you plan to start working, you need to press the combination “SHIFT + F3”.

Now you can start working with the hard drive. The MHDD program by default will offer to familiarize itself with all the commands that are available to us. To open a list of commands, press the "F1" key.

Let's look at the most popular of them:

As an example, I will run a regular surface scan for bad blocks. To do this, enter the command “SCAN” and press “Enter”.
In the window that opens, I leave all the values at default and press “F4” to start scanning. In this case, all information will be saved, and ultimately I will receive a report on the existing problems.

I would like to immediately draw your attention to the fact that there are other functions:
- Start LBA– the starting point from which the scanning will start.
- End LBA- final destination.
- Remap– used in cases where it is necessary to scan with automatic reassignment bad sectors(used to restore the functionality of the hard drive). Takes the value " OFF" And " ON", that is, turn on - turn off.
- Timeout– delay time for reading a sector. Upon expiration, a transition will be made to the next area.
- Spindown after scan– stops the HDD after the scanning procedure is completed.
- Loop test/repair– cyclic check.
- Erase Delays– used to completely overwrite slow or inaccessible sectors. In this case, some of the information located on the drive will be deleted. Accepts the value "OFF" and "ON".
To change settings in MHDD program The "Enter" key is used, you can use the arrow keys on your keyboard to move to another option.
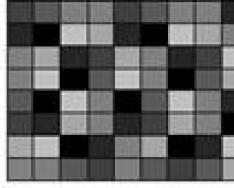
Analysis of scan results
After the verification is completed, you will see a window with detailed information in the form of multi-colored squares and letter designations.

What does each of them mean:
- Gray squares (3-50 ms) - show the total number of the fastest sectors with which no problems are observed.
- Greens (<150 ms) – they talk about the presence of slow sectors. A large number of them (above 500) can reduce the speed of the hard drive. However, the presence of green squares is inherent in each drive and is the norm (in reasonable values).
- Orange (<500 ms) – very slow sectors, significantly reducing the speed of the drive. Ideally, they should not exist at all. The presence of at least one indicates the beginning of problems in the hard drive.
- Red (>500 ms)– bad sectors (bad blocks). They significantly slow down the operation of the hard drive and cause various malfunctions in Windows and programs.
- UNC– a failed area that cannot be restored. Most likely this is a “logical bad block”. Usually eliminated by overwriting with the “ERASE” function.
- AMNF– missing address label. Most often it occurs due to a malfunction of the hard drive hardware. You can try ERASE or REMAP, but in most cases this does not work.
- ABTR– read request rejected. It may appear as a result of a hardware malfunction, or due to the incompatibility of the MHDD program with a specific hard drive.
- IDNF– identification number not found. Indicates a malfunction or an unsuccessful attempt to access the area.
- T0NF– the zero track was not found, recalibration failed. Indicates a HDD failure.
Recovery procedure
Now, judging by the received report, we can proceed further according to the instructions.

It is important to remember that the Erase Delays command will only delete some of your files, while the ERASE command will completely delete all files. Therefore, I first recommend saving all important files to another medium.
Then we re-check. If some bad blocks remain, then it is obvious that they are caused by a physical malfunction of the hard drive. In this case, only the “REMAP” option or replacing the drive will help. Otherwise, such a HDD may fail at any time.
Now about how I do it. First, I start a regular scan with the Remap function. Then I start Windows and save all the information to another medium. Then, using the MHDD utility, I overwrite the damaged areas with the “ERASE” function. This approach increases the chances of effectively restoring the HDD and saves time.
SMART Analysis
In theory, this is the topic of a separate article, but I would like to touch on some values that in one way or another affect the result of the test and generally show the current state of the hard drive.
The F8 key or the “SMART ATT” command will help you open SMART in the MHDD program. Pay attention to the “RAW” column. 
The most significant attributes:
- Reallocated sectors count– the total number of automatically reassigned sectors (bads).
- Current pending sectors– sectors that are in line for reassignment.
- Ultra ATA CRC– the number of errors that occurred when transmitting data via a SATA cable. The value should be reduced to zero. Eliminated by replacing the cable or SATA connector.
Read what actions to take in this or that case in the previous section.
Problems you may encounter
It happens that the utility MHDD, even though it is displayed in Windows. Most likely it's a physical problem. Try connecting the device to a different connector using a new SATA cable or remove oxides on the board.
If the device emits, then most likely the problem is in the internal mechanism, then only replacement will help.
A freeze at the testing stage may also indicate a faulty mechanism. Or the HDD dump in the main menu with the message “driver has been disconnected”.
Detailed video on working with MCDD
youtu.be/8gYB4u_2rzc
Updated: 2018-10-19
Professional help
If you are unable to resolve the problems yourself,
then most likely the problem lies at a more technical level.
This could be: a failure of the motherboard, power supply,
hard drive, video card, RAM, etc.
It is important to diagnose and repair the breakdown in time,
to prevent failure of other components.
Our specialist will help you with this.
Leave a request and receive
Free consultation and diagnostics from a specialist!
Before issuing this command, the UNLOCK command must be issued.
RPM Change spindle speed(this procedure is not guaranteed to work)
FF Write disk sectors. The data to be recorded is taken from the specified file
A.A.M. Configure the noise characteristics of the drive
MAKEBAD Generation of BAD blocks. Does not work on all drives
RANDOMBAD Generation of bad blocks, scattering them randomly across the surface
INIT Reset and recalibration
FDISK Make one partition for the entire disk. Only MBR changes
SMART / Control the SMART system and view attributes
STOP / Stop spindle
I/ Send ID commands, then INIT
ERASE Selectively erase sectors or completely erase a surface (low-level formatting)
To erase directly, bypassing the BIOS, you can disable the disk in the BIOS settings, or erase with the parameter /DISABLEBIOS.This parameter does not affect the erasing speed.
FASTERASE Surface erasing at maximum speed (password system is used)
TOF Reading disk sectors to a file
Recently, manufacturers have seriously taken up the problem of reducing the noise level emitted by drives.
Some have achieved amazing results - for example, Seagate managed to reduce the spindle noise of the fourth “Barracuda” so much that it was no longer perceptible to the ear.
But rotating pancakes are not the only source of noise in hard drive mechanics.
The head drive is also noisy - its sharp movements cut through the air inside the can, generating a “grunting” positioning sound.
Of course, it can be slowed down by changing the shape of the current in the coil to a smoother one, but this will inevitably cause a deterioration in such an important hard parameter as access time - it is this that determines the performance of the disk subsystem in multitasking environments and during operations with many small files.
At the same time, there are tasks in which fast positioning is not needed at all, but silence is needed - for example, when working in office applications, when playing music and movies.
How can we be here?
It is this problem that was solved by hard drive developers quite recently - the ATA specification introduced the “Automatic Acoustic Management” (AAM) function - rapid adjustment of the noise level emitted by the drive as a result of the movement of the heads by reducing the speed of their movement.
AAM can be managed by proprietary utilities of some hard drives, for example IBM and Maxtor.
But they make it extremely inconvenient - the user does not have the ability to quickly assess the current noise level.
In MHDD, all this is implemented much more conveniently: just enter “AAM” into the console, and the hard drive itself will begin to crack its heads, demonstrating its noise level.
And you can change it with the keys “M” (minimum noise level), “L” (medium) and “P” (maximum).
The “D” key turns off AAM completely, while the hard drive becomes as fast as possible, but at the same time as loud as possible.
You can switch the hard drive directly from Windows 9x at any time, unlike other “branded” utilities (Fig. 3).
Figure 3. Automatic Acoustic Management
Security Options
Have you ever wanted to protect your information from strangers?
Of course, such a desire sometimes arises, especially if several people work at the computer.
Personal correspondence, documents, or even just a well-functioning operating system - this is not a complete list of what you want to protect and protect from someone else’s intrusion.
The most common way to restrict access to confidential information is to create encrypted partitions on the hard drive, archiving with a password, password-protecting the entire file system at the logical level (with special programs in the boot sector of the HDD), and sometimes physically changing the entire hard drive (for example, using a mobile phone). rack).
But such protection has many disadvantages.
The information still remains on the media, and although it is not explicitly accessible (protection programs are often limited to encrypting only the boot record, leaving even FAT unchanged), it can be easily extracted from such a disk by setting a disk editor on it, or (which is simpler ) - one of the programs for saving information, for example the well-known “Easy Recovery”.
On-the-fly file encryption is more resistant to hacking, but its operation requires a permanent memory resident that intercepts part of the system API and creates a considerable load on the central processor.
And no one is immune from such a program glitching or freezing at the most inopportune moment.
And even if the encrypted partition is damaged (for example, by viruses), it will be extremely difficult to extract information from it.
Ideally, a security system should meet 3 basic requirements:
1. Be independent of the OS, file system, computer and their glitches.
2. Be reliable and difficult to break.
3. Do not take up system resources.
And it would have remained a dream if no one had thought to entrust this to the hard drive controller!
This was proposed by the developers of the ATA/ATAPI-3 standard back in 1996, but hard drives that actually support security functions appeared relatively recently.
This feature is called “Security Set”, and in common parlance - ATA password.
It allows you to protect the entire contents of the hard drive not only from reading, but also from writing, and even from low-level formatting!
This was achieved by integrating a protection program directly into the hard drive.
It communicates with the outside world through a regular IDE interface - you only need a utility that can do this correctly.
The BIOSes of some motherboards can set a password on modern hard drives, and on many laptops (for example, from DELL), this has long become the norm.
But now we don’t need to be the owner of a super-cool board or laptop to protect our information - this can be done on any computer using MHDD!
And not only from the BIOS, but also from DOS and Windows at any convenient time.
Let's try to figure out how it works.
We launch MHDD, and by pressing the + key combination, select the hard drive to which we want to deny access.
Click.
Pay attention to the line “Security: High, Off” - it means that the password for the hard drive is not set (Fig. 4).
AMD Radeon Software Adrenalin Edition 19.9.2 Optional Driver
The new AMD Radeon Software Adrenalin Edition 19.9.2 Optional driver improves performance in Borderlands 3 and adds support for Radeon Image Sharpening technology.
Windows 10 Cumulative Update 1903 KB4515384 (Added)
On September 10, 2019, Microsoft released a cumulative update for Windows 10 version 1903 - KB4515384 with a number of security improvements and a fix for a bug that broke Windows Search and caused high CPU usage.
Bluetooth