First a little theory. It must be remembered that in fact the layer never changes its size - it has no dimensions at all, either in width or height. When we talk about changing the size of a layer, we, first of all, talk about its contents - about the image that is located on this layer.
In this regard, in Photoshop there is not a single command like “Change layer size” or “Set width/height for layer”. It is important to understand that this is an abstract phenomenon.
Let's see what dictated the desire to change the size of a layer - you opened/placed a certain image or a separate object on a layer, and now you want to change its size (reduce or increase).
Let's say the task is to make a picture whose dimensions will be 550x350 pixels. To do this, you created such a document. Now you want it, but those times - she didn’t clean up!
In common parlance, the visible part of a document is called a layer. But actually it is not. Look, although the picture with the tiger is cropped, this does not mean that the missing parts of the image are cut off! Everything is there, they are just hidden behind the document viewing area.
The Photoshop layer is also what goes beyond this very area. Where it is hidden from view and nothing is visible, the pixels continue their life. At any moment we can move the contents of the layer, and everything secret will come true:

We come to the conclusion that we act exclusively on the contents of the layer, which means that when we say about changing the layer size, need to keep in mind resizing content layer!
How to resize a layer's contents
To perform this simplest operation, you will need the Edit command (hotkey combination Ctrl+T).
A bounding box appears around the layer's contents, with handles on the corners and sides. Changing sizes is carried out by influencing these markers.
![]()
Note that a border will appear around all of the layer's contents, including what's in the hidden part of the viewport.
It happens that you inserted an image that is significantly larger than the viewing area. Therefore, choosing the command Free transformation, you may not see this frame because it is hidden somewhere far away, even behind the Photoshop panels.
In such cases it is necessary zoom out (Ctrl + — ) of the viewing area until a frame appears.
- To decrease the size of the layer, pull the marker towards the inside of the frame; to increase the size, pull it towards the opposite part.
- If you pull the marker located on the side of the frame, the picture will stretch in the selected direction.
- If you drag the corner of the frame, the height and width will change simultaneously.
- To apply the size changes, press Enter or the checkmark button in the options bar.
- If , Photoshop will also do the same size editing.
- To change the size proportionally, you can use one of two methods:
- Hold down the Shift key and drag around a corner.
- Click on the circuit icon in the options bar Free transformation.

Once again, pay attention to the screenshot of the panel in the top screenshot.
If you need set your own specific dimensions for the layer, then enter the appropriate values in the fields W (width) And H (height). By default, the unit of measurement is percentage, but if you right-click on the window, a menu will appear to select other units of measurement, including pixels, centimeters and millimeters.
Resizing the background layer
The most common mistake made by beginners is that they open a picture in Photoshop and want to resize it, but the Ctrl+T command does not respond and the frame does not appear.
First, look at the Layers palette, is there a padlock icon on the layer? Most likely there is. This suggests that in front of you is pho new layer, which has a lot of limitations, including the inability to resize using the command Free Transformation.
In this case, the image size can be changed either through the command Image - Image Size, and then enter the required values, or you need to unlock the background (this operation is called Educate). To do this, double click on the background layer. A window will appear in which, without changing anything, click on OK. Now you can work with the layer as usual, all restrictions have been removed.
Image quality after reduction/enlargement
Reducing, and especially enlarging, an image does not go unnoticed for him. This process leaves an indelible imprint - loss of quality.
When we enlarge the picture, it increases - that is, there are more pixels forming this image. For example, the width of the picture was 100 pixels, but we enlarged it, and the width became 200 pixels, the difference is 2 times! But where will the new 100 pixels suddenly appear?
They are completed by Photoshop itself. It has an algorithm that allows you to analyze the contents of the picture and when it is enlarged, it knows which pixels should be added. But this is automation, this is a dry, lifeless algorithm of actions - it is not ideal. This means that the pixels are not drawn as desired. The effect of blur and unclear details will appear.
The process of reducing the image it goes away less painfully. Since it is placed smaller, we become less picky about details, so whether they are there or not is no longer important - and so nothing is visible.
Pixels cannot be compressed; when they are reduced, Photoshop throws out the extra ones (that’s why pictures with lower resolution weigh less). For example, an image 200 pixels wide was reduced to 50 pixels. In this case, 150 pixels down. That's it, they are no more - they are irretrievably lost. If you want to return the picture to its original size, it will be radically different from what it was. The process described above in the first case will go through. Schematically this is what it looks like:

You need to always be prepared for this and approach the process wisely:
- Take images in high resolution, where the loss of quality will be less noticeable.
- When enlarging, do not make a big difference from the original - no need to enlarge it 10 times. The higher the magnification, the more obvious the loss of quality.
But, by the way, this problem knows its solution. There is a special type of layers in Photoshop - smart objects. These are containers that store all the information about the image. Therefore, the enlargement may come with a loss, since here, whatever one may say, you need to fill in the missing pixels, but the process of first reducing the image and then enlarging it will not affect its quality at all, since Photoshop will not lose pixels , he will carefully store them in his special container, and then, if necessary, take them back and restore them as they were. There is a large detailed article on the site, I recommend you read it.
If you notice an error in the text, select it and press Ctrl + Enter. Thank you!
2 votesGood day, dear readers. Today you will find a very simple lesson, you will learn how to work with the sizes of objects. This is necessary almost every time you open Photoshop. I think that an advanced user can also learn a few things from this publication. useful tips.
So, let's get started? How to make an object smaller in Photoshop.
Working with the dimensions of a rectangular object
In some cases, you need to reduce the size of not the whole image, but only part of it. How to do it? Open the photo and select a rectangular selection.

If you click on the left mouse button and hold the button for a few seconds, an additional menu will open in front of you. There is an interesting round selection tool, you can use that too (see).

Select the desired fragment of the image.

Now simultaneously hold down the CTRL + T button.

You have now used shortcut keys. It was possible to take the long route: open in top panel"Editing" and then select "Free Transform".

Hold down the Shift button on the keyboard and drag the corner of the selected object to the side.


So, I selected this flower here.

And then pressed Ctrl + T. Remember, you can also do this through the panel at the top: Editing - Free Transform.

The size of the visible fragment of any graphic layer Photoshop document is the same as the size of the entire searched document canvas. Therefore, you can change it simply by changing the size of the source document. But Photoshop still has standard tools for editing the fragment size. In order to learn how to change the size of a fragment yourself, you will need to open a file in Photoshop that contains several fragments.
Instructions
- You can change the scale of any object in the file using the Free Transform command, it is located in the Edit menu, or you can use the Scale option, which can be found in the same menu in the Transform list. Having selected one of the above options, drag the edge of the frame in which the object to be changed is located. If you need to maintain the proportions of the object's size when changing the scale of a layer, hold down the Shift key while stretching or shrinking. To save the size, press Enter on your keyboard.
- In some cases, the size of the image on one of the layers may be larger than the size of the main background of the document. In this case, the background borders of this image will extend beyond the entire document. To see the boundaries of this background, you need to use the Navigator tool and use it to reduce the scale of the entire document to the size at which the boundaries of the larger object will be visible.
- If you need to set a specific layer size, you must manually enter the required data into the transformation value fields. To change the height and width of an object independently of each other, enter the height data in column H, and the width data in column W. Data is entered as a percentage of the original dimensions. In order for the size to change proportionally to the original one, you need to enable the Maintain aspect ratio option in the settings panel.
- If the picture you want to resize is on the main background, you should unlock the image. To do this, use the Layer from Background function. You can find it in the Layer menu, or just double-click on the layer. Next, the size changes in the same way as in the case described above.
- If you need to resize several images located on different layers while maintaining the original proportions. Then simply select the required volumes while holding the Ctrl key.
- Next, you should use the Image Size or Canvas Size function, they are located in the Image menu. When using the first option, the scale of objects on all layers will change. The second option will resize adjustment layers, as well as layers containing fill. The remaining layers will remain unchanged.
When you resize an image in Photoshop, the scale of all the layers that make up the document changes. This option can be found in the Image section. In the case when you need to change the size of not the entire document, but a specific layer, you need to use the functions of the “editing” section.
Photoshop is a very popular, widely functional and in-demand program in the field of image processing and creation. Very often, when working in it, you have to change the size of cut or added objects. You will learn how to do this quickly and easily in any version of Photoshop from this article.
Reduce the Size of an Object in Photoshop Using the Free Transform Tool
The simplest and quick way resizing an object in Photoshop is to use the " Free transformation". It is located in the second item of the main menu - “ Editing«.
In order to use it, you need to go to the layer on which the object whose dimensions you want to change is located.
Free Transformation in Photoshop
After this, your object will be wrapped in a rectangular frame with squares at the corners. Now, to reduce or increase the size of an element, you need to pull these same squares in the right directions to give the selected object the desired shape and size.

Squares that you can drag to change the size of the object
After the size is set, to apply and save it, you must click the “ Enter«.
This way you can increase or decrease the size of any elements, including cut ones, in all versions of Photoshop.
The best way thank the author of the article - repost it on your page
17.11.2014 27.01.2018
After studying this lesson you will learn in Photoshop:
- Reduce photo size
- Reduce the size of an individual object in the photo
- Transform photos and objects - twist, compress, flip and flip.
In this article I will tell you how to use Photoshop to reduce a picture, image, text, layer, individual object - everything that can be reduced in Photoshop. Photoshop program allows you to quickly and conveniently reduce objects without losing image quality.
After all, it often happens that it is necessary to reduce a photograph or picture before sending it by mail or uploading it to any website in order to show it to people. The huge original sizes of photos are not suitable and therefore Photoshop comes to the rescue to make the photo smaller.
I will be using Photoshop CS 6 to perform the reduction operations.
How to make a photo smaller
First open required photo in Photoshop. Click CTRL+O or File - Open (File - Open) and select the desired photo on the disk.
The photo was opened in Photoshop:
The photo is a huge size 1600x1200 pixels. But for example, we need 600x450 or so.
There is a way to reduce the photo proportionally, to do this, go to the menu Image - Image size (Image - Image Size). In English Photoshop this window looks like this:

We see the meanings Width And Height (Width And Height), make sure the values are shown in pixels, but if you need you can view and change in centimeters and other measurements.
Enter the width instead of 1600 to 600 and you will see how the height is automatically adjusted to 450 so that the photo resize is proportional.

Click OK and that's it! Our photo has been reduced in size:

Select the desired area and zoom out
But what if we don’t need the whole photo, but part of it? And we need to reduce this part, but not proportionally and in our own opinion. The function we used before will not work for this.
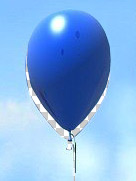
Let's say we have this picture with balloons and we opened it in Photoshop:

But we don’t need all the balls, we only need the blue one and we need to reduce it a little. To do this, select a tool Crop Tool(in the Russian version it is called Cropping) - using it we can select the area of the image we need and crop it. Namely the blue ball.
The tool itself on the panel looks like this:

Select the desired area:

Click Enter on the keyboard - we will cut out this ball and the rest of the image will be deleted.

Great. Now we need to make the ball smaller. You can use the function as in the previous step. Or you can do it differently, while maintaining the size of the image. First, let's get rid of the background and make it plain. To do this, we need to select the ball, cut it out and place it on a separate layer. And on another layer we will make the background.
Using a tool Polygonal Lasso Tool select the ball.

Click CTRL+X to cut it and copy it. After you click, it will disappear, and behind it will be transparent background. Press CTRL+V immediately to insert the ball. The ball is inserted a little to the side from the original place. And it will be immediately inserted automatically onto a new layer:

Now we'll quickly make a different background so that the ball doesn't seem cut out. But the old background is not suitable because there is a cut-out area due to the ball, and since we will make the ball even smaller, it will be even larger.
Create a new layer under the ball and fill it with any color:

Of course, the ball does not look neat, but the purpose of this article is to tell you how to reduce it in Photoshop, and not cut it out. Read about how to cut in Photoshop and in what ways in our other article.
Now let's make the ball smaller. Select the ball layer and click CTRL+T(or menu Edit - Transform - Scale(Edit - Transform - Scale)) and you will see how a frame appears around the ball to make it smaller:
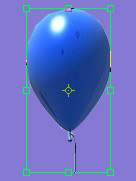
Now drag the squares to scale the ball. You can make an image smaller as needed while maintaining the overall size of the document in Photoshop. You're scaling down an individual object that's on a separate layer, not the entire image document.

You can apply all these methods as you need, in any order. Knowing these techniques, you will cope with any task in which you need to reduce something in Photoshop.
Bluetooth

